Blog
Demystifying MLOps: From Notebook to ML Application

What is this thing called MLOps? You may have heard about it by now, but never really understood what all the fuzz is about.
In this blog post, we'll try to demystify MLOps and take you through the process of going from a notebook to your very own industry-grade ML application. The first part will be about the what and why of MLOps and the second part about technical aspects of MLOps.
This post is based on a tutorial given at EuroPython 2023 in Prague: How to MLOps: Experiment tracking & deployment and a Code Breakfast given at Xebia Data together with Jeroen Overschie. Code is made available here. We recommend you to follow along with the code while going through the technical part of this post.
Machine learning operations: what and why
MLOps, what the fuzz?
There seems to be an "Ops" hype going on. DevOps may sound familiar, but nowadays there are a lot more terms: LLMOps, LegOps (no, not Lego-Ops), and of course MLOps.
Fig. 1 
But what is MLOps, and why do we need yet another "Ops" term in the picture?
MLOps stands for machine learning (ML) operations. Let's look at what that means.
Data science is generally not operationalized
Consider a data flow from a machine or process, all the way to an end-user.
Fig. 2 
In general, the flow of data from machine to the data engineer (1) is well operationalized. The process is automated and there are systems in place to ensure a reliable and constant flow of data.
You could argue the same about the data engineering step (2), although this differs per company. In this step, automated pipelines are in place to ensure reliability, quality and accessibility of the data for the organization. Therefore, let us say this step is operationalized as well.
In the last step (3), data scientists (DS) or analysts manipulate the data further to serve a specific business case or customer. The problem is... this step is often fully manual, lacking standardization and automation.
Let's look at an example:
Fig. 3 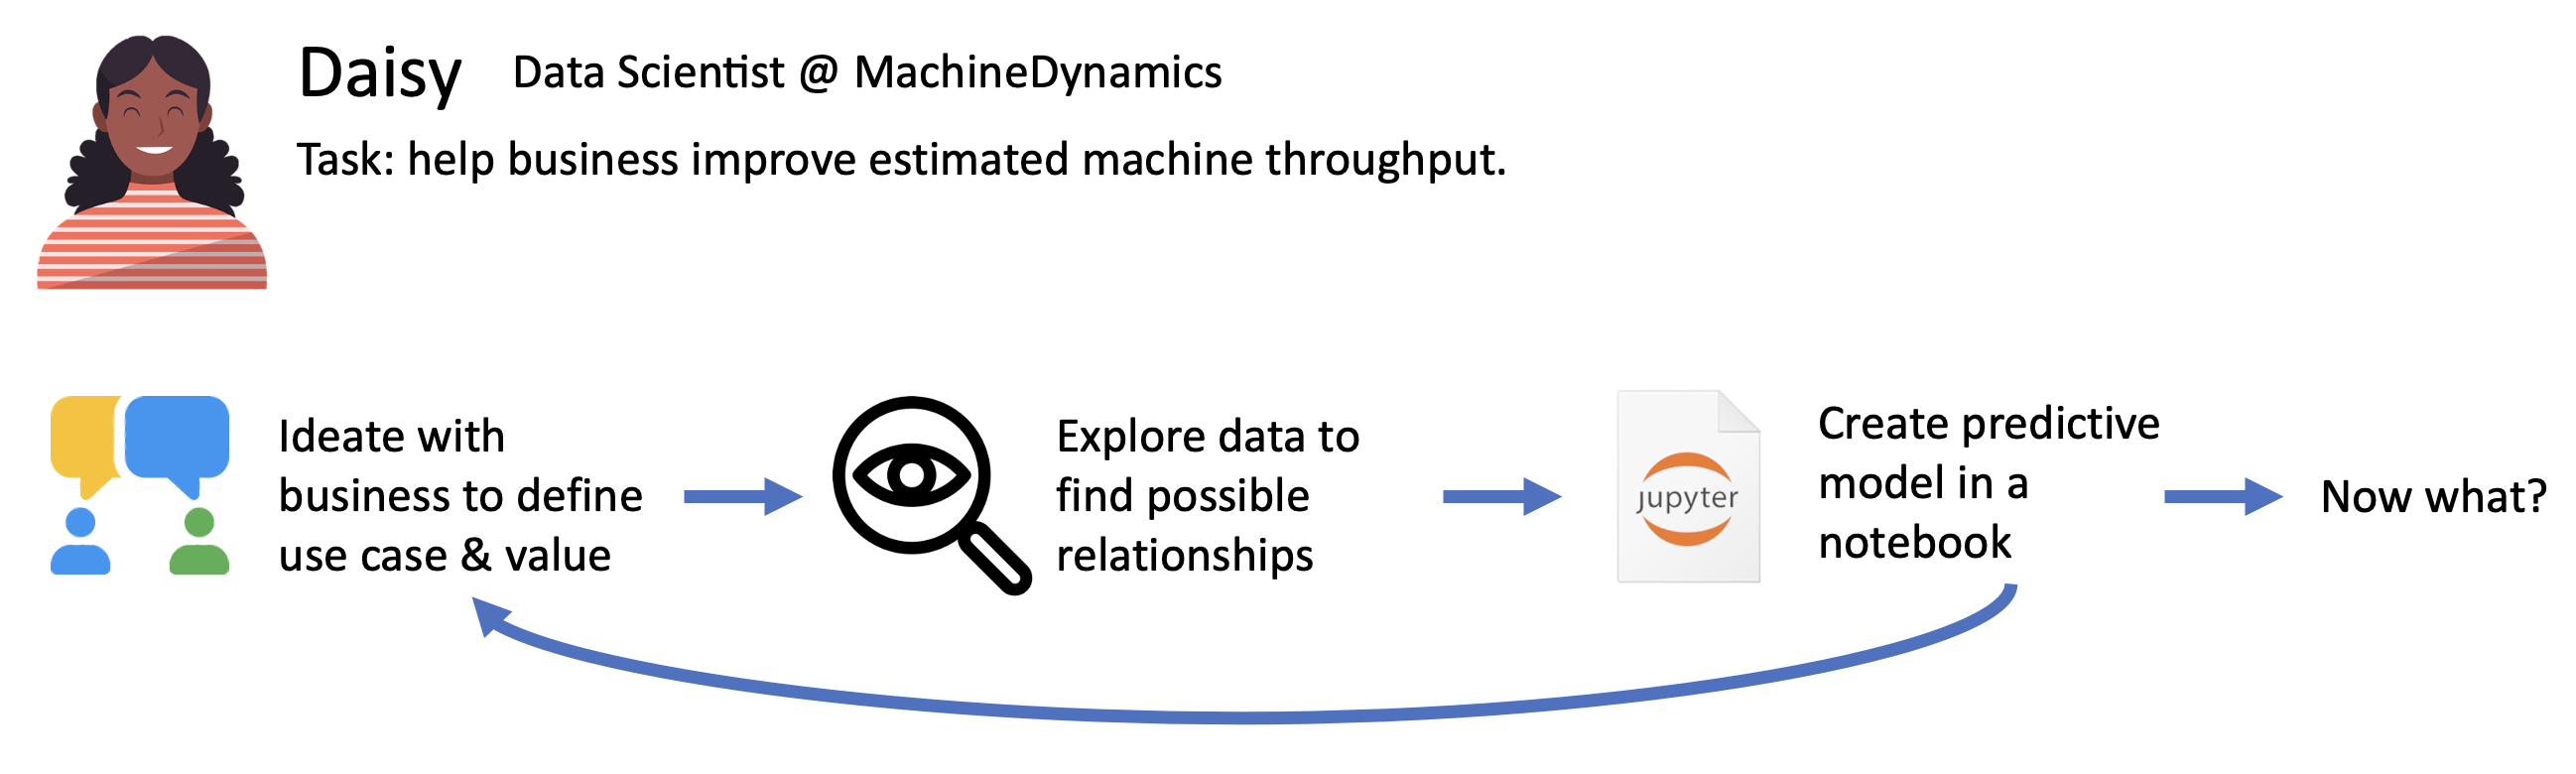
Daisy the DS generally follows the same iterative process from ideating a use case, to creating a solution in a notebook. Along the way, she may be reinventing the wheel several times. Furthermore, the big question at the end is: "now what?" How do we go from notebook to an actual sustainable ML-solution in production?
Ideal scenario: the MLOps lifecycle
Ideally, a project (or product) follows the so called "MLOps lifecycle", which can be defined in different shapes and forms. The most important aspects of this lifecycle are that it is (1) end-to-end: from design to operations, and (2) iterative: each step in the cycle can be revisited many times.
Fig. 4 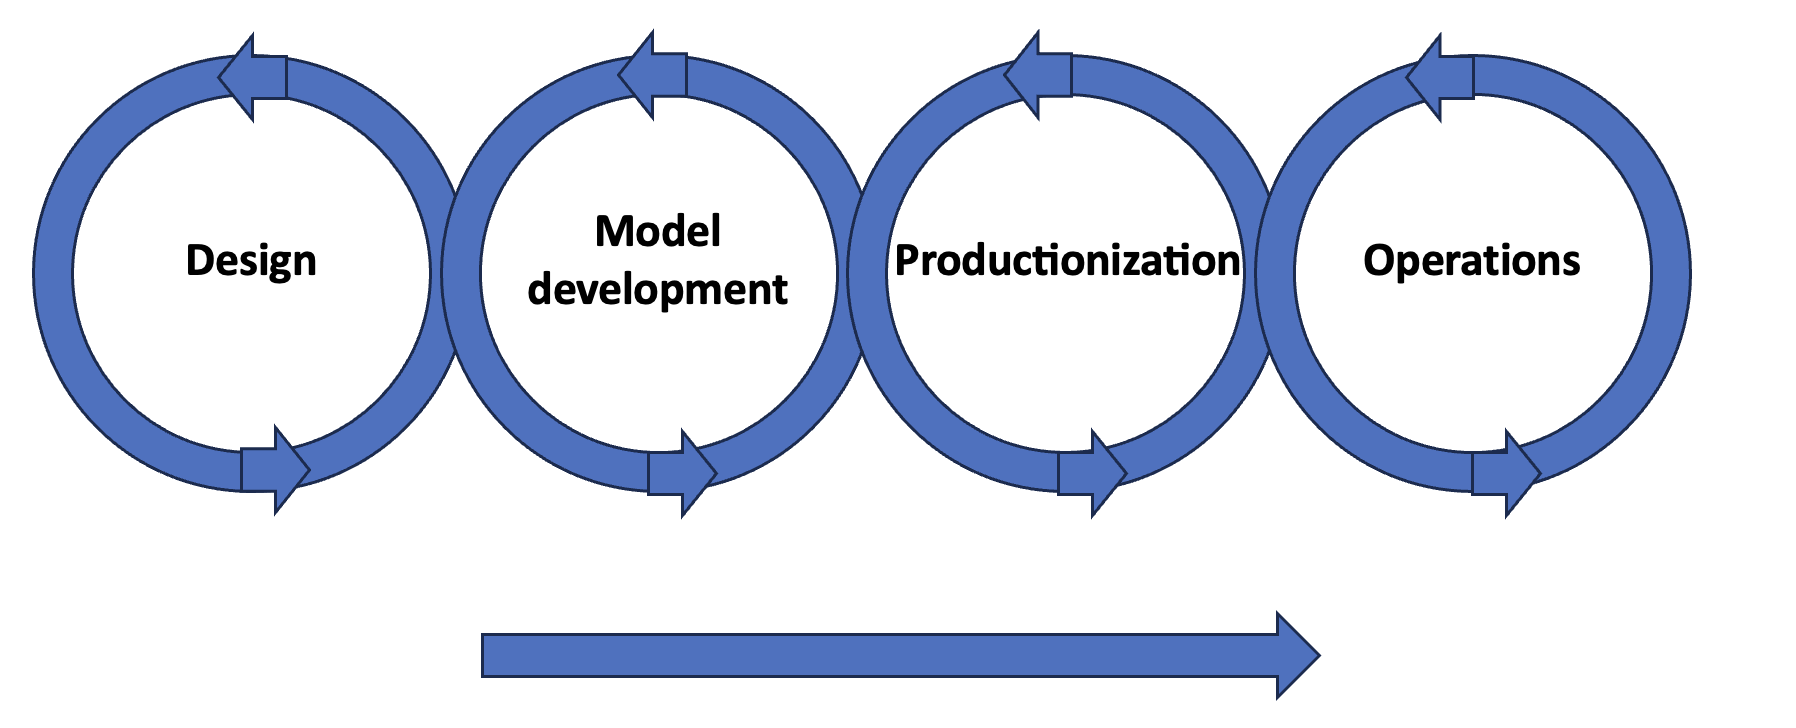
Each of the different phases serves a purpose:
- Design: define use case, scope and assess business value
- Model development: create a working solution and validate
- Productionization: package/containerize code, create pipeline for training and serving
- Operations: deploy, monitor and maintain
Common ML lifecycle
The problem with Daisy in Fig. 3 is that she is not following the MLOps lifecycle, but rather only a part of it.
Fig. 5 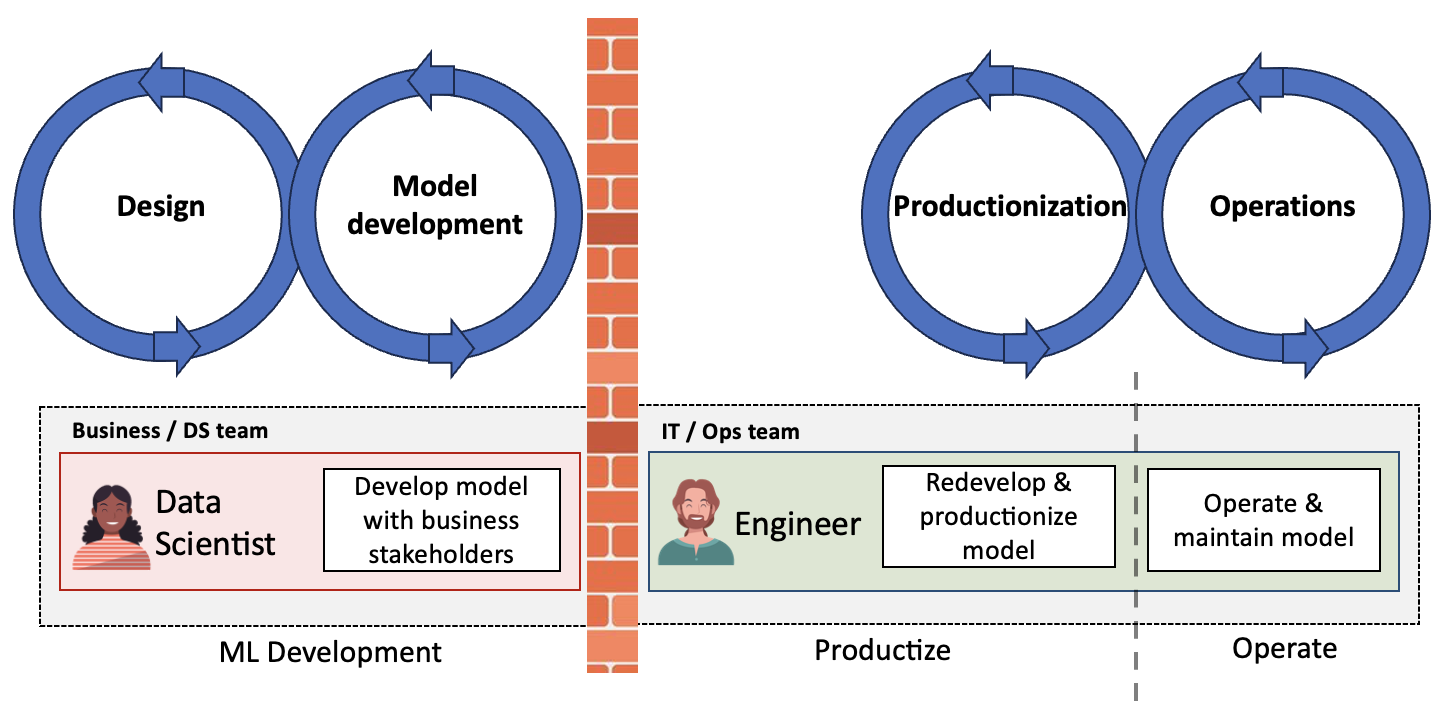
In many companies, we see different teams being responsible for separate parts of the lifecycle, as depicted in Fig 5. This is described in more detail in this blogpost: MLOps: why and how to build end-to-end product teams.
This is a problem, because there is a major handover in the process. This handover can cause:
- Loss of information, because the operating team was not involved in development
- Loss of time due to lots of going back and forth
- Failures. The Ops team may not know how to identify or fix model failures, and the DS team may not know how to identify or fix operational failures.
In other words, the gap between different teams along the MLOps life can cause many headaches.
MLOps: close the gap between DS and Ops
The goal of MLOps is to close the gap between data science (or ML) and operations, and get rid of that handover. A common misconception is that this can be achieved with technology only. However, to truly close the gap and operationalize ML, we need to focus on three axes: people, process, and technology.
Fig. 6 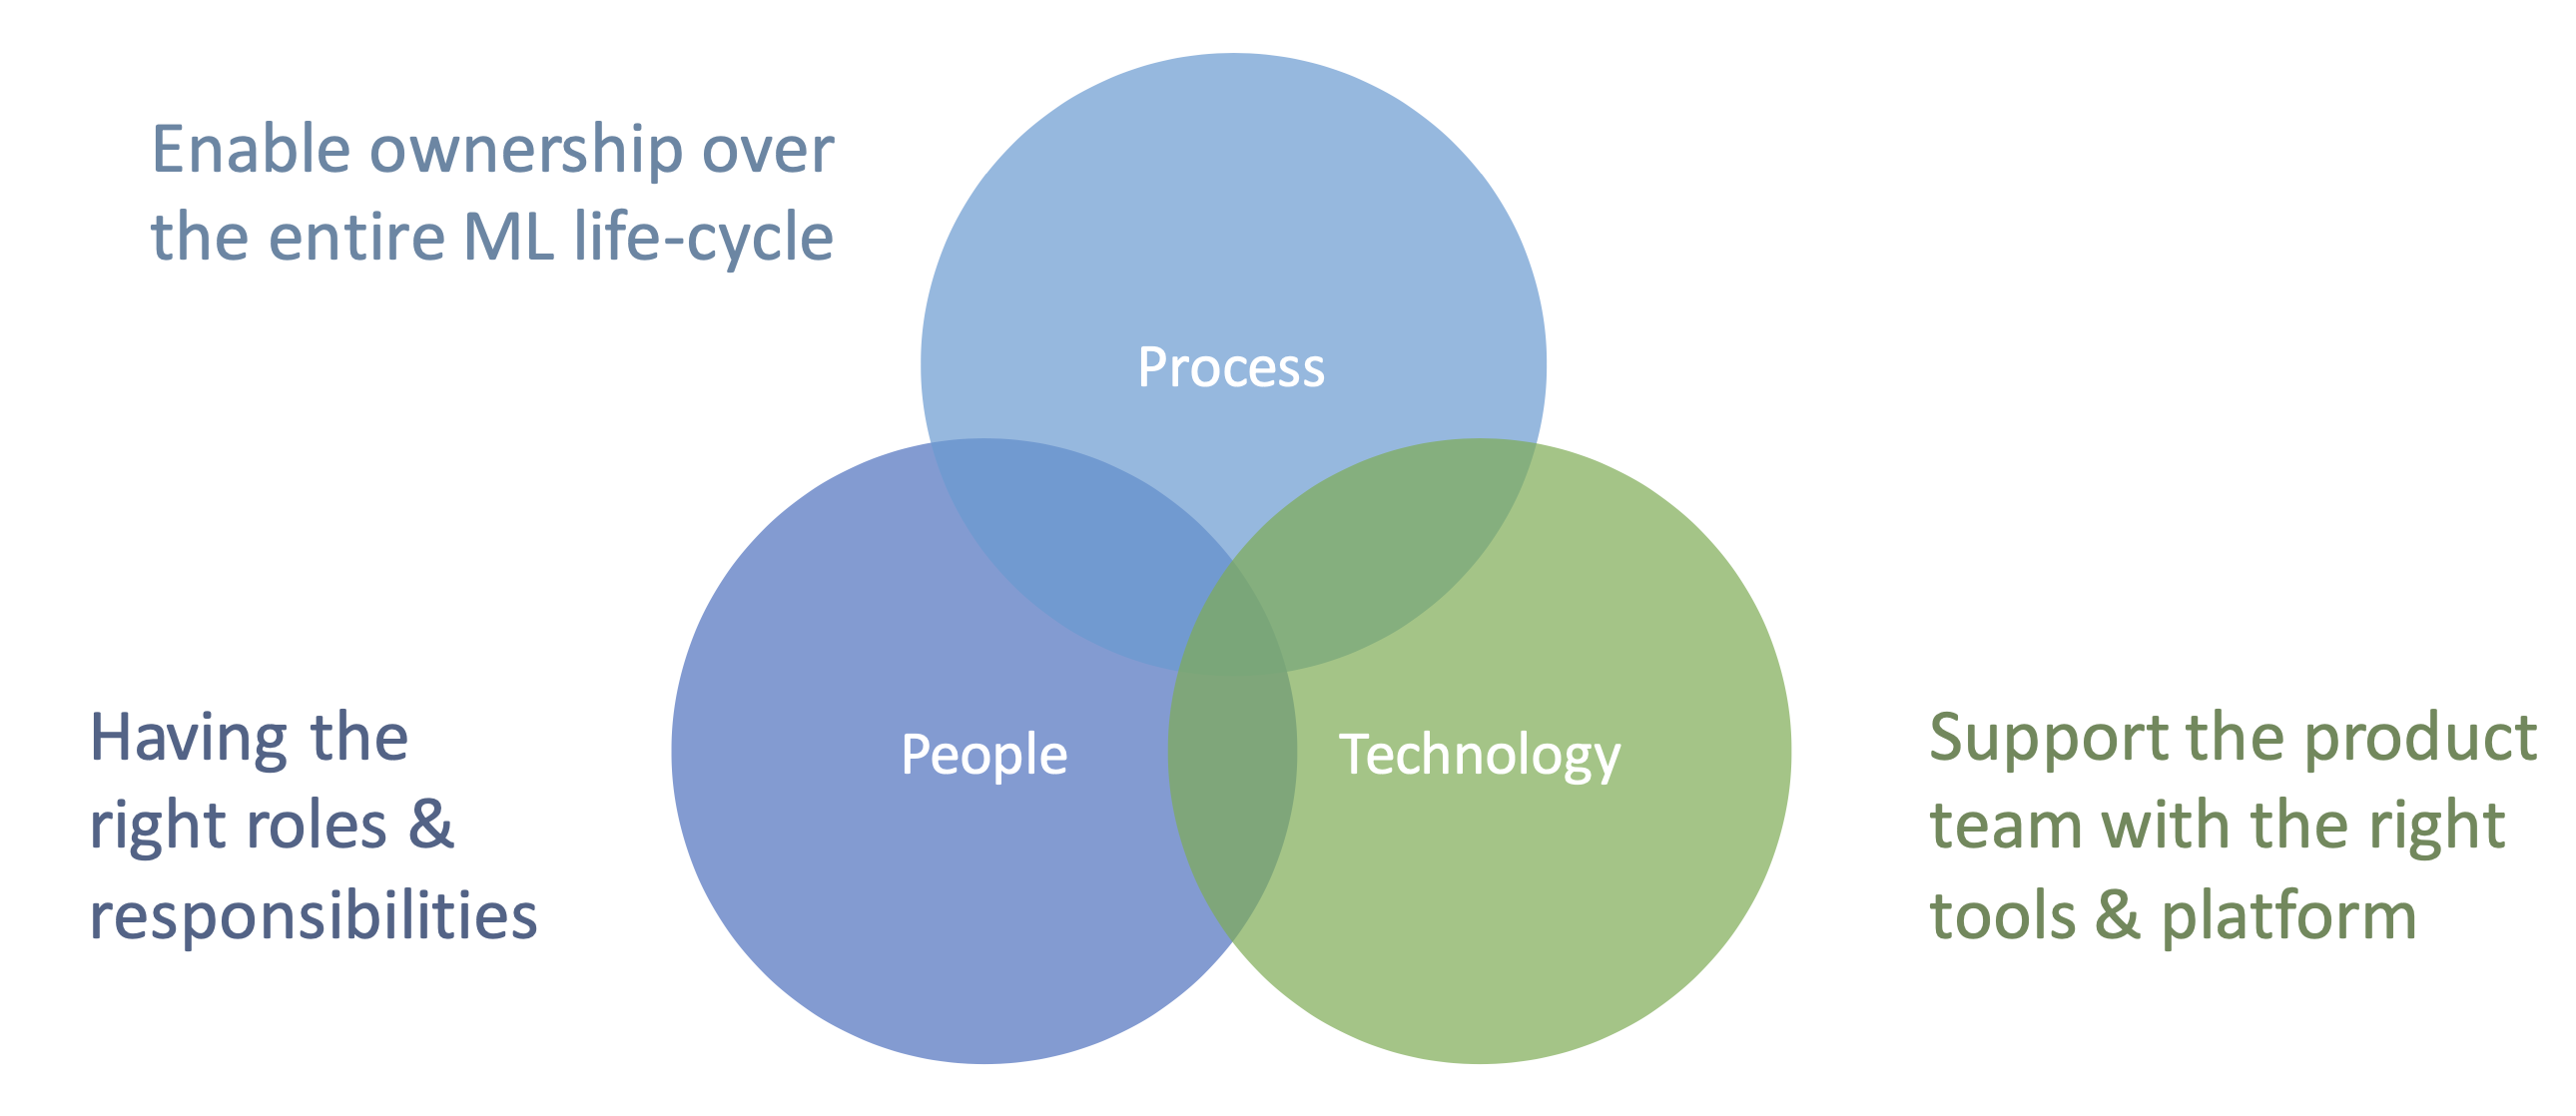
For example, in Daisy's case, we can enable end-to-end cross-functional teams with proper roles and responsibilities. Instead of having separate teams involved in a single project, we get a team with ownership over the entire ML lifecycle.
Fig. 7 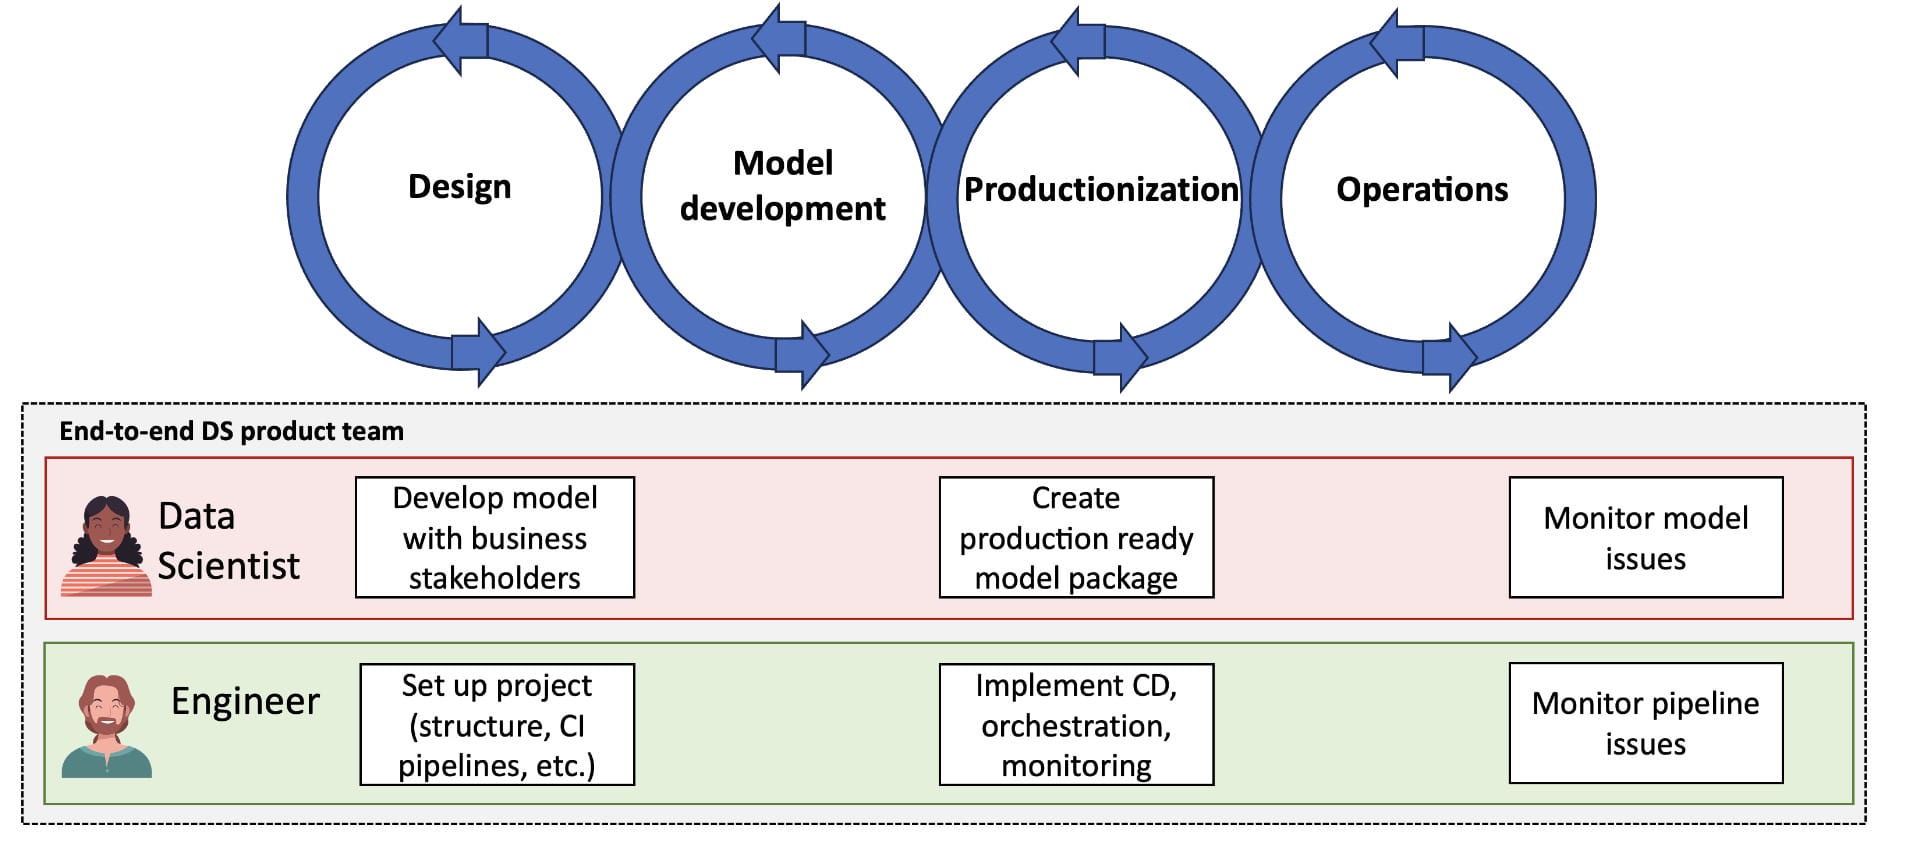
What a relief, no more headaches! At least, if we assume the right technologies and processes are also in place.
Unfortunately, this is rarely the case. Therefore, for the remainder of this post, we will zoom in on some of the technical aspects of bringing your ML solution from notebook to production.
Operationalizing the process from notebook to production
Let's say we have a notebook in which we are developing an ML solution. What steps can we operationalize? The list is too long for us to cover everything, such as versioning and packaging your code, standardizing your developing environment, and so forth. In the following, we will focus on how we can operationalize the process of experiment tracking, serving and deployment. Several common open source tools such as MLflow are discussed, but the same principles apply to other tooling you can find in the market.
Experiment tracking
One of the first thing we can operationalize is the process of developing, validating and comparing different models.
If you're working on a project alone, you need a structured way of keeping track of your past experiments. If you're working with multiple colleagues, you need a way to track each other's progress to prevent you from reinventing the wheel.
The most common open source tool that allows you to do this is MLflow. Most enterprise ML platforms (Vertex AI, Azure ML, Sagemaker) integrate with MLflow.
So how does it fit in the process? Let's zoom in on the "Data science" box of Fig. 2:
Fig. 8 ![]()
The process can look as follows:
- You and your colleagues develop different models with different performance scores.
- Each run of each person is logged to a central experiment tracking (MLflow) server. You can log the model, the code, the scores and even figures to the server. This allows you to easily compare different runs and see which has the best score.
- The model with the best score is selected for "production". Note that we still have to bring it there ourselves though! We can tag the best registered model, so we can easily load it again in later steps.
Model serving
We can now track our experiments and select the best model. However, our end user cannot use it yet, because we cannot expect the end user to take our notebook, load the model and run it themselves...
Fig. 9 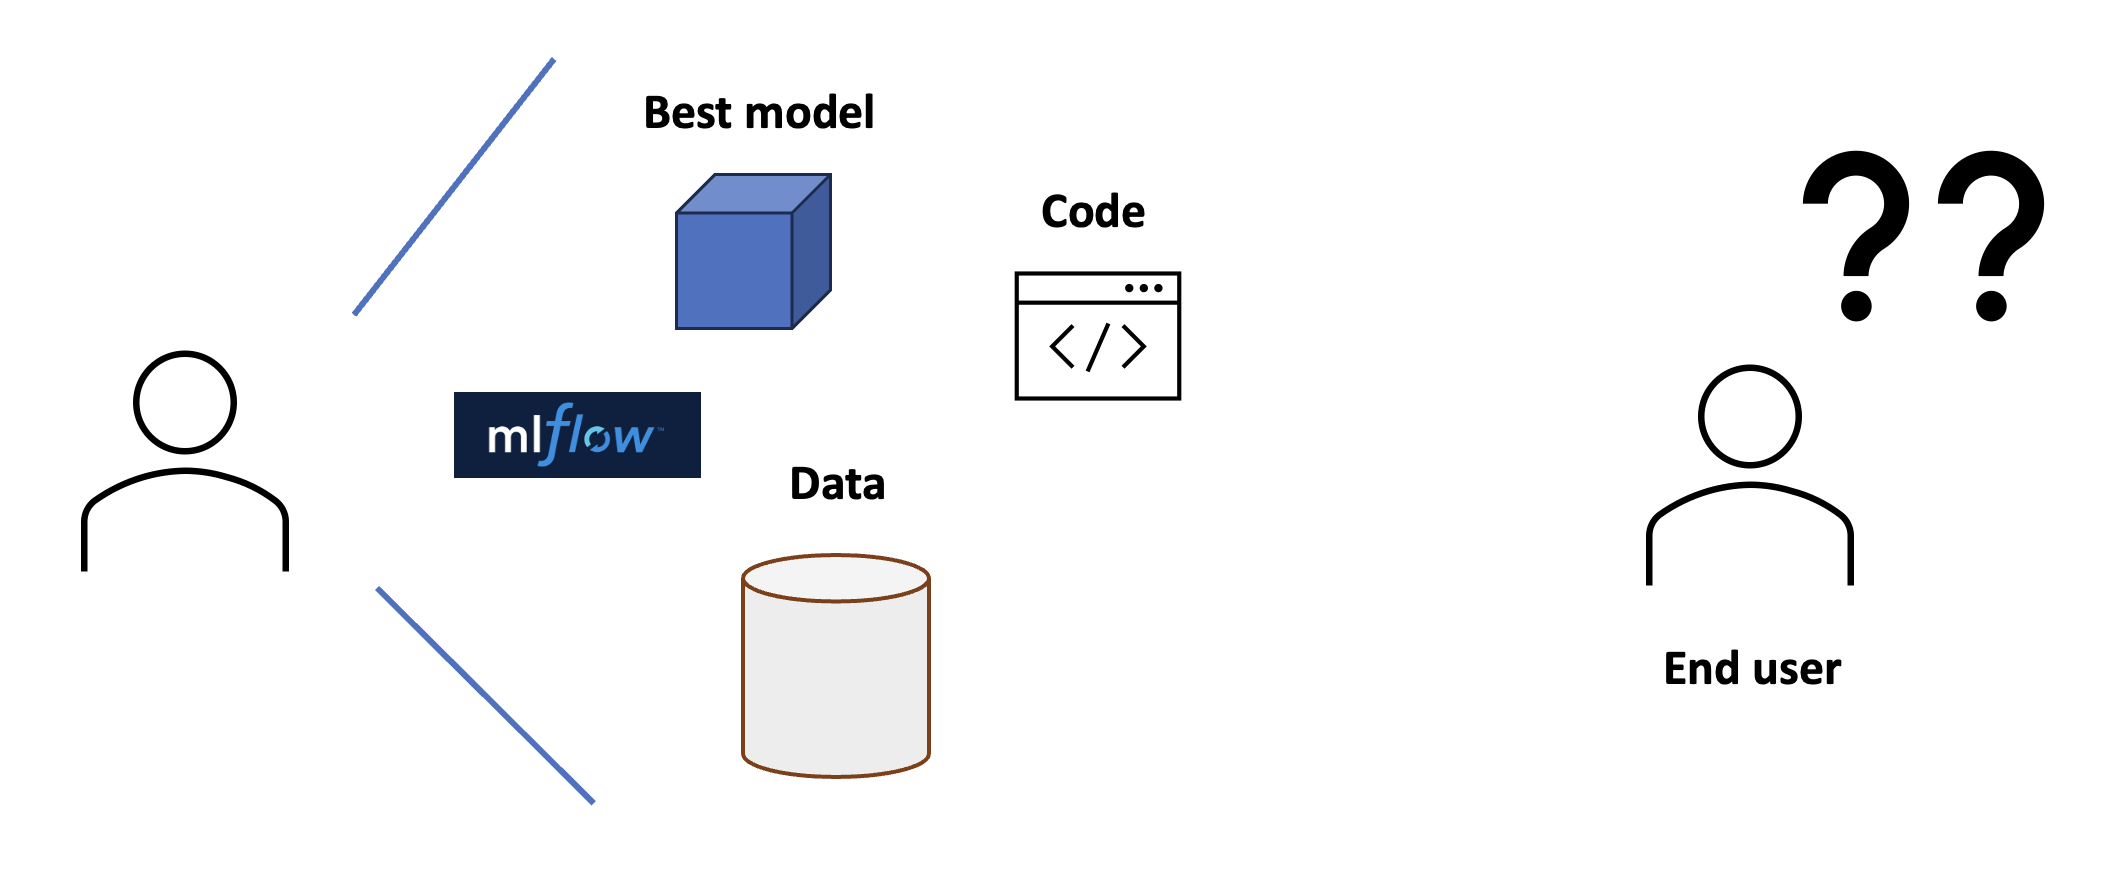
Instead, we can serve our model. Serving can take different forms. We can serve batch predictions, or we can serve the model directly with an API. For our case, let's assume on-demand predictions are necessary and so we go for the API.
If we wrap our solution in an API, the user does not have to worry about the logic and code, only the interactions with the API. Furthermore, any other programming language can now also interact with our API, as it adheres to a standardized web protocol.
An easy to use and open source library that can be used for creating an API in Python is FastAPI.
Fig. 10 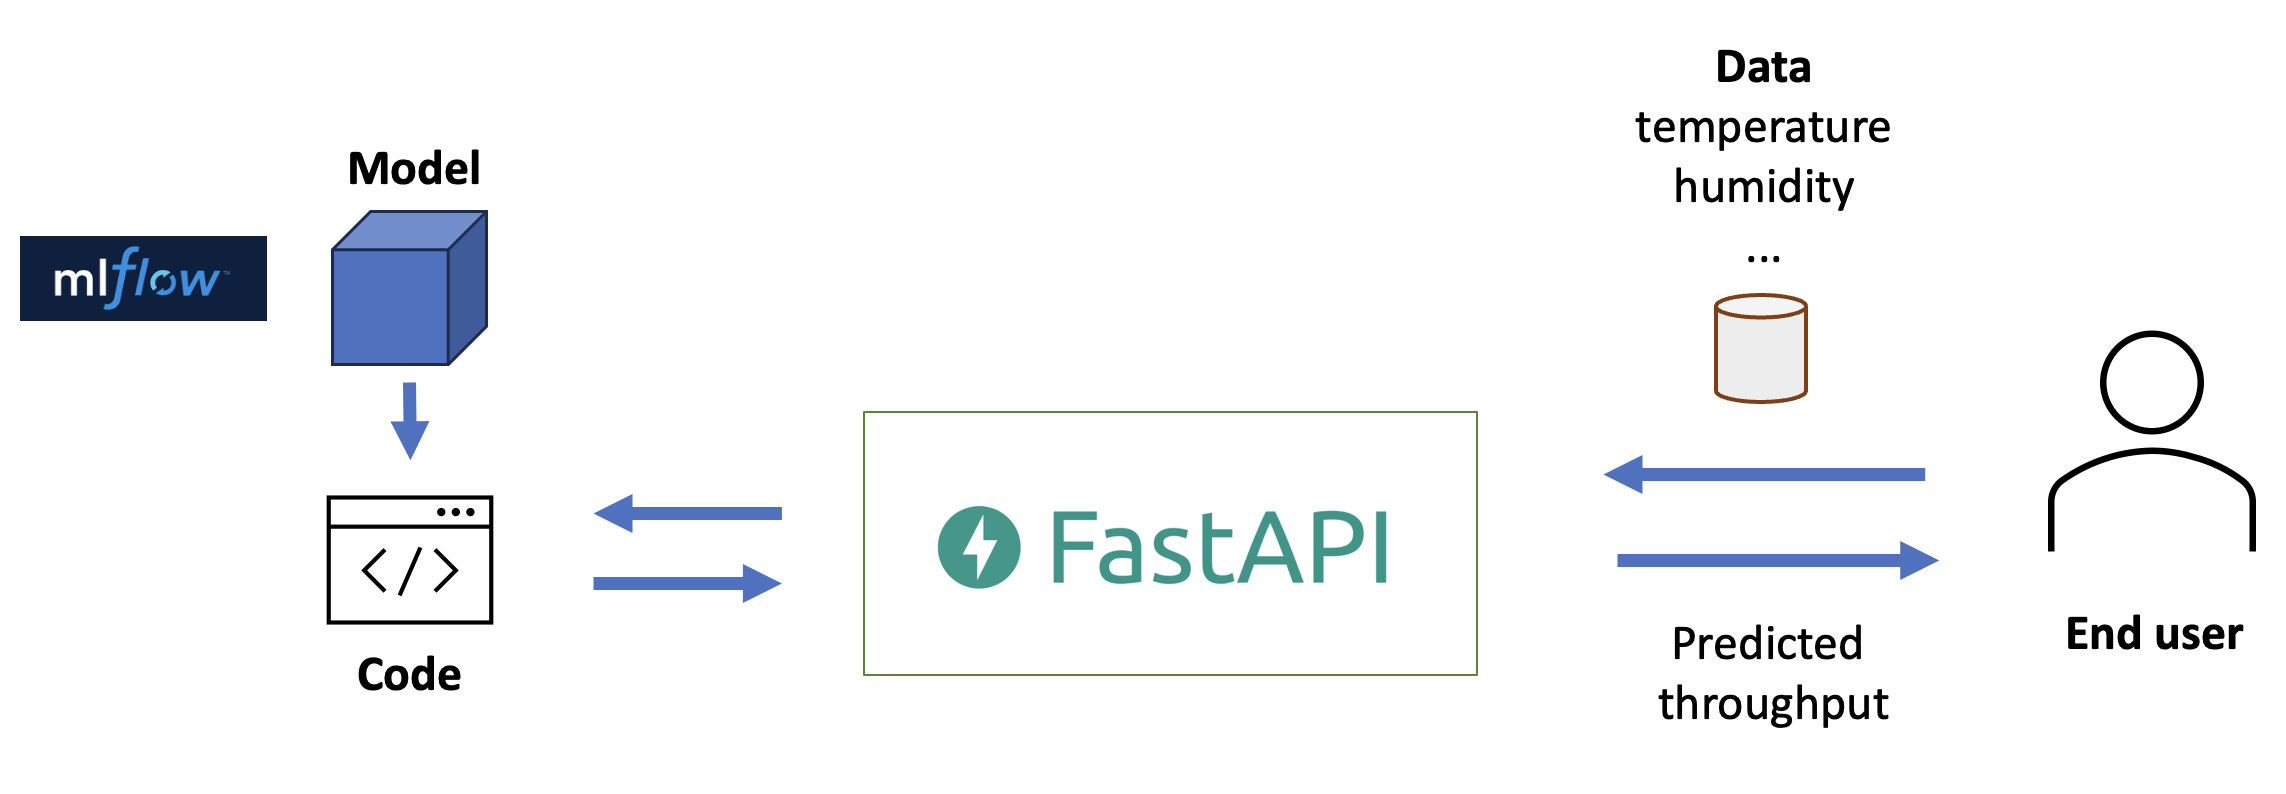
At this point, you will likely move from notebook to a structured Python package. Not only is this necessary to write your API, it also has the benefit of allowing for modularization, linting and unit testing to ensure code quality.
Containerization
Now, we can serve our model and send data (e.g. temperature) to the API endpoint to get predictions back (e.g. predicted machine throughput). However, the API is still running on our own computer! This means if we close our laptop, our service is down. This is not ideal. Where should we run our API?
Fig. 11 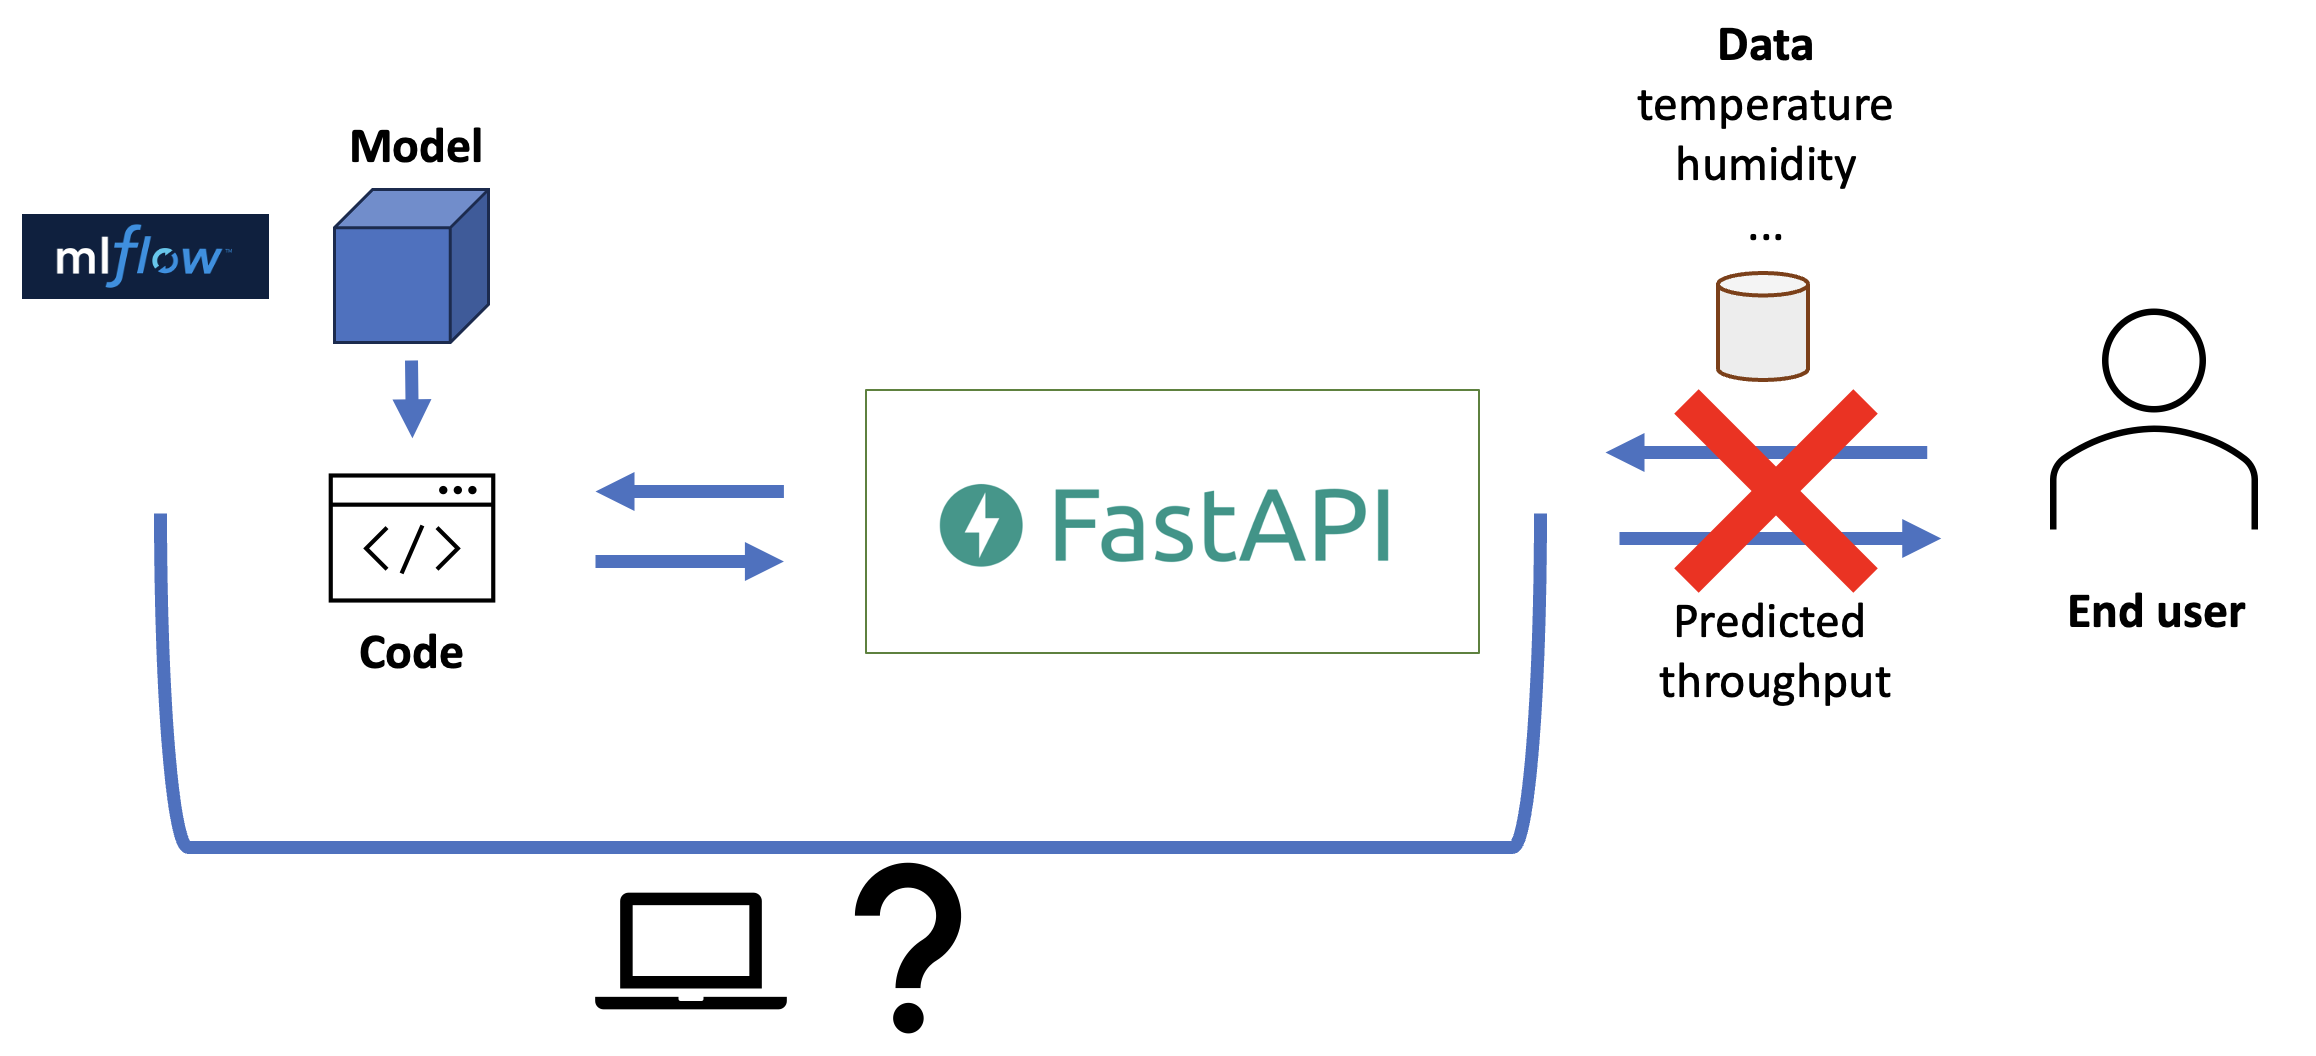
We need a server to run our API instead. However, just shipping our code to a server is not guaranteed to work: it may use a different operating system, may have a different python version installed, and there may already be other libraries installed that conflict with ours.
To ensure our code will run on the server, we need to containerize our application. A container is an isolated process that can run on any operating system. It is the running instance of a container image, which is a file containing everything our application needs to run: Python version, dependencies, files, entrypoint commands, etc.
A common open source tool that allows you to containerize your applications is Docker. Most, if not all enterprise serving solutions allow Docker images to be run on their servers. A requirement is that the container image is registered in a location that can be accessed through the internet. For registering Docker images we can use DockerHub, similar to how we use Github to register our code, or MLflow to register our ML models.
Fig. 12 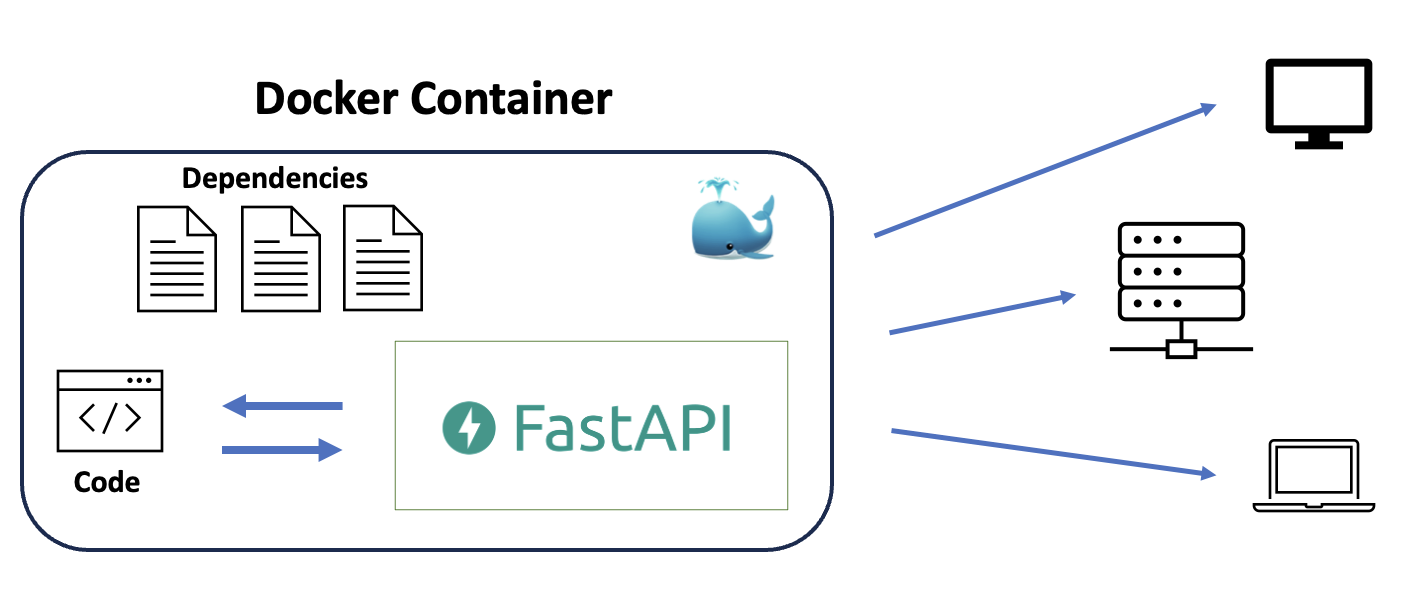
Deployment
The last step to make our solution accessible to end users is to deploy it to a server. But to which server, and how do we get it there?
Let's assume that you don't have your own servers or want to be bothered by managing all the networking that comes with it. Therefore, we will deploy our solution to one of the cloud providers (Azure, GCP, AWS, or others). Several of these providers offer "serverless" deployment options, but we'll refer to those as "servers" in the following, as they still require a physical machine to run your code.
Fig. 13 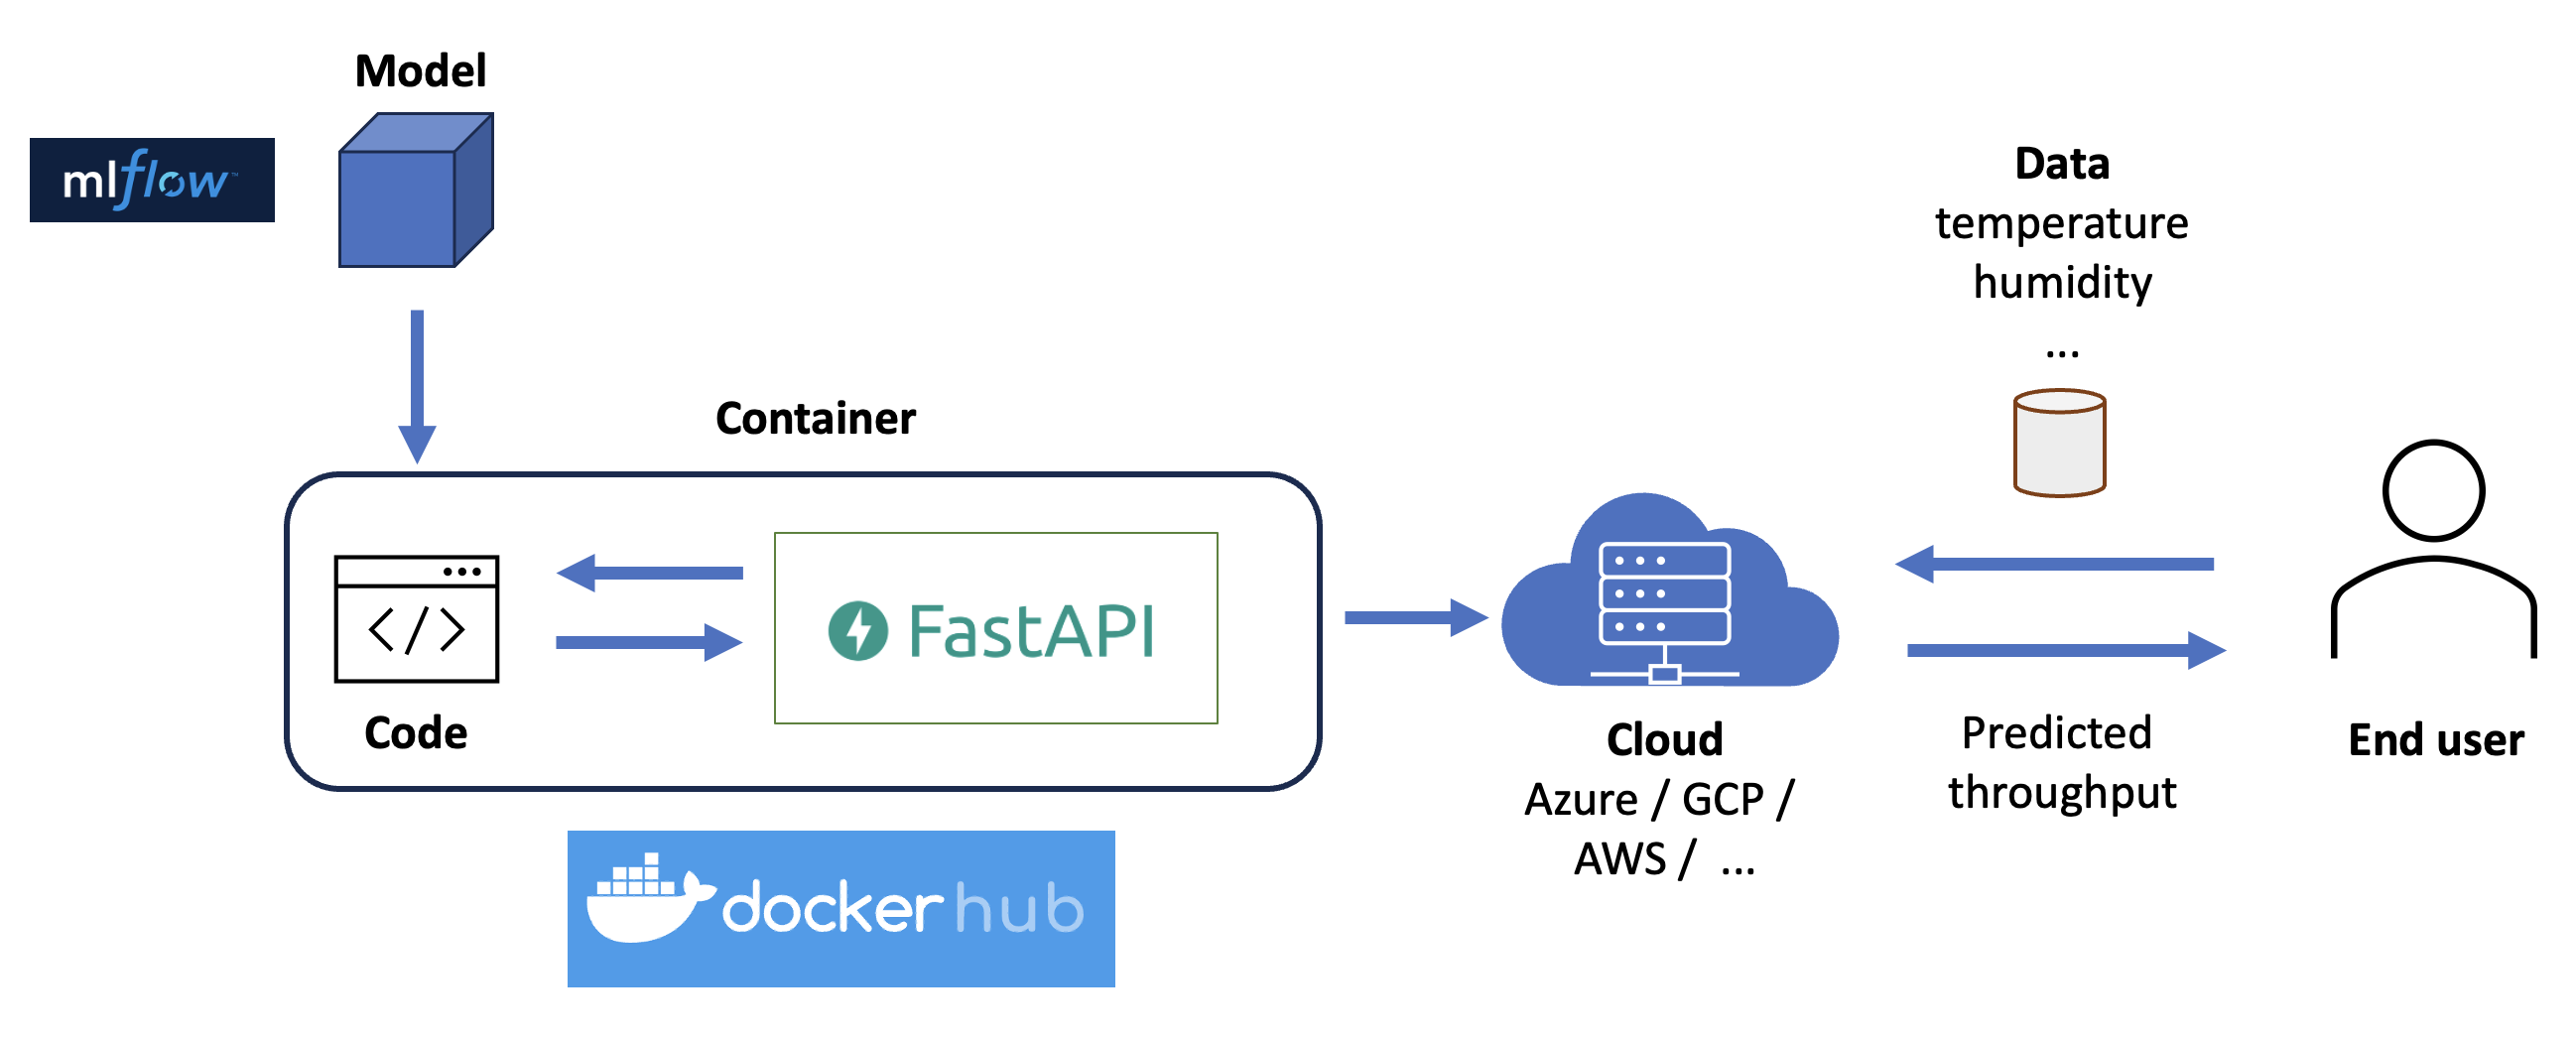
Whether you go for Azure Container Instances, Google Cloud Run or AWS Fargate, all these serving solutions generally allow for different ways to deploy your container:
- Through the user interface (UI) of the provider
- Through your command line interface (CLI)
Both options should lead to the same result, so we recommend to try out both. Option (1) has the benefit of seeing quick results. Option (2) has the benefit of allowing for automation and reproducibility.
Still with us? Hopefully you've now deployed your app in the cloud and can send some requests to it. Now, let's automate the whole shebang in the final section.
Continuous integration and continuous deployment (CI/CD)
We already went from a local notebook to a container to cloud. But we can do better!
So far, we have run things ourself, either in the UI, or through the CLI. But we can automate this process, so that our application is automatically deployed to the cloud when we push a new version of the code to our repository.
To do so, we can use Github Actions, a CI/CD tool that is integrated with GitHub.
Fig 14. 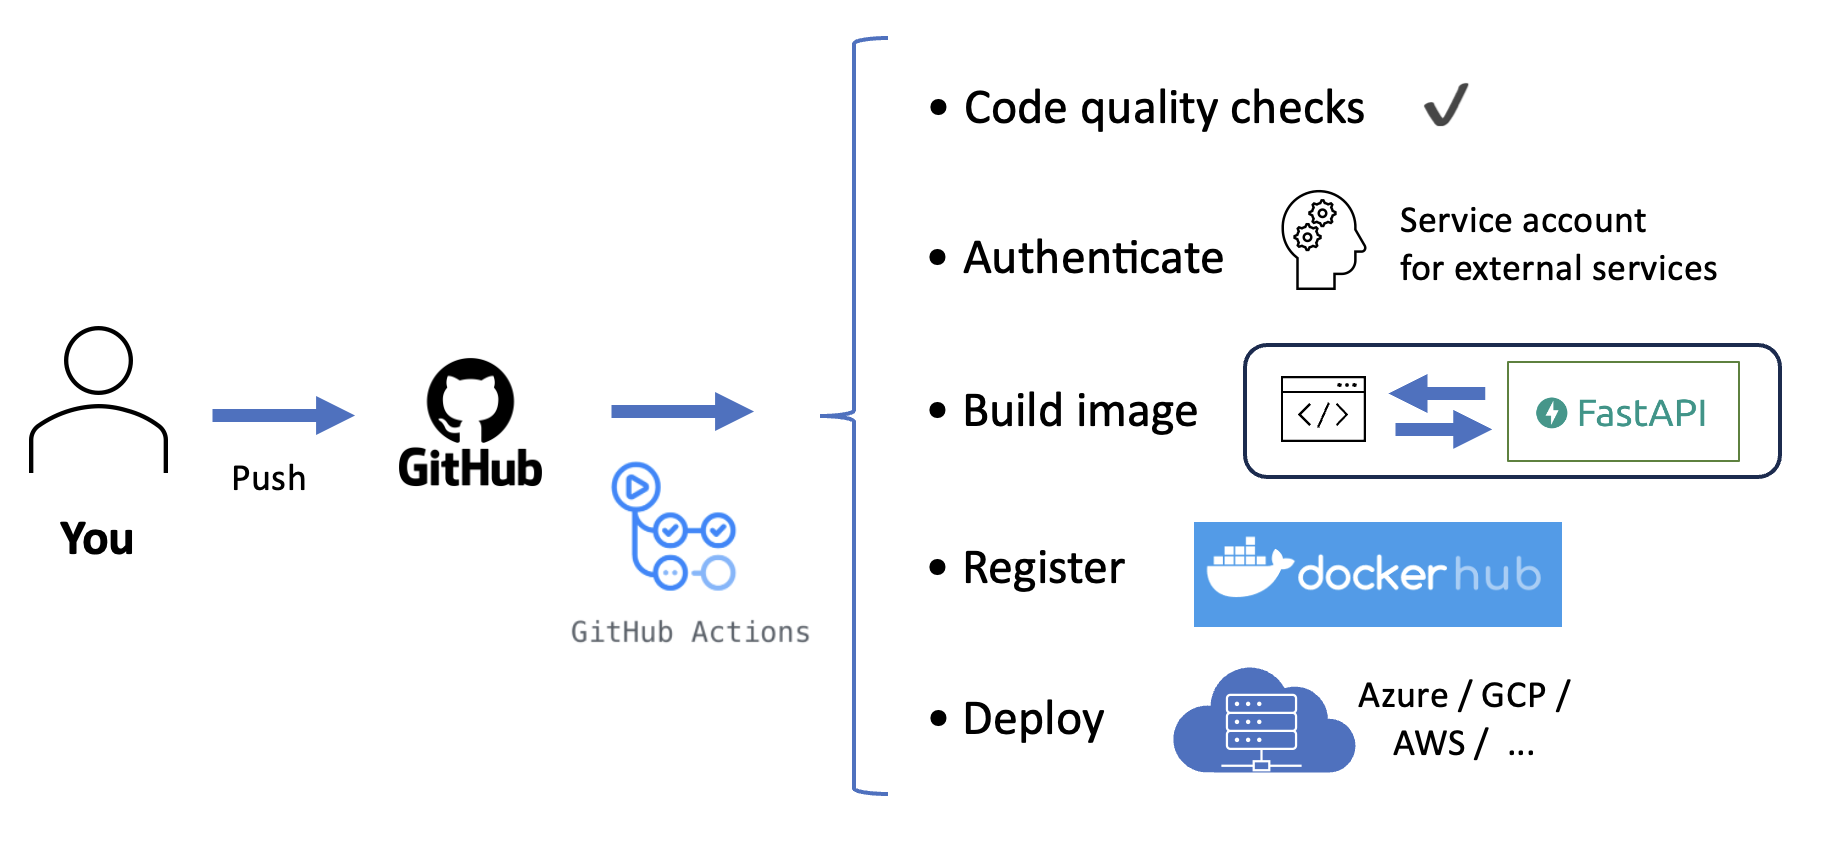
We can implement a CI/CD pipeline as a yaml file, specifying which steps and commands we want Github to execute in which order. In our case, we could include the following steps:
- Continuous integration: run code quality checks and unit tests
- Continuous deployment: build, register and deploy our Docker image
Importantly though, Github needs to interact with external services such as DockerHub and the cloud provider on our behalf. So each time Github runs our CI/CD pipeline, it needs to "log in" to the external service with valid credentials. These credentials need to be added to the Github secrets, which you can find in your repository settings.
Now, where can you find these credentials? That depends on the provider at hand, but in general it is good practice to use a service account instead of your own account for this purpose. In the latter case, it happens too often that when a employee a company, services break down because their personal account is deleted. In the tutorial we show how you can get service account credentials for Azure and GCP.
Try to change the code (e.g. in a fork of the repository), and watch the CI/CD pipeline do all the steps to update your ML service in the cloud
Summary
Companies often struggle to get their ML solutions live and realize value. In this blogpost, we have seen how this problem is often caused by the gap between data science and operations. We have also seen how MLOps aims to close this gap along the axes of people, process and technology.
Regarding people and process, we highlighted how end-to-end cross-functional teams can own responsibility across the entire MLOps lifecycle, removing the need for handovers. For the technology part, we have delved into the process of going from a notebook to usable ML service in the cloud in an operationalized fashion.
There is much we have not covered, such as monitoring, setting up proper cloud infrastructure, or even, the change management required to get organizations to think with an MLOps mindset. Nevertheless, we hope this post has given some concrete insights in common problems that you may recognize, and potential solutions you can explore.
Would you like to learn more? Check out our trainings (e.g. these or this one) and services, and look out for our upcoming MLOps white paper!
Written by
Yke Rusticus


Contact