
I previously wrote about using child pipelines in GitLab, but there's another kind of pipeline called a multi-project pipeline that allows you to control multiple separate repositories from a single source.
The difference between child pipelines and multi-project pipelines
A child pipeline is sub-pipeline triggered in the context of same repository. The benefits are explained in that post, but the gist is that your pipelines are better isolated, more streamlined and reusable.
Imagine now that you have one or more existing independent repositories (that may even use their own child pipelines), each with their own rules and conditions for when they run. In a multi-project pipeline setup you would create a new master pipeline that can trigger one or more of those pipelines in their own repositories.
For instance, let's say you have several teams managing different parts of your website, each with its own repository. They can push updates and start a build that goes live on the website. But, there might be times when you need to synchronize updates from several repositories. This is where a "manager" repository comes in handy. It can start the pipelines of the other repositories, maybe even in a certain sequence, without changing them.
In simpler terms, a multi-project pipeline lets one repository's pipeline start the pipeline of another repository.
For this blog, I will use the terms upstream and downstream a lot. Here’s what I mean:
- downstream: A normal pipeline in a repository that runs when the right conditions are triggered. It becomes “downstream” when triggered by another repository (upstream).
- upstream: A pipeline that triggers a pipeline in another repository (downstream).
A basic multi-project pipeline
Let's start with a basic example. Create two repositories to follow along.
You can find the source code in the upstream repository and the downstream repository.
The first file to define is .gitlab-ci.yml in the downstream repository:
downstream-job:
  script: echo "I test the code"
When we push this file, the pipeline starts and runs as normal.
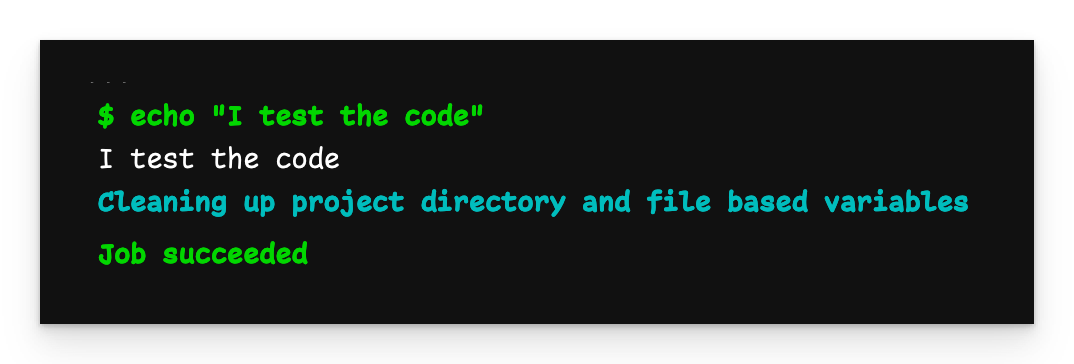
Basic pipeline output
The next file is .gitlab-ci.yml in the upstream repository:
trigger-downstream-job:
  trigger:
    project: zaayman-samples/using-multi-project-pipelines-in-gitlab-downstream
    branch: basic-multi-project-pipeline
Notice that we don’t specify a filename for the pipeline defined in the downstream repository. This is because we are triggering that repository’s regular pipeline and that is always defined in
.gitlab-ci.yml.
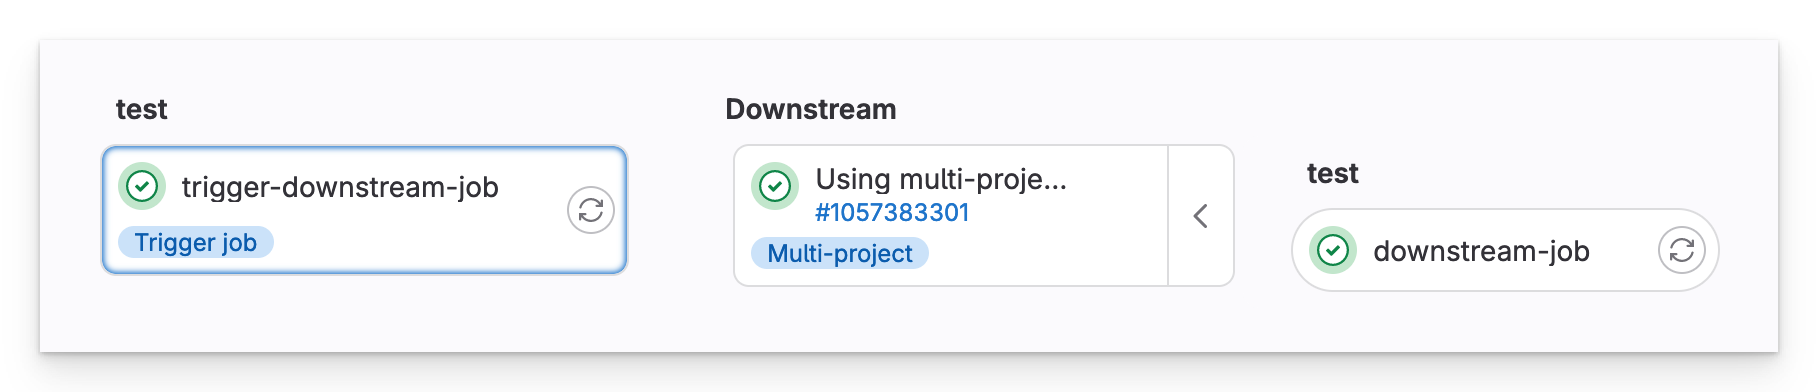
Upstream pipeline
In the upstream pipeline, we see that a multi-project downstream pipeline has been triggered in our other repository.
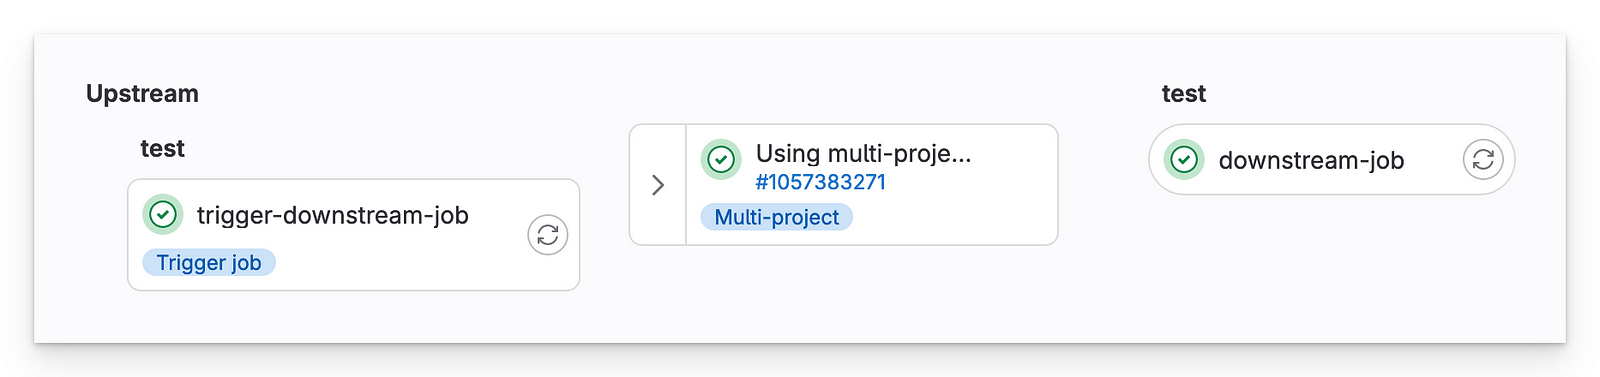
Downstream pipeline
The important takeaways from this example are:
- The repository with the basic job is a normal, independent repository and pipeline. It only becomes a “downstream” repository when triggered by the upstream repository.
- The “manager” repository can trigger that repository to run its pipeline as if it had been triggered normally.
Passing variables
Like the examples from the child pipelines post, variables you define in the upstream YAML file will get passed to the downstream pipeline. However, none of the GUI variables you define under Settings > CI/CD > Variables are automatically shared with the downstream repository’s pipeline. This is because it runs in a completely different repository. If you want it to access these variables, you must pass them manually.
You can find the source code in the upstream repository and the downstream repository.
We start in the downstream repository with .gitlab-ci.yml:
variables:
  GLOBAL_VAR: Downstream

job-local-entry-point:
  variables:
    LOCAL_VAR: Downstream
  trigger:
    include: child-pipeline.yml
For this pipeline I defined 3 variables:
- A GUI variable under Settings > CI/CD > Variables called
$GUI_VAR - A global variable called
$GLOBAL_VAR - A job-local variable called
$LOCAL_VAR
Next we define the child-pipeline.yml: file that gets triggered.
child-job:
  script:
  - echo "Doing some testing"
  - echo "GUI_VAR=$GUI_VAR"
  - echo "GLOBAL_VAR=$GLOBAL_VAR"
  - echo "LOCAL_VAR=$LOCAL_VAR"
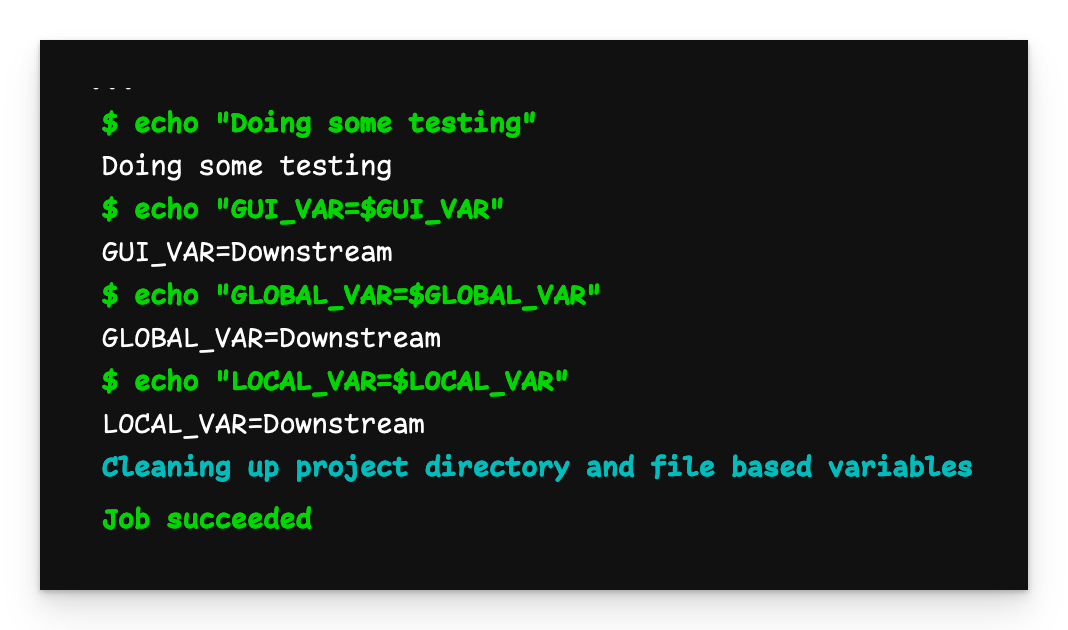
Variables passed to child pipeline
We see that all the variables have the value Downstream as we defined them.
Now on to the upstream repository. First, we also define a GUI variable called $GUI_VAR with the value Upstream. Then we define .gitlab-ci.yml:
variables:
  GUI_VAR: $GUI_VAR
  GLOBAL_VAR: Upstream

manager-trigger-job:
  variables:
    LOCAL_VAR: Upstream
  trigger:
    project: zaayman-samples/using-multi-project-pipelines-in-gitlab-downstream
    branch: passing-variables
For the upstream pipeline I’ve defined 3 variables:
- A GUI variable called
$GUI_VAR - A global variable called
$GLOBAL_VAR - A job-local variable called
$LOCAL_VAR
We also need to update the downstream repository’s .gitlab-ci.yml file:
variables:
  GLOBAL_VAR: Downstream

job-local-entry-point:
  rules:
  - if : $CI_PIPELINE_SOURCE != "pipeline"  # Add this rule
  variables:
    LOCAL_VAR: Downstream
  trigger:
    include: child-pipeline.yml

job-upstream-entry-point:  # Add this job
  rules:
  - if: $CI_PIPELINE_SOURCE == "pipeline"
  variables:
    GUI_VAR: $GUI_VAR
    GLOBAL_VAR: $GLOBAL_VAR
    LOCAL_VAR: $LOCAL_VAR
  trigger:
    include: child-pipeline.yml
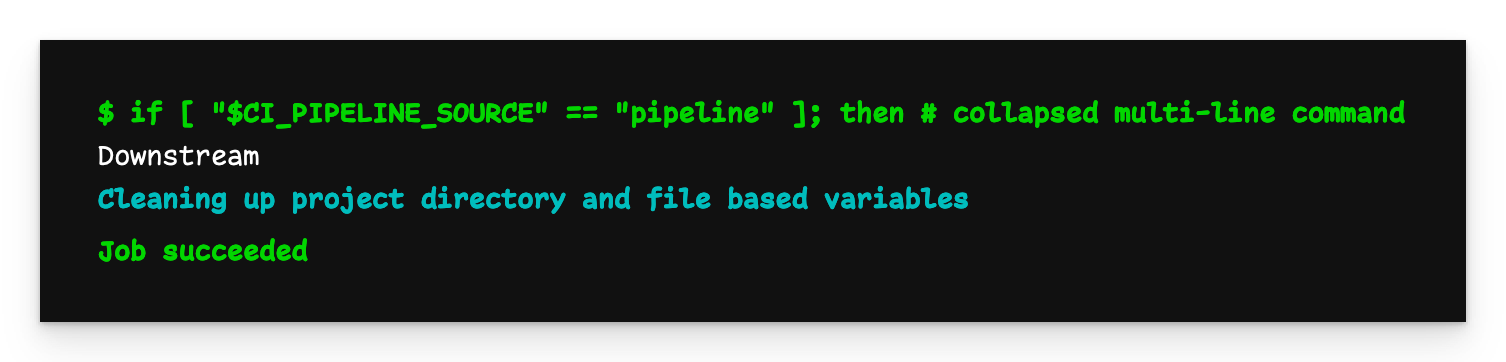
Notice the rules I’ve added. If a pipeline is triggered by an upstream pipeline, $CI_PIPELINE_SOURCE will be “pipeline”, meaning job-upstream-entry-point will run. When triggered normally (e.g. a push), job-local-entry-point will run.
We now have two separate entry points to the downstream pipeline, where the variables passed to the child pipeline will be different depending on how the pipeline was triggered.
Now we push the upstream pipeline file.

Downstream pipeline output with upstream variables
When we now inspect the output of the downstream pipeline, we see that all the variables now have the value Upstream as they were passed from the upstream pipeline.
Safety concerns
Be mindful when triggering a pipeline in a project you don’t control. It’s entirely possible for bad actors to update what was once benign code to something more malicious. While the code is executing in a completely separate (and isolated) project, you don’t know what context is being shared (or accidentally leaked) by GitLab when the downstream pipeline is triggered. This is especially dangerous if you’re sharing variables with the child pipeline. It’s best to just avoid it altogether and fork the repository so you have full control over it.
Passing files
Passing files in a multi-project setup (if you’re not using their Premium subscription) is a bit more tricky than with a child pipeline, but still possible. However, we’re going to have to go outside of GitLab and fetch the files from the upstream pipeline using curl.
You can find the source code in the reference repository and the child repository.
Let’s start with the downstream repository’s .gitlab-ci.yml file:
downstream-job:
script: |
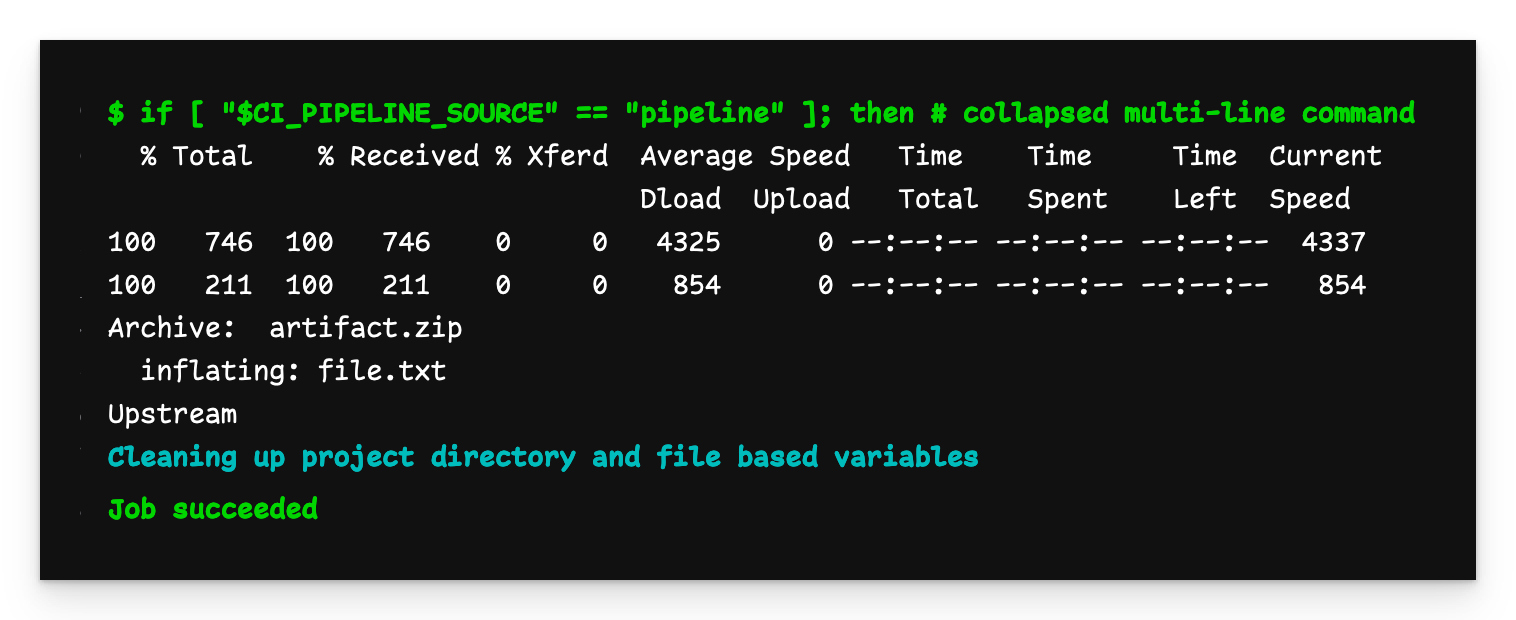
if [ "$CI_PIPELINE_SOURCE" == "pipeline" ]; then
curl -L --header "PRIVATE-TOKEN: $ACCESS_TOKEN"
"https://gitlab.com/api/v4/projects/$PROJECT_ID/jobs/artifacts/$BRANCH/download?job=create-file-job"
--output artifact.zip
unzip artifact.zip
else
echo "Downstream" > file.txt
fi
cat file.txt
Ignore the
$variables for now.
This pipeline has two behaviours depending on how it starts. When triggered from an upstream pipeline, it uses curl to retrieve the artifacts archive from the GitLab API. When run locally, it creates file.txt.
Downstream pipeline output
As expected, the “downstream” flow ran and we have a file containing “Downstream”.
Let’s now define .gitlab-ci.yml in the upstream repository:
create-file-job:
  stage: build
  script:
    - echo "Upstream" > file.txt
  artifacts:
    paths:
    - file.txt

upstream-trigger-job:
  stage: test
  variables:
    PROJECT_ID: $PROJECT_ID
    ACCESS_TOKEN: $ACCESS_TOKEN
    BRANCH: $CI_COMMIT_REF_NAME
  trigger:
    project: using-multi-project-pipelines-in-gitlab-downstream
    branch: passing-files
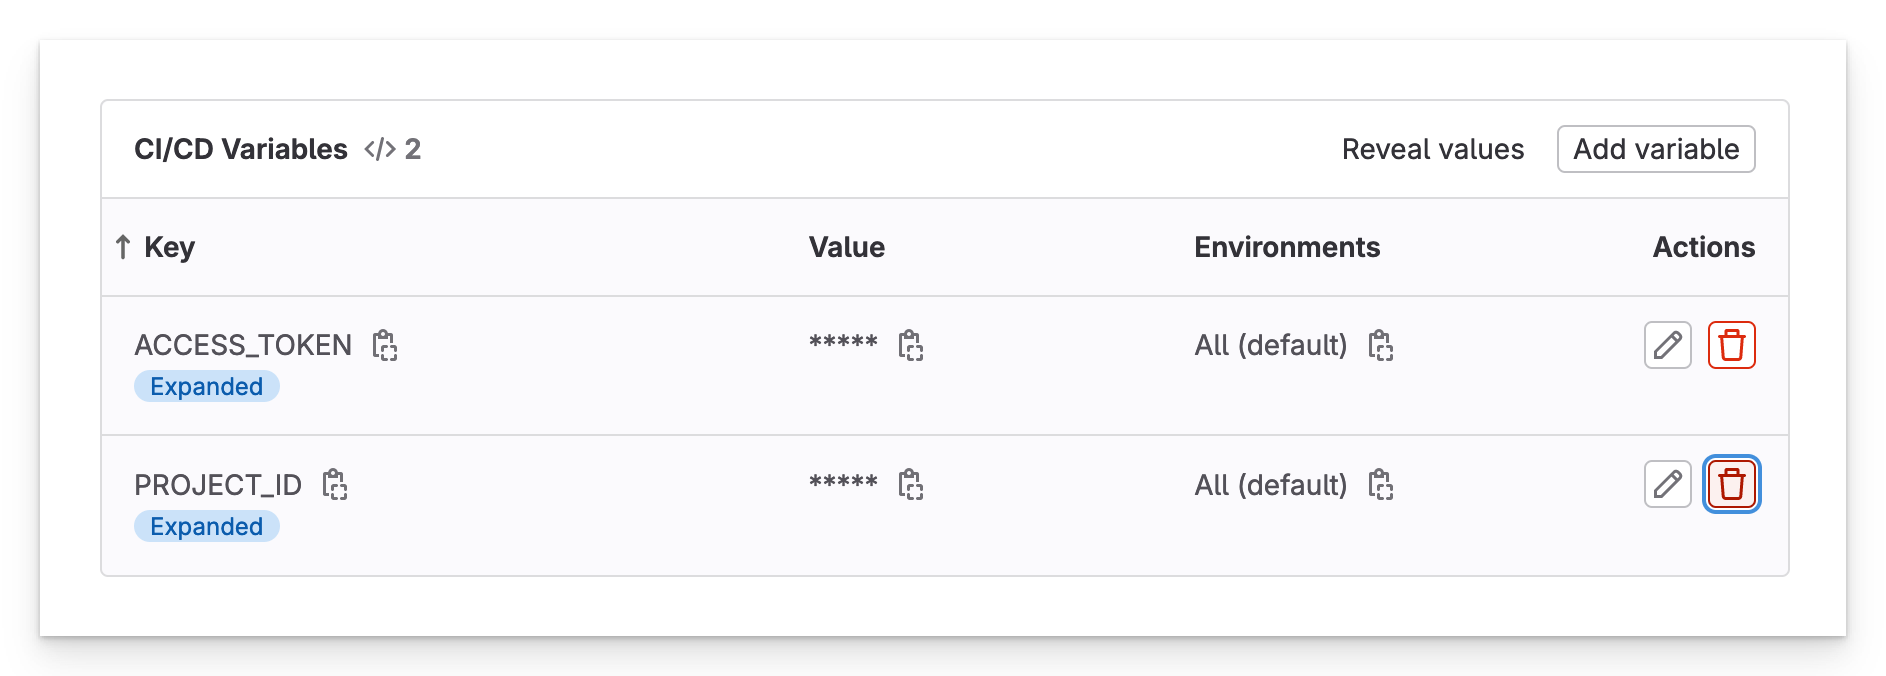
In order for this example to work, you’re going to need a few extra variables:
- ACCESS_TOKEN: In the web UI, click on your profile picture, then Preferences > Access Tokens. If you don’t already have an one, create an access token, give it
read_apiscope and save it. - PROJECT_ID: In the web UI, click on Settings > General. Here you will find the Project ID.
Now add these two values as variables in the GUI under Settings > CI/CD > Variables.
GUI variables
In the pipeline file, you pass ACCESS_TOKEN and PROJECT_ID to the downstream pipeline, as well as the current branch (CI_COMMIT_REF_NAME)the upstream job is running in. This tells the curl command which branch’s job to download the file from.
Passing files in a multi-project setup is a bit more tricky than with child pipelines, but still possible. However, we’re going to have to go outside of GitLab and fetch the files from the upstream pipeline using curl.
You can find the source code in the reference repository and the child repository.
In order for this example to work, you’re going to need a few extra variables:
- ACCESS_TOKEN: In the web UI, click on your profile picture, then Preferences > Access Tokens. If you don’t already have an one, create an access token, give it
read_apiscope and save it. - PROJECT_ID: In the web UI, click on Settings > General. Here you will find the Project ID.
Armed with this information, you are ready to proceed.
Let’s start with our manager repository and define .gitlab-ci.yml:
create-file-job:
  stage: build
  script:
    - echo "Important stuff" > file.txt
  artifacts:
    paths:
    - file.txt

parent-trigger-job:
  stage: test
  trigger:
    project: zaayman-samples/using-child-pipelines-in-gitlab-child
    branch: main
Next, we define .gitlab-ci.yml in the downstream repository:
child-job:
  script: |
    curl -L --header "PRIVATE-TOKEN: <ACCESS_TOKEN>"
    "https://gitlab.com/api/v4/projects/<PROJECT_ID>/jobs/artifacts/main/download?job=create-file-job"
    --output artifact.zip
    unzip artifact.zip
    cat file.txt
The .gitlab-ci.yml file of the downstream project uses a basic curl command to retrieve the file from the GitLab API.
Substitute your
ACCESS_TOKENandPROJECT_IDfor the placeholders above. Also, note that you need to specify the name of the job that created the artifact (in this case,create-file-job).
Multi-project child pipeline output
The output of child-jobin the remote repository (i.e. “Upstream”) shows that the file was successfully downloaded and extracted.
Final notes
- A child pipeline runs in the same repository as the pipeline that triggered it, while a multi-project pipeline runs in the repository downstream from the one that triggered it.
- When using a child pipeline, variables defined in the GUI are automatically available to the child pipeline, while a GUI variable define in an upstream repository are not automatically passed to a downstream multi-project pipeline.
- A child pipeline is limited to two levels of nesting (i.e. parent/child/grandchild), while a multi-project pipeline can trigger infinitely (i.e. pipeline A can trigger B, which can trigger C, which can trigger D, and so on).
Conclusion
Multi-project pipelines can be useful to add centralised control over your existing pipelines. If you build all your pipelines with this in mind, each repository can focus on its functionality, while the manager repository can focus on coordination.
Frequently Asked Questions
Written by
Jeffrey Zaayman
Our Ideas
Explore More Blogs


Contact