Blog
Simplify your workflow deployment with Databricks Asset Bundles: Part I

Databricks is now a top choice for data teams. Its user-friendly, collaborative platform simplifies building data pipelines and machine learning models. However, deploying these workflows into production, programmatically, can be challenging. Many data practitioners, myself included, have faced various deployment and resource management strategies. I've explored different approaches. They range from custom Python packages using the Databricks CLI and API to a mix of Bash scripts and dbx (a former tool for Databricks). This variety raises several questions: Which pieces of infrastructure should be included in the application? How do we configure application-specific resources? How can we isolate deployments in development/production environments? How do we handle multiple deployment targets? Instead of focusing on our core apps, we often navigate a mix of tools and custom code that needs constant attention.
In the next couple of blog posts, I would like to introduce Databricks Asset Bundles (DABs or bundles) as a new way to make deployments on Databricks:
-
First, we will introduce DABs, explain its benefits and show their lifecycle through an example. We are also going to discuss similarities and differences between DABs and Terraform as tools for managing infrastructure.
-
Then, we will dive into bundles and showcase how you can use it to customise accordingly to your project's needs.
-
Finally, I would like to move a step further and show how you can integrate it into your CI / CD pipelines.
Databricks Asset Bundles: What
Databricks Asset Bundles are a way to define project settings, resources, environments, and artifacts in a simple, unified format. DABs help us to adopt best practices in software development and integrate smoothly with CI/CD tools.
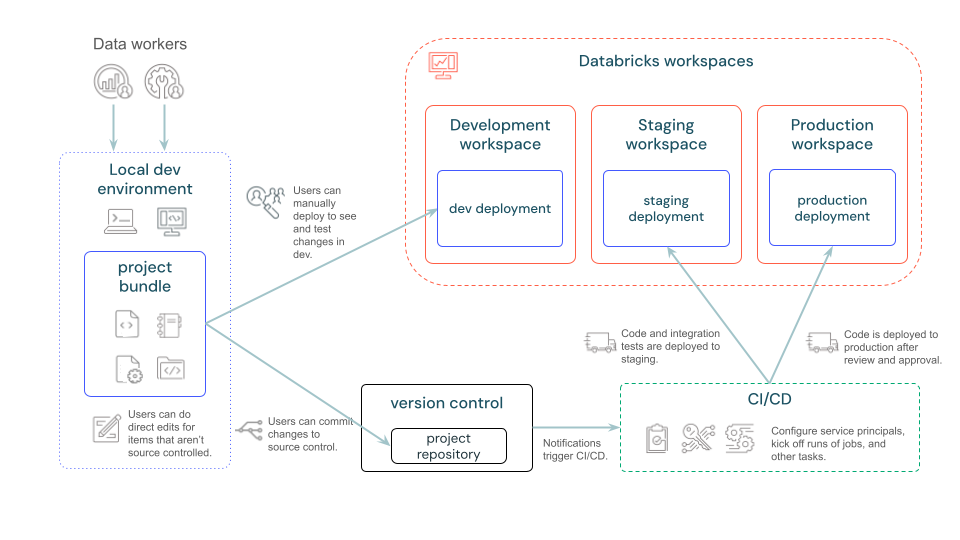 source: https://docs.databricks.com/en/dev-tools/bundles/index.html
The above diagram illustrates how bundles will interact with Databricks resources and CI/CD tools to facilitate the development lifecycle. In general terms:
-
Project Bundle: Code and resource configuration reside in a single repository. Resources are defined in a readable format (YAML files).
-
Data workers can deploy their resources to a development workspace to test their application.
-
After testing, you can integrate your bundle to a CI/CD pipeline to make deployment to a production environment. You may also deploy to production from your local machine if wanted.
Before DABs, you had to use various Databricks CLI commands and API calls. You also had to configure json files for job resources. Alternatively, you could deploy manually, but that was error-prone and hard to maintain long-term. Now let's see through an example how bundles are centralising deployment in a single command-line interface.
Databricks Asset Bundles: How
We'll work on a demo use case to show the power of bundles. I hope to show you their main features and how they simplify development and deployment on Databricks.
You must build a data ingestion app. It should read data from a specific source and write it to your data lake. You develop a Python application that accepts dynamic parameters to programmatically accomplish that.
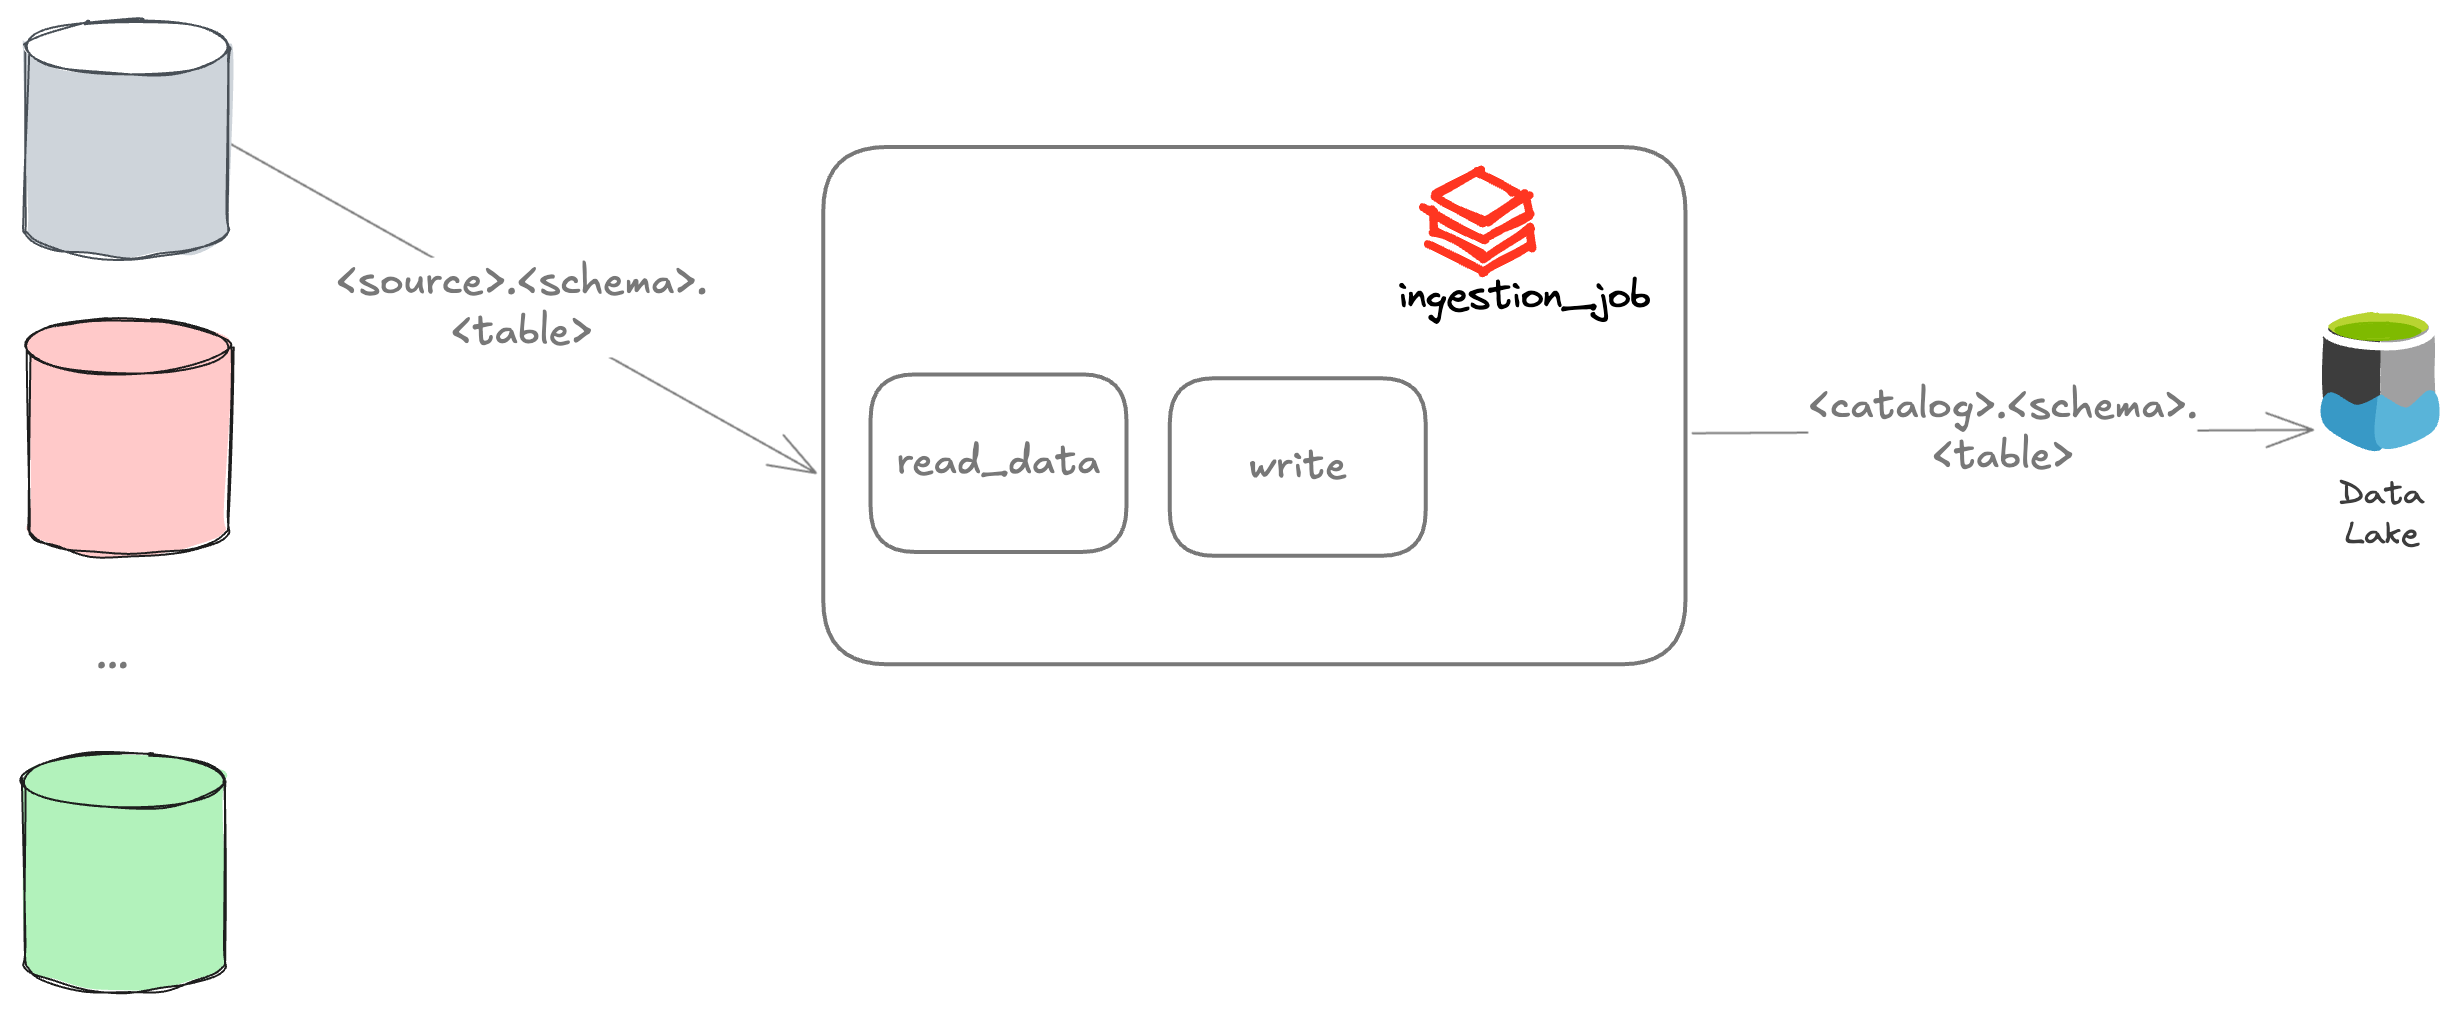
Your application will retrieve data from the external source such as schema and table names. It will then write to your data lake.
Your task needs the following parameters as input:
 - input_source

 - input_schema

 - input_table

 - output_catalog

 - output_schema

 - output_table
You developed your code, and now you want to test your application and eventually deploy it using Databricks jobs.
Lifecycle of a Bundle
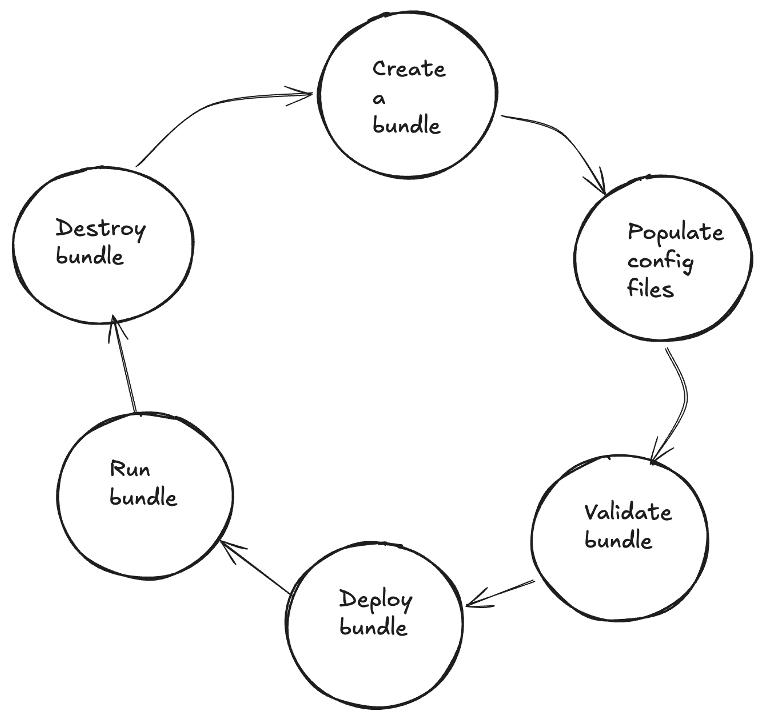
Step 1: Create a bundle
The first thing you need to do is create a bundle file configuration. You can do that in two ways, either via command-line or by manually creating a YAML file.
From Databricks CLI, you can do:
databricks bundle init
With this option, you are provided with a few built-in templates. However, you can also create a YAML file manually, or pick one of the many templates available in the Databricks repository.
For our use case, we are going to pick the python_wheel_poetry template from the repository, which uses Poetry to build your Python application and manage dependencies. If you want to know more about Poetry, check out the official documentation.
Step 2: Configure a bundle
Everything starts with the databricks.yml file. This will be the central place where all your project configuration is defined. It must exist only once in your project structure. For our use case, that is the initial configuration:
bundle:
  name: ingestion_demo

include:
  - ./resources/ingestion_job.yml

artifacts:
  default:
    type: whl
    build: poetry build
    path: .

targets:
  dev:
    default: true
    mode: development
    workspace:
      host: https://adb-xxxxxxxxx.x.azuredatabricks.net/
There is a top-level mapping syntax that defines some main components here:
bundle: Where you define bundle general settings, for instance, the bundle name.include: A list of path globs where your resources will be included (will discuss resources shortly)artifacts: Which artifacts are being deployed with the bundletargets: To which environments you are deploying and any specific configuration during deployment.
This central file defines how and where we are deploying resources, but we are missing what we are deploying, the job definition itself. For our use case, it would be:
resources:
  jobs:
    ingestion_job: # unique identifier of job resource beind deployed
      name: ingestion_job
      tasks:
        - task_key: main
          python_wheel_task:
            package_name: ingestion
            entry_point: ingestion
            named_parameters:
              input_source: mysql
              input_schema: foo_schema
              input_table: foo_table
              output_catalog: bar_catalog
              output_schema: bar_schema
              output_table: bar_table
          libraries:
            - whl: ../dist/*.whl

          new_cluster:
            node_type_id: Standard_DS3_v2
            num_workers: 1
            spark_version: 15.3.x-cpu-ml-scala2.12
We start by defining a key named resources followed by the resource itself we want to deploy, in this case: a job workflow and its corresponding tasks. The task is named main and receives the parameters mentioned previously. Besides that, in the end of the file we define minimal cluster configuration which our job will use to run the specified tasks.
Step 3: Validate a bundle
Next, we are going to validate our bundle configuration via the following command:
databricks bundle validate
Outputs:
# Name: ingestion_demo
# Target: dev
# Workspace:
#   Host: https://adb-1065999601799872.12.azuredatabricks.net/
#   User: victor.deoliveira@xebia.com
#   Path: /Workspace/Users/victor.deoliveira@xebia.com/.bundle/ingestion_demo/dev

# Validation OK!
If you didn't authenticate to your Databricks workspace, an error will occur. Then you need to authenticate using the command provided in the output.
This validation will check if the YAML syntax is correct and also if the schema of our bundle is valid, that is, if the field mappings are in the correct place and have correct type. To generate the bundle schema, you can run:
databricks bundle schema > bundle_config_schema.json
Tip: By including the following line:
# yaml-language-server: $schema=../bundle_config_schema.jsonat the top of your DABs files, you can inspect expected types and fields through your IDE.
Validation is a nice extra verification step to prevent bugs in production environments, but also during development, where you can flag issues before you actually try to execute code on the Databricks side.
Step 4: Deploy a bundle
Then, we deploy our bundle by running:
databricks bundle deploy
Outputs:
# Building default...
# Uploading ingestion-0.2.0-py3-none-any.whl...
# Uploading bundle files to /Workspace/Users/victor.deoliveira@xebia.com/.bundle/ingestion_demo/dev/files...
# Deploying resources...
# Updating deployment state...
# Deployment complete!
On the workspace, you can check the deployed job:
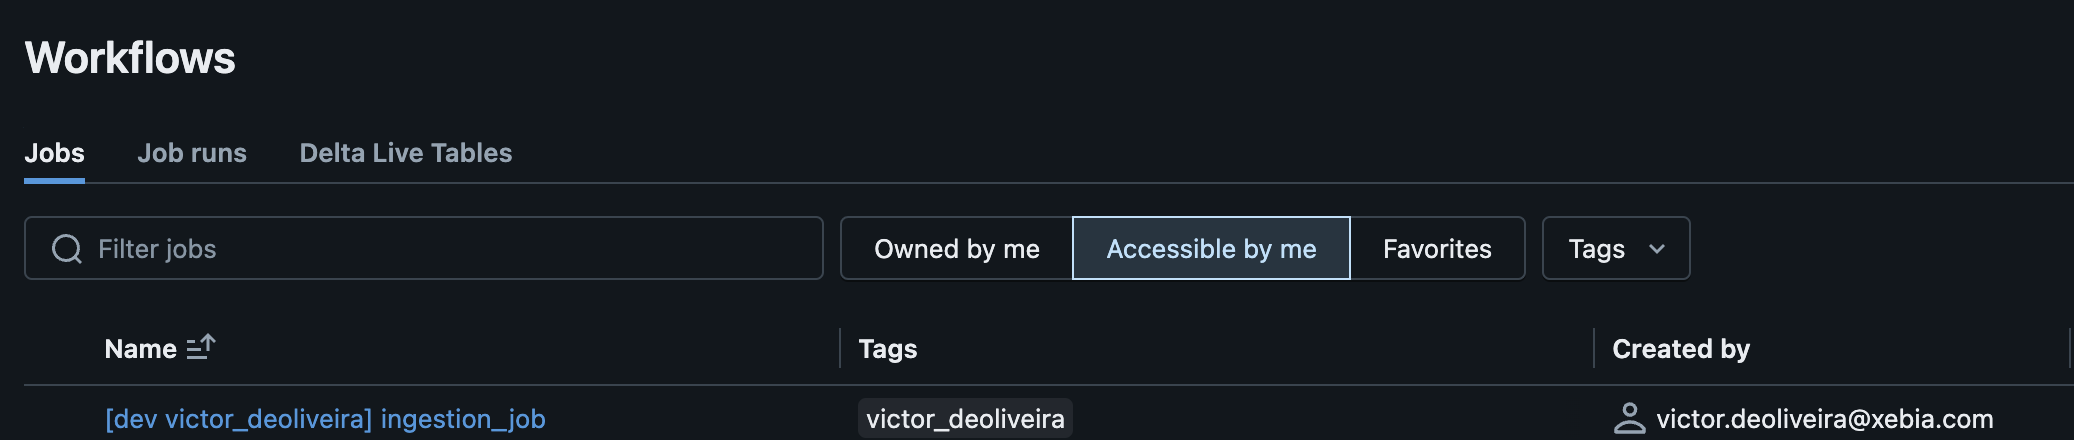
For now, we have only one target, and by default, it will deploy to our dev (development) workspace. By default, all files will be deployed under the user who ran the deploy command. In my case, I can find it at: /Workspace/Users/victor.deoliveira@xebia.com/.bundle/ingestion_demo/dev/.
Notice how bundles natively introduce deployment isolation. They do this by deploying your resources under the username folder workspace and by adding a prefix to your deployed job. In the second part of our series, we are going to provide more information about it.
In your folder structure, you can find then three subfolders:
- artifacts: Artifacts for your project. In our demo it will contain the
.whlfiles related to our Python wheel package being deployed. - files: All relevant files being deployed with the project, since we didn't exclude any files, it will sync all project files to the workspace.
- state: Under the hood, bundles is executing Terraform code; therefore, you are going to find the Terraform state file here.
What do you do once your job is deployed? You are ready to run and test your application logic.
Step 5: Run a bundle
You can also easily run deployed jobs via the bundles cli:
databricks bundle run ingestion_job
Tip: The
runcommand has the--validate-onlyoption, which can be useful to test your logic application without actually loading the table. It will check for schema names, tables and columns without loading the data.
Step 6: Destroy a bundle
Finally, you can destroy all jobs, pipelines and artifacts that were deployed by just running:
databricks bundle destroy
Destroying a bundle permanently deletes a bundle’s previously-deployed jobs, pipelines, and artifacts. This action cannot be undone.
In our case it will delete the deployed job as well as delete resources folders that were created.
We've reached the end of bundles' lifecycle. In a few steps, you can run code from your machine to test your app on Databricks. This gives you more confidence to push your changes to production, as you tested it end-to-end.
Are DABs a replacement for Terraform code?
If you are familiar with Terraform, you probably noticed the similarity between validate, deploy and destroy commands with the ones you find in Terraform. The reason is because as we saw, DABs run Terraform code behind the scenes. Then a natural question is: which parts of our infrastructure should stay in Terraform and which in Databricks Asset Bundles?
One important aspect of adopting a new tool is to understand its purpose and limitations. From Databricks official bundles documentation:
"Databricks Assets Bundles are an infrastructure-as-code (IaC) approach to managing your Databricks projects."
As Alex's post Terraform vs. Databricks Asset Bundles explains, bundles manage project-level resources. They also simplify deployment across multiple environments. All high-level infrastructure, such as Workspaces, Metastore, Catalogs, and Cloud resources, should be managed via Terraform, not bundles. This includes Access Control over those objects.
For our case, we can see that a workspace, a catalog, and a personal cluster compute should be provided outside bundles. On our repository we defined then a job-cluster to execute the code, which environment to deploy artifacts and files, and our application itself, a Python wheel package. We also can manage permissions on project's level.
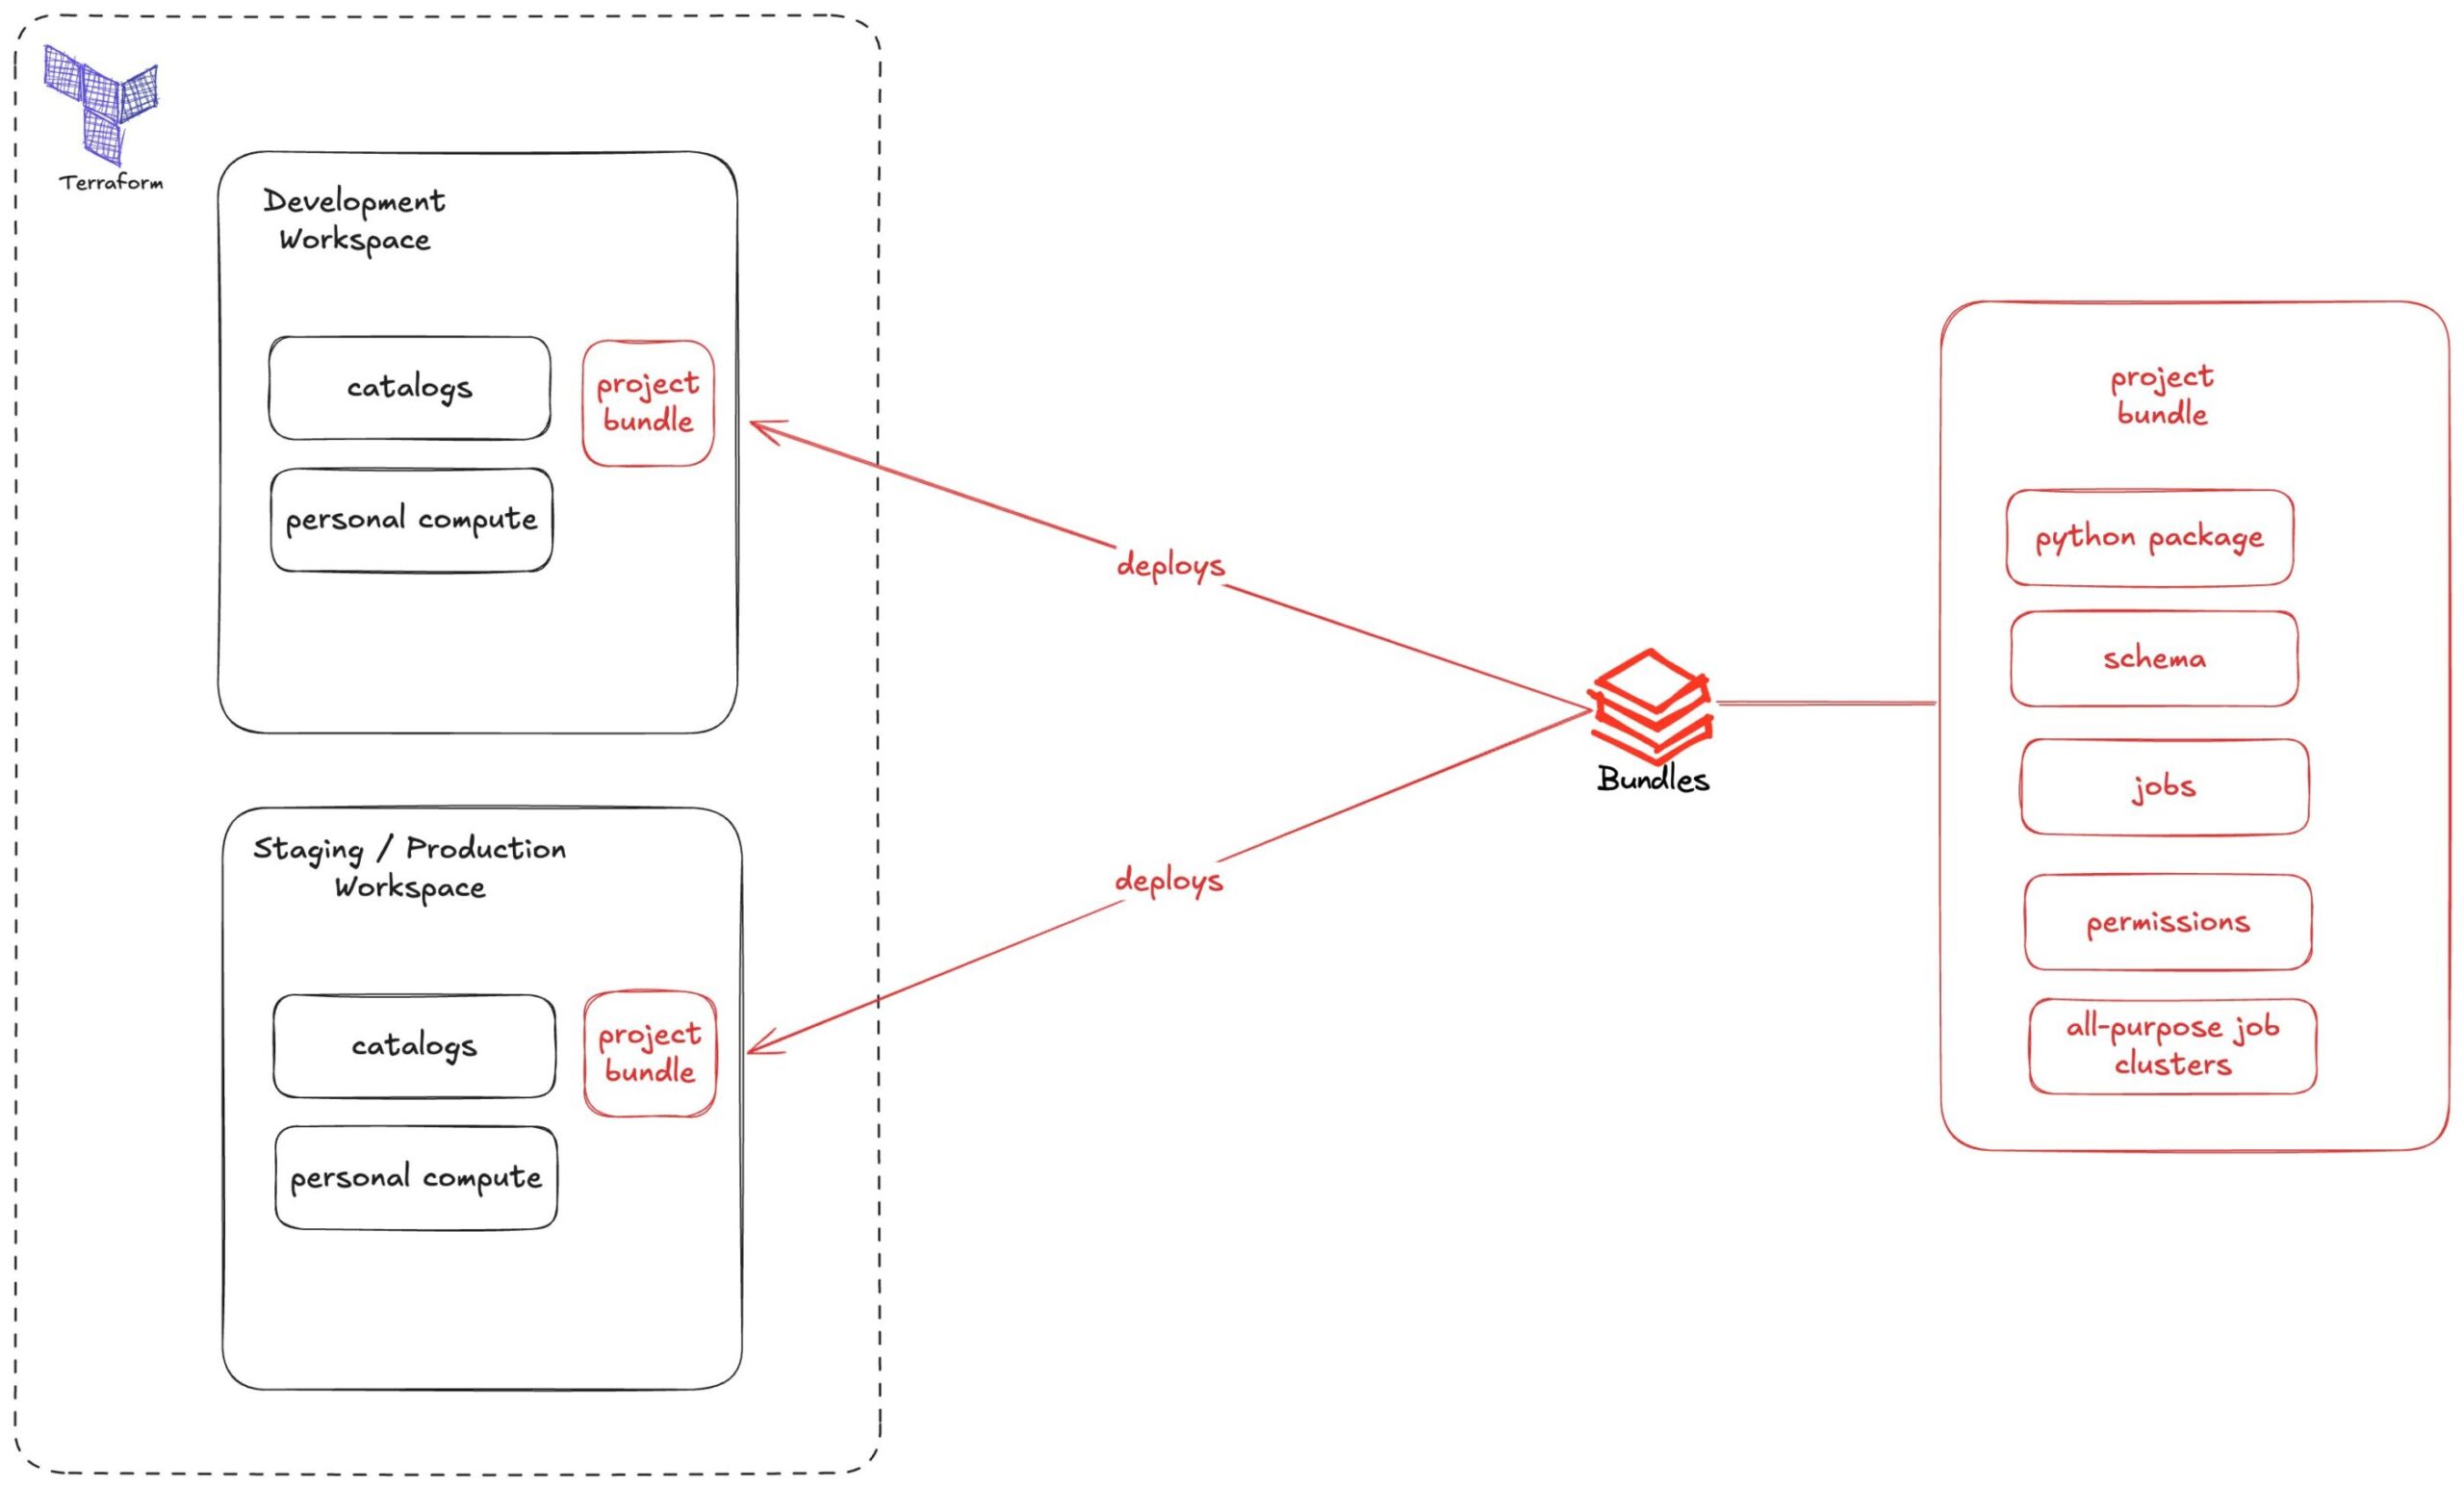
In the above diagram we see how bundles will be a smaller chunk of logic that will represent all of your project's dependencies and how it interacts with Terraform's deployed resources such as different workspaces and catalogs.
Conclusion
In this first part of the series, we introduced Databricks Asset Bundles. They are a vital tool for data practitioners. They help to streamline development while following software best practices. We demonstrate how you can easily set up a project with just a few YAML files and a few CLI commands to initiate, validate, deploy, run and eventually destroy all of your job-specific resources and configuration. We also touched upon which parts of your infrastructure should be handled by Terraform and which ones should be handled by DABs. In the next part of this series, you are going to learn how bundles simplify deployment isolation, how to use your own cluster to speed up your job runs during development, adding resources beyond jobs, such as schemas or MlFlow experiments, using presets to customise job deployment per target and how to use custom variables to augment bundles' capabilities to fit your project's needs. In the meantime, I invite you to explore DABs and test them in your projects.
Written by
Victor De Oliveira
I appreciate feedback: https://www.linkedin.com/in/victor-de-oliveira-b0634449/
Our Ideas
Explore More Blogs


Contact