Blog
Automate Sensitive Data Protection with Metadata-Driven Masking

Data Access Management is hard
One of the core jobs of a data professional is to handle data responsibly. If you get access to data and make it available for others to consume, you need to make sure you know what it is and for what different purposes it can / cannot be used. Consequently, you want to be in control of who can / cannot access your data.
However, without a clear and simple process, data access management can become both messy and tedious, especially if there are many manual steps involved. At some point it can even feel like trying to stay in control is distracting you from making impact at your job.
In this blog post, we want to tell you about our recent effort to do metadata-driven data masking in a way that is scalable, consistent and reproducible. Using dbt to define and document data classifications and Databricks to enforce dynamic masking, we ensure that access is controlled automatically based on metadata. As long as you correctly specify your data classifications, data access is provided automatically.
Let's take an example
Say your data is divided in two categories: personal and non-personal data. And that some people in your company should be allowed to view that personal data, while others should not.
And let's say you have an employees table that looks like this:
| employee_id | first_name | yearly_income | team_name |
|---|---|---|---|
| 1 | Marta | 123.456 | Data Engineers |
| 2 | Tim | 98.765 | Data Analysts |
You could provide access to this table in different ways. In different scenarios, you could:
- not provide access at all,
- provide access only to some columns (let's say the non-personal ones)
- provide access only to some rows (e.g. only the data for one team)
- provide access only to some columns and some rows
- provide access to all data
In this blog, we're focussing on a way to automatically manage access to this table using dbt metadata, combined with Databricks Unity Catalog.
For simplicity, we will focus on distinguishing between scenario 2 and 5. However, this method can be extended to cater for the other scenarios.
In our example we want some people (in the group can_handle_personal_data) to be able to use the entire table. While people that are not part of this group can only see the non-personal data. When they query the table, we want it to look like this:
| employee_id | first_name | yearly_income | team_name |
|---|---|---|---|
| 1 | NULL | NULL | Data Engineers |
| 2 | NULL | NULL | Data Analysts |
Options
When it comes to implementing this flavour of data access within our Databricks and dbt setup, there are two primary approaches we can consider:
1. Split up data into "masked" and "unmasked" schemas
One common approach is to create separate schemas within your data platform: "masked" schemas and "unmasked" schemas. In this setup, you are effectively managing access by dividing datasets into two versions: one with plain, unmasked data, and another where all sensitive data is masked. This separation enable you to specify that only users with higher access privileges can view the unmasked data, while other (regular) users interact with the masked data.
- Advantages: This method provides a straightforward way to control access, allowing a clear distinction between data that can and cannot be accessed freely.
- Limitations: While splitting data into masked and unmasked areas works for simple cases, it is hard to scale to situations requiring more granular masking where a simple masked/unmasked split is not enough. Such situations will require further refinement or additional databases, complicating data management. It can also increase storage and compute cost, for re-processing your data and keeping separate copies for each "split".
2. Use dynamic masking
A more flexible solution is to use dynamic data masking to control what data each user or user group can see based on their access level. With this approach, masking functions are applied on-the-fly, altering the dataset based on the viewer’s permissions. This allows a single dataset to appear differently depending on the user’s access level.
- Advantages: Dynamic masking offers enhanced flexibility, making it easier to introduce and handle more split than just masked-unmasked and apply it consistently. It reduces storage and compute costs, by eliminating the need for multiple versions of the same data. All users can use the same data, but will see different versions based on their access levels.
- Limitations: Dynamic masking may be experienced as a bit less explicit. The name of your schema will not include a hint like "masked". You will need check table definitions (or a catalog) to see which columns are masked and how. Users who can only access masked data, will need to get used to this.
Metadata driven dynamic masking
In this blog, we will walk through a solution that leverages implementation of the automated data masking based on a well-defined classification system. The solution consists of three main steps:
- Agree on Data Classification: the first step is to define a clear classification system for your data, distinguishing which data should be masked. This agreement lays the foundation for consistent handling of sensitive information across your team and ideally should be standardized at an organizational level.
- Classify Your Data: with the classification framework in place, we systematically apply it to all relevant columns in our datasets. By documenting the data classification and data type within dbt YAML files, we create a version-controlled, central repository of metadata that guides our masking strategy, specifically using dbt documentation features.
- Masking function generation: we create SQL functions in Databricks separately from applying them. This separation of function generation and application ensures flexibility, security, and minimal manual intervention.
- Automatically Apply Masking to Your Data: finally, we implement automated data masking using a combination of Databricks SQL functions and dbt post-hooks. The masking functions applied dynamically in dbt based on the documented classifications.
1. Agree on types data classification
The first step in the implementation is reaching an agreement on what data needs to be masked. This involves establishing a classification system that the entire team can use to differentiate between data accessible to everyone and data that should be restricted from the broader audience. If you’re handling personal data, GDPR classification is a common framework to define clear access boundaries. In our example, we will use a simplified classification with two categories: non-personal and personal data. Naturally, we should apply masking to the personal data. It’s important to design a flexible classification framework from the start, allowing for future expansion. As new data sources are integrated or as business requirements change, you might need to add new categories or refine existing ones. Our example classification can be extended, for instance, by introducing a sensitive-personal category or adding a second classification layer for business sensitivity.
Here's our example data again, now with the classifications included:
| employee_id (non-personal) |
first_name (personal) |
yearly_income (personal) |
team_name (non-personal) |
|---|---|---|---|
| 1 | Marta | 123.456 | Data Engineers |
| 2 | Tim | 98.765 | Data Analysts |
2. Classify all of your data
There are multiple ways to store the metadata — GDPR class and data type — needed for masking. The key requirement is that the data must be accessible wherever masking is applied. For example, tags can be applied in data warehouses as additional metadata attributes, or you can use a data catalog for storing metadata. Alternatively, this metadata can also be stored in separate files in a central repository for a single source of truth.
In our setup, we use dbt, and dbt’s YAML documentation which provides a reliable, version-controlled place to store the metadata classes required for masking. YAML is particularly well-suited for this use case because it is both machine-readable and human-readable. Using the example table from above, we document it as follows:
models:
  - name: data_masking_example
    description: Dummy data to show data masking
    columns:
      - name: employee_id
        data_type: int
        description: Data identifier
        meta:
          gdpr_class: Non-Personal
          primary_key: Y
        tests:
          - not_null
          - unique
      - name: first_name
        data_type: string
        description: First name of employee
        meta:
          gdpr_class: Non-Personal
          primary_key: N
      - name: yearly_income
        data_type: string
        description: Yearly income of employee
        meta:
          gdpr_class: Personal
          primary_key: N
      - name: team_name
        data_type: string
        description: Name of team employee is part
        meta:
          gdpr_class: Personal
          primary_key: N
For large dbt projects or multiple projects, maintaining documentation can be challenging. Although it is each developer’s responsibility to update documentation after any change, enforcing this can be difficult. Here are some tools that can help:
- dbt-osmosis: This tool supports the automatic generation of documentation by inheriting metadata from other models. It can significantly streamline the documentation process by generating columns and data types lists, which is useful for minimizing documentation upkeep over time.
- dbt-bouncer: This tool enforces compliance with required documentation fields, ensuring that users adhere to set documentation standards.
Note that, if your company does acquire a data catalog tool, you can use the metadata you've started gathering in your dbt project, to populate the data catalog with valuable metadata.
3. Create masking functions
To maintain security and control, we separated the creation of masking functions from their application. We ensure that users who apply the masking functions cannot modify them. In fact, we make sure no one is able to change the masking functions without going through a review process.
The Python script below iterates over combinations of GDPR classes and data types present in our configuration and creates a masking function for each. Note that we need separate functions per data type, as the masked data should have the same type as the original data, to avoid type mismatches. For each function, we check which user groups should have access to unmasked data, and return NULL otherwise.
Note that we don't need to create masking functions for the class "non-personal" as that data doesn't need to be masked.
# simplified examples of the config
data_types = ["string", "int"]
gdpr_classes = ["personal"]

# mapping of the GDPR levels per access groups
access_groups = {"can_handle_personal_data": ["personal"]}

for data_type in data_types:
  for gdpr_class in gdpr_classes:
    print(f"Creating masking function for {data_type}, {gdpr_class}")

    # Get the access group which has access to the data
    gdpr_specific_groups = [
        group_name
        for group_name, gdpr_classes in access_groups.items()
        if gdpr_class in gdpr_classes
    ]
    groups = " OR ".join([f"is_account_group_member('{group}')" for group in gdpr_specific_groups])

    # Create the function name by combining data type and the GDPR class
    function_name = f"mask_{data_type}_{gdpr_class}"

    sql_query = f"""
        CREATE OR REPLACE FUNCTION {function_name}(val { data_type })
        RETURN
        CASE WHEN { groups } THEN val ELSE cast(null as { data_type })
        END
    """

    spark.sql(sql_query)
Each iteration in the Python script generates a SQL function within a specific schema. To ensure seamless functionality, it’s important that all developers and jobs across relevant environments have "USE" access to these functions. The function names are a combination of the data type and the GDPR class, and they are later referenced in dbt using the same naming convention. Therefore, maintaining a clear and consistent naming strategy is essential.
In our implementation, the masking function replaces values with NULL. However, there are other approaches you might consider, such as hashing strings, binning numeric values, or using placeholder dates. The following example demonstrates a function that masks integer values containing personal data, showing NULL to users who are not part of the can_handle_personal_data group.
CREATE OR REPLACE FUNCTION mask_int_personal(val int)
  RETURN
    CASE WHEN is_account_group_member('can_handle_personal_data')
    THEN val
    ELSE cast(null as int)
  END;
As a final note on function generation, ensure that the workers or service principals running automated jobs have access to unmasked data. This means they need to be included in the group that permits unmasked access to the data.
4. Apply masking functions
The application of the masking function is intentionally separated from its generation. The masks are applied to the data in dbt using a post-hook, which we configured in the dbt_project.yml file to apply across all models. By setting this function directly under models, it will execute universally, regardless of model path.
models:
  +post-hook:
    - "{{ dbt_macros.apply_masking_to_model(this) }}"
In our case, we created the following macro for applying of the masking functions:
{% macro apply_masking_to_model(model) %}
    {# Apply dynamic masking function to a model. We assume the model is materialized as a table to be able to re-create the table each time. #}

    {% if execute %}
        {{ log("Model: " ~ model) }}

        {# Get the model equal for which this post-hook is executed #}
        {% for node in graph.nodes.values() | selectattr("resource_type", "equalto", "model") | selectattr("name", "equalto", model.table) | selectattr("schema", "equalto", model.schema) %}
            {# Iterate over each column and apply masking function to each #}
            {% for column_name, column in node["columns"].items() %}

                {# Extract metadata from documentation #}
                {% set data_type = column_data["data_type"] %}
                {% set gdpr_class = column_data.get("meta", {}).get("gdpr_class", "sensitive-personal") %}

                {# Generate function names #}
                {% set function_name = "mask_" ~ data_type ~ "_" ~ gdpr_class %}

                {# Apply function #}
                {% set apply_masking_code -%}
                    ALTER TABLE {{ model }} ALTER COLUMN {{ column_data["name"] }} SET MASK {{ function_name }}
                {%- endset %}

                {% do run_query(apply_masking_code) %}
            {% endfor %}
        {% endfor %}
    {%endif%}
{%- endmacro %}
In the macro, we leverage the dbt graph nodes to extract the fields needed for masking. By using graph.nodes.values(), we can iterate over all nodes in the graph. To efficiently target specific nodes, we apply selectattr to filter the graph down to the required node. Once the correct model is selected, we proceed with operations on each column, extracting the GDPR class and data type from the graph node.
The GDPR class is optional. If a user does not specify the GDPR class, we default to the most restrictive class for safety, ensuring that data is protected even if documentation is incomplete. The data type, however, is a required field and must be specified and kept up to date for all columns. Using these two values, we generate the appropriate masking function name and apply it to each column in the model. Below is an example of the SQL code applied by this macro:
ALTER TABLE masking.example.test_masking_table ALTER COLUMN yearly_income SET MASK USING mask_int_personal;
In our example, the ALTER TABLE statement is executed for each column in the model. If working with models containing a large number of columns, consider grouping ALTER TABLE statements to optimize execution speed.
After applying the masking to each column, the results can be validated in Databricks. Each table should reflect the new column-specific masking function, as seen in the example below:
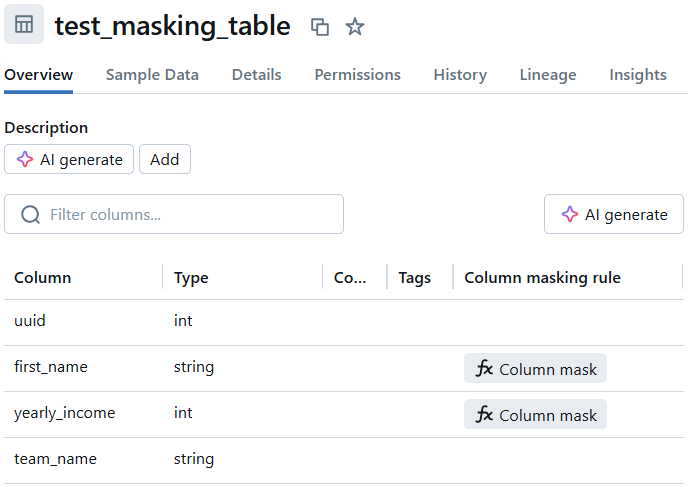
A SELECT * FROM example_table should then reflect the applied masking, where we should not be able to see the personal columns any more, as suggested before:
| employee_id | first_name | yearly_income | team_name |
|---|---|---|---|
| 1 | NULL | NULL | Data Engineers |
| 2 | NULL | NULL | Data Analysts |
Where for users in the group can_handle_personal_data, the result of the same query should look like this:
| employee_id | first_name | yearly_income | team_name |
|---|---|---|---|
| 1 | Marta | 123.456 | Data Engineers |
| 2 | Tim | 98.765 | Data Analysts |
Limitations
While our solution for automated data masking provides a flexible and scalable way to manage sensitive data, there are some limitations and potential areas for improvement. While these are not (all) unique to our chose implementation, we want to list a few of them here:
Performance penalty in dbt
For effective masking, each model needs to be checked for personal data immediately after its creation. Every time a masking function is applied, an ALTER TABLE SQL statement needs to be executed. In the Databricks SQL dialect, these statements cannot be combined, meaning each masking operation runs separately. This can become time-consuming, especially when working with a large number of sensitive columns. To mitigate this, it’s crucial to carefully evaluate which columns truly require masking and avoid unnecessary masking to prevent long-running jobs. Also, we want to look at avoiding the ALTER statements by including MASK clauses in the CREATE TABLE statements (described here).
Development on masked data
Working with masked data can create issues for developers. Testing implementations or analyzing the data may be problematic if the developer does not have access to the unmasked version. A similar issue might arise when performing operations like JOINs, where masked data might have values replaced with null or placeholders like ***. This challenge isn’t unique to our approach; it’s a general issue when working with masked data. A best practice is to allow developers to work with "safe" or synthetic datasets where masking isn’t required. By clearly marking these sources as safe for development, we can reduce the need for masking in those environments.
Data misclassification
As the project grows and new datasets are added, the use cases and data requirements may evolve. Given the performance cost of masking operations, it’s important to regularly review the classification of datasets to ensure accuracy. This is particularly critical when dealing with personal data, as the classification may need to be updated to comply with changing regulations. Regular audits and reviews can help ensure that data is classified correctly and that masking is applied appropriately.
Extending to more materializations
The approach above works fine for any dbt materialization resulting in a table, but doesn't for views. This is because views don't support the same MASK clauses. Adding support for views would require a different approach.
Technical Limitations to dynamic masking
There are still some limitations on how you can apply dynamic masking and how you can use datasets with dynamic masking applied. They are listed here and examples include the type of compute cluster you can use.
Written by
Marta Radziszewska
Data Engineer


Contact