Blog
A first look at the UI library of AWS Amplify Studio

Last re:Invent AWS launched AWS Amplify Studio as an extension to the current AWS Amplify service. It allows you to create full-stack applications using a visual development environment and with little coding. In this guide I will walk you through creating a simple frontend using the new UI library and share my view on it.
What is AWS Amplify Studio?
AWS Amplify offers a set of tools to simplify the development of full stack serverless applications. Within a few minutes you can configure a backend and connect it to your web or mobile app. However, connecting your frontend to the backend or integrating different Amplify features does still require quite some coding.
With the new Amplify Studio features, AWS aims to take away a bit of that coding. It allows you to import a Figma design into Amplify Studio and create a UI in the visual development environment directly from your browser. Using automatically mocked data you can bind the models to the different components in your frontend and create a rich UI. Whenever you are ready, you can export the artifacts as code and use it in your application where you still have the flexibility and control to change things around.
Who is it for?
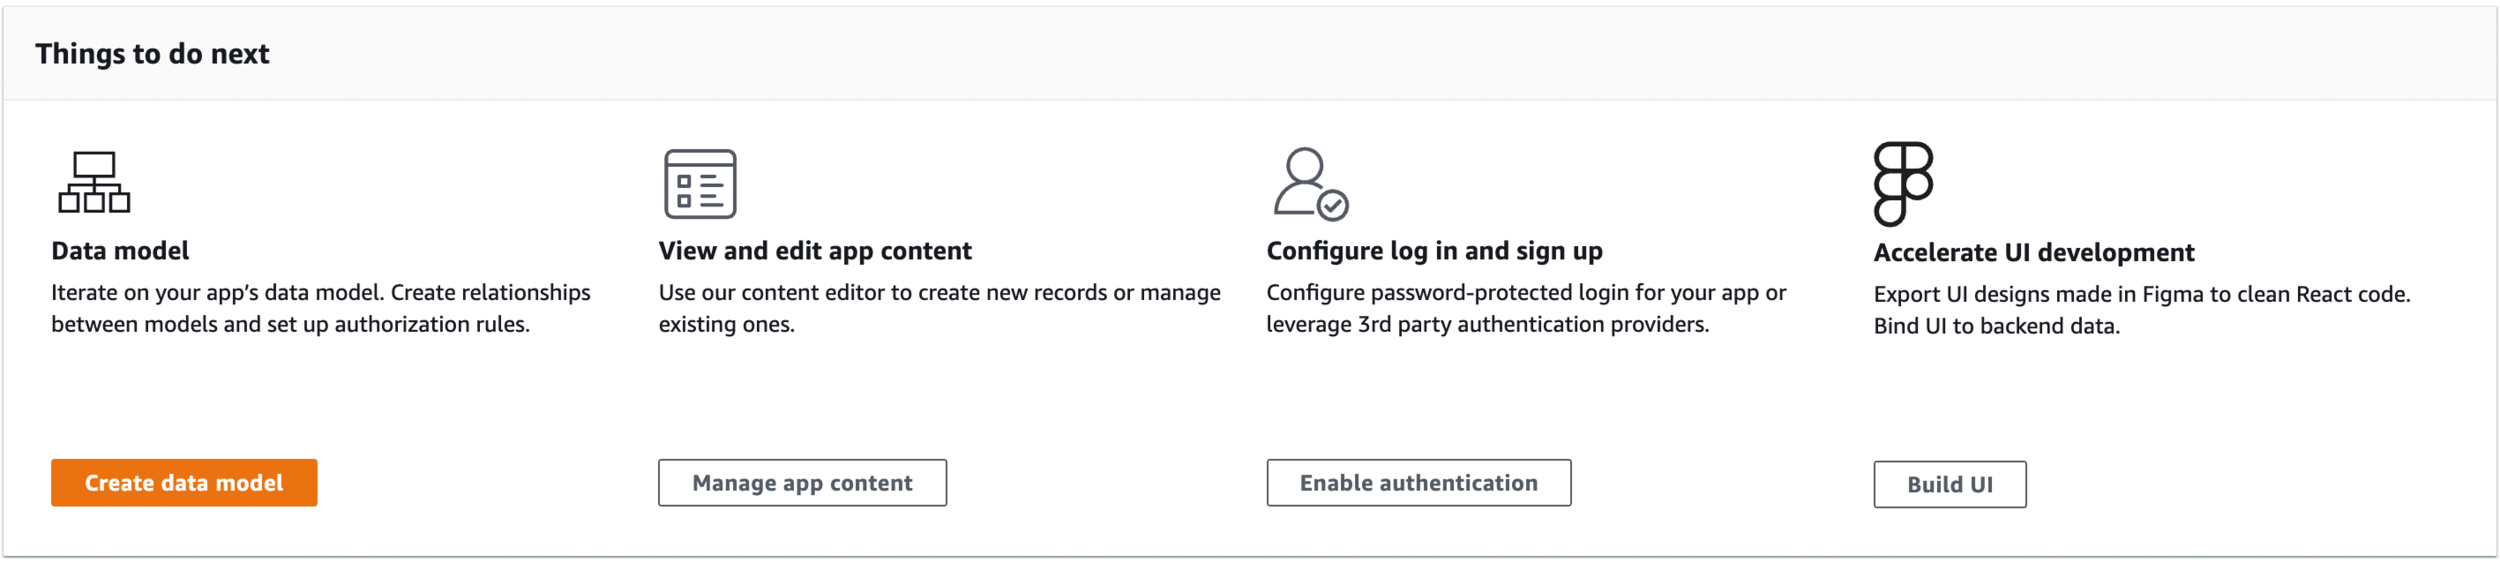
AWS Amplify is mainly focussed towards frontend developers and development teams that want to create full stack serverless applications. With the new features of Amplify Studio, previously Amplify Admin UI, you can also include your designers to take a bigger part in the development of the app.
How does it work?
Amplify Studio allows you to create large parts of your application from the browser. However you are not limited to keep working from the browser. Together with the amplify-CLI you can switch between different development environments by pulling and pushing changes to AWS Amplify Studio.
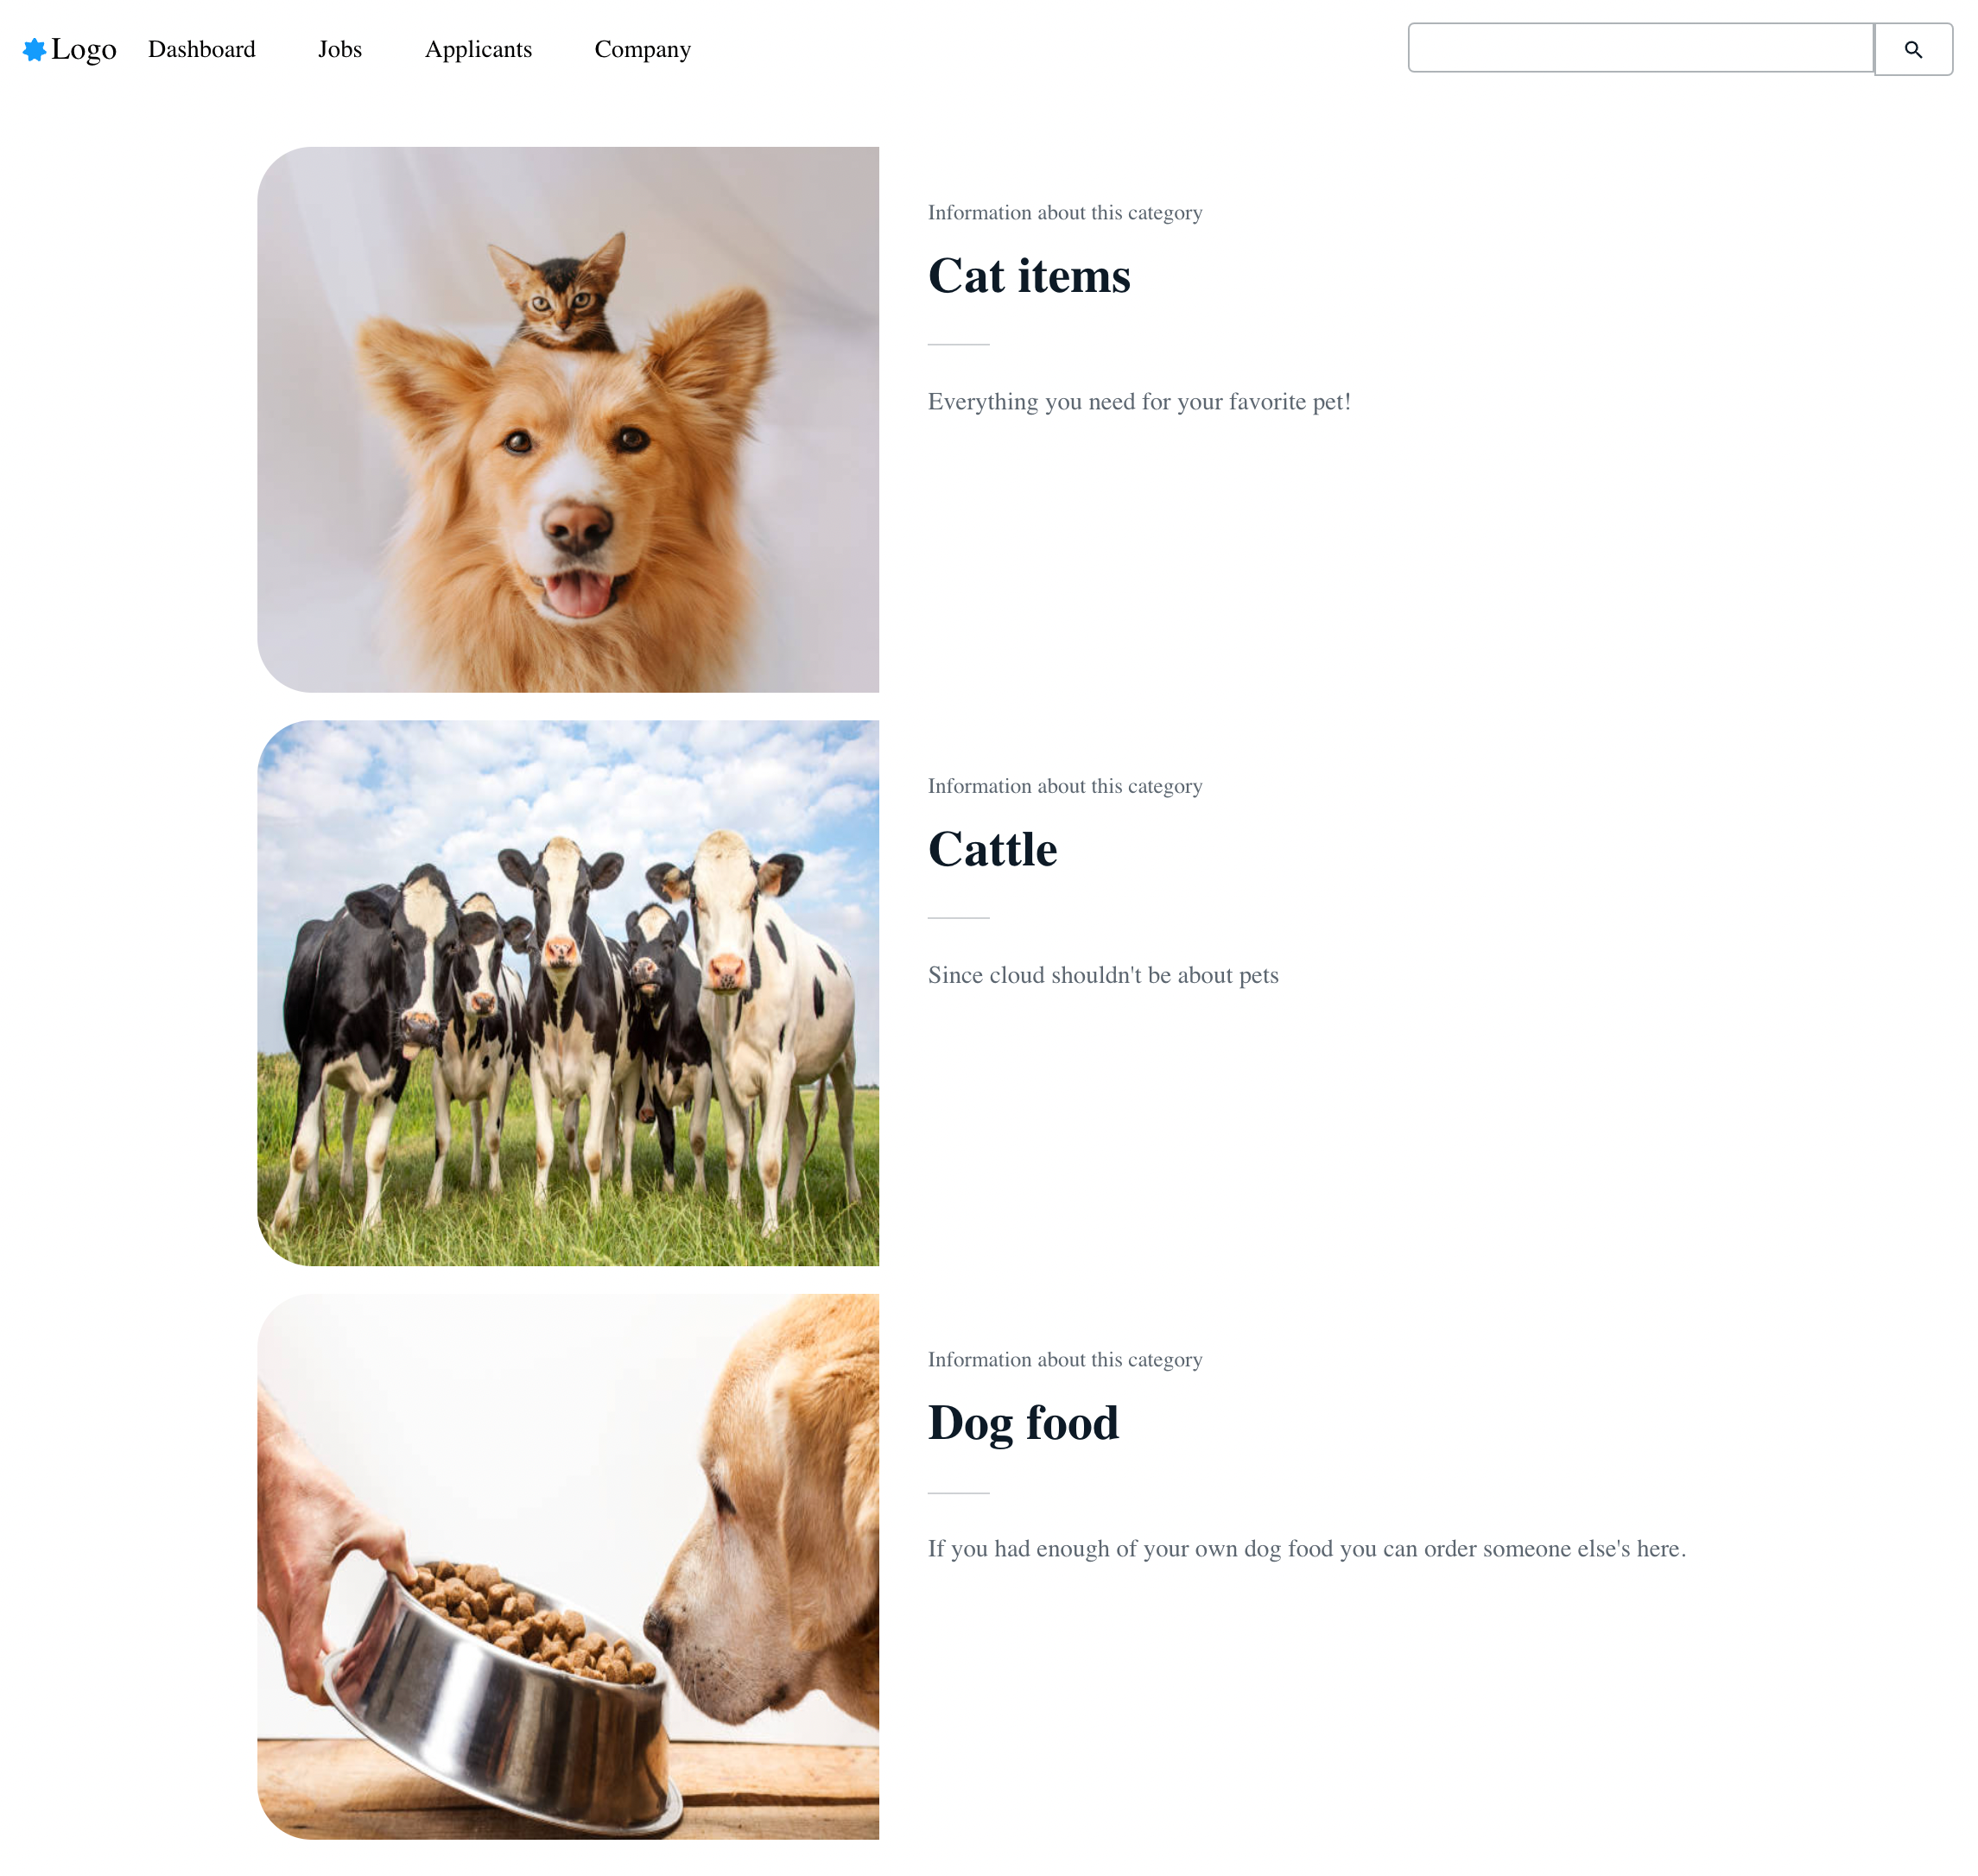
The first step in the development workflow is to design our data model. In this guide we will be setting up a pet store where you can buy cool stuff for your favorite pet. We start by creating a Category with a name, description and an image. Categories will hold our other model, a Product. Products have a name, description, price and image. We also define a relation between a category and product as a 1-to-N relationship, one category can have many products.
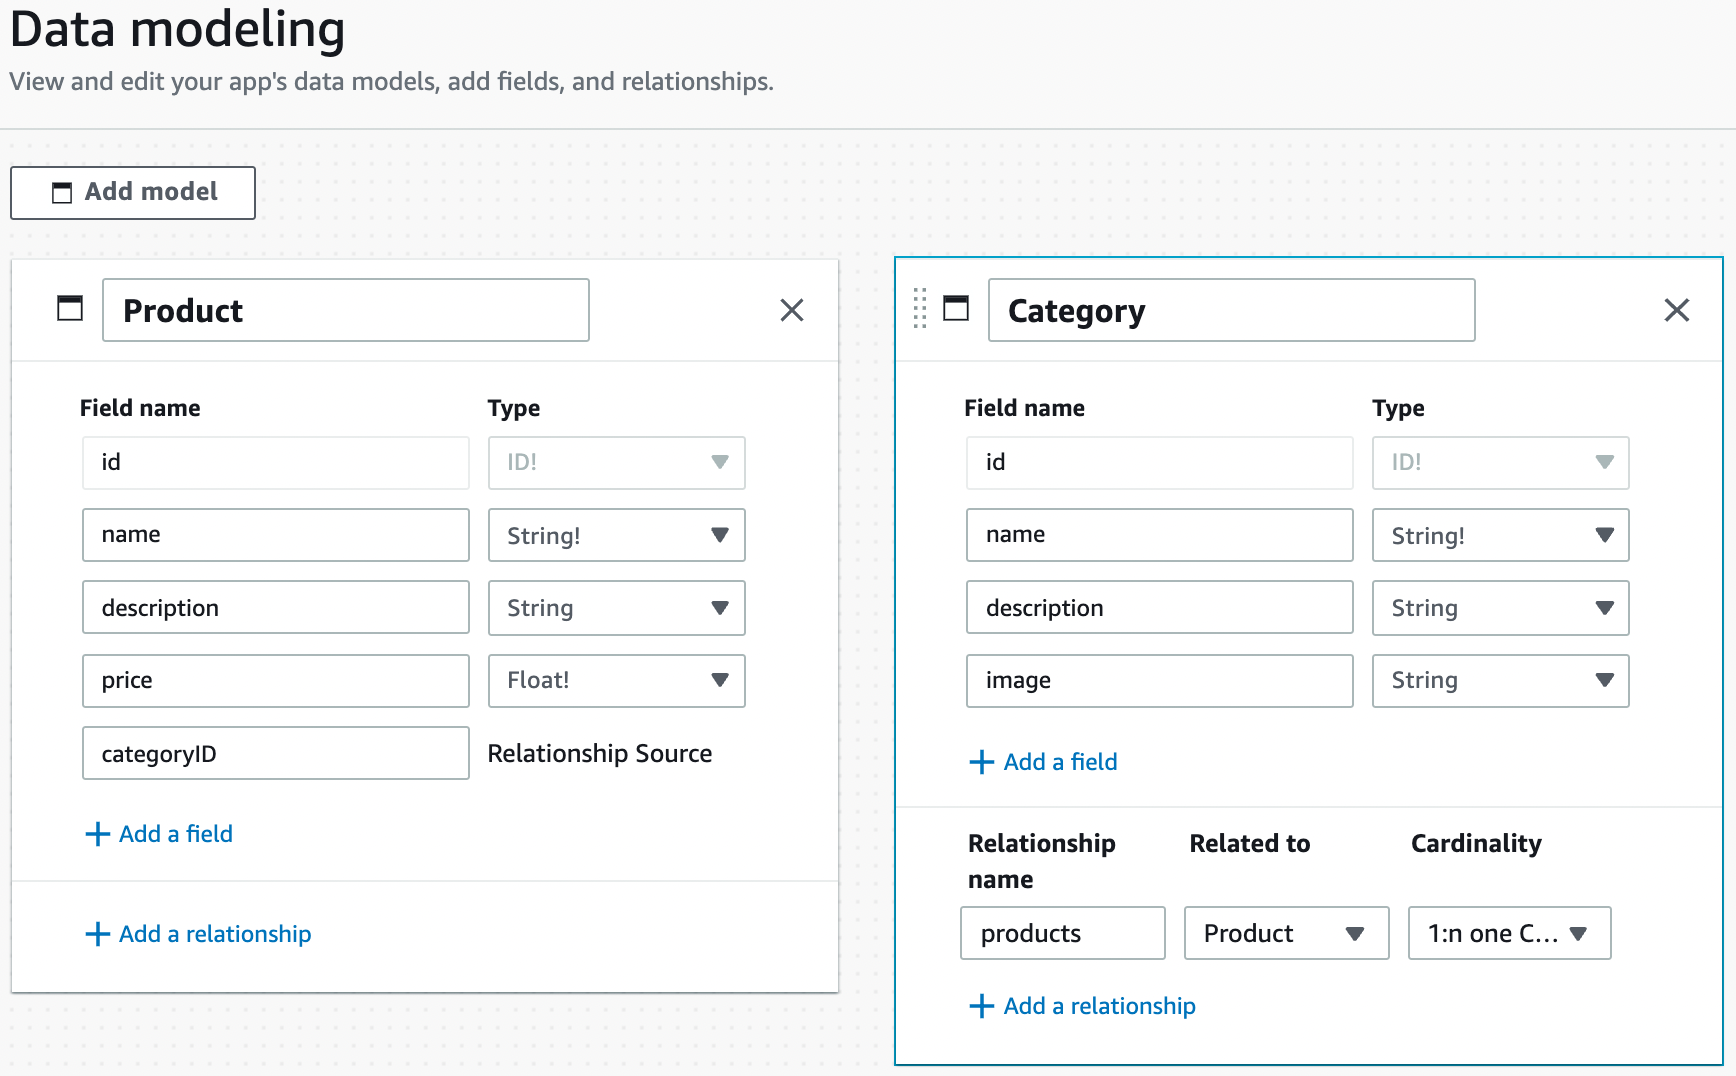
Now that we have our models ready we can hit “Save and Deploy” and have AWS deploy the initial tables and API that can be consumed by our application.
After everything is deployed you can enter some testing data in the Content section of AWS Amplify Studio. One cool feature that can be very useful during testing is the ability to seed your database with some auto generated test data. For this example we will just quickly create a few categories manually.

Please note that we didn’t change any of the authorization rules and that we are going to skip the login and sign-up part of the application. This will allow anonymous users to read als also write data in your application, something you definitely want to change in the real world.
Now for the fun part, actually creating a frontend application based on a Figma design. AWS supplies a Figma template with a lot of example components and primitives that can be used to create your own design. After duplicating the Figma AWS Amplify UI Kit into your own Figma account you can get started by altering the provided components or by creating your own. When you are done you can import the design into the UI Library of Amplify Studio by using the Figma url. Each component that you created in Figma will show in the Amplify UI Library where you can either accept or reject it for import.
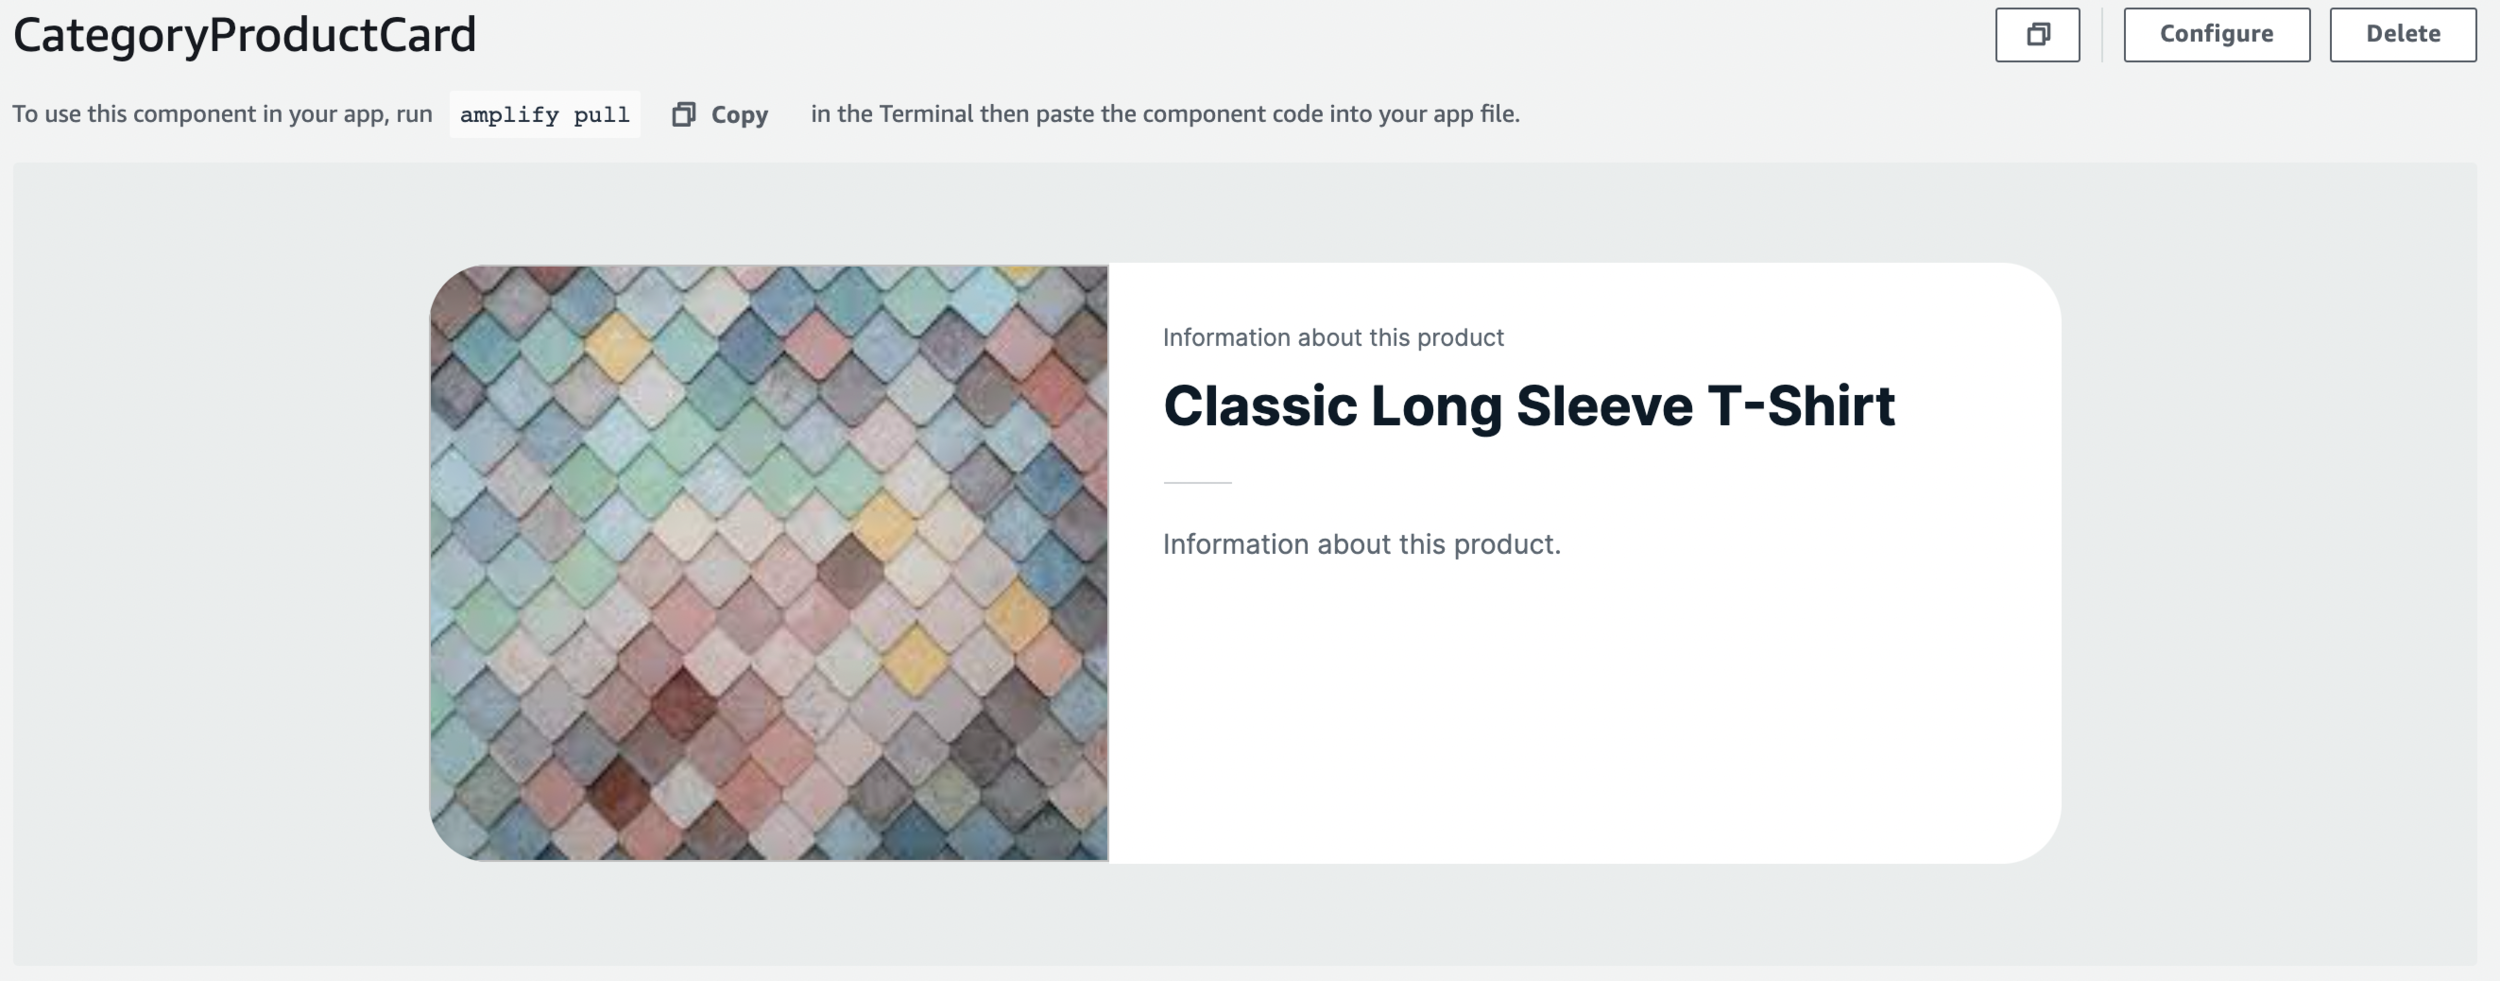
Here you see an example component from the template with some mandatory rounded edges. To use this component and have it show the required data just click “Configure”. On the right side you can add component properties and child properties to each selected object in the component. Click “Add prop” on the component, give it the name “Category” and a type of Category from our models. Next click on the image in the component and “Set prop” on the right side of the Child properties. There you have a list of properties that you can set. Select src as the property and category.image as the value.
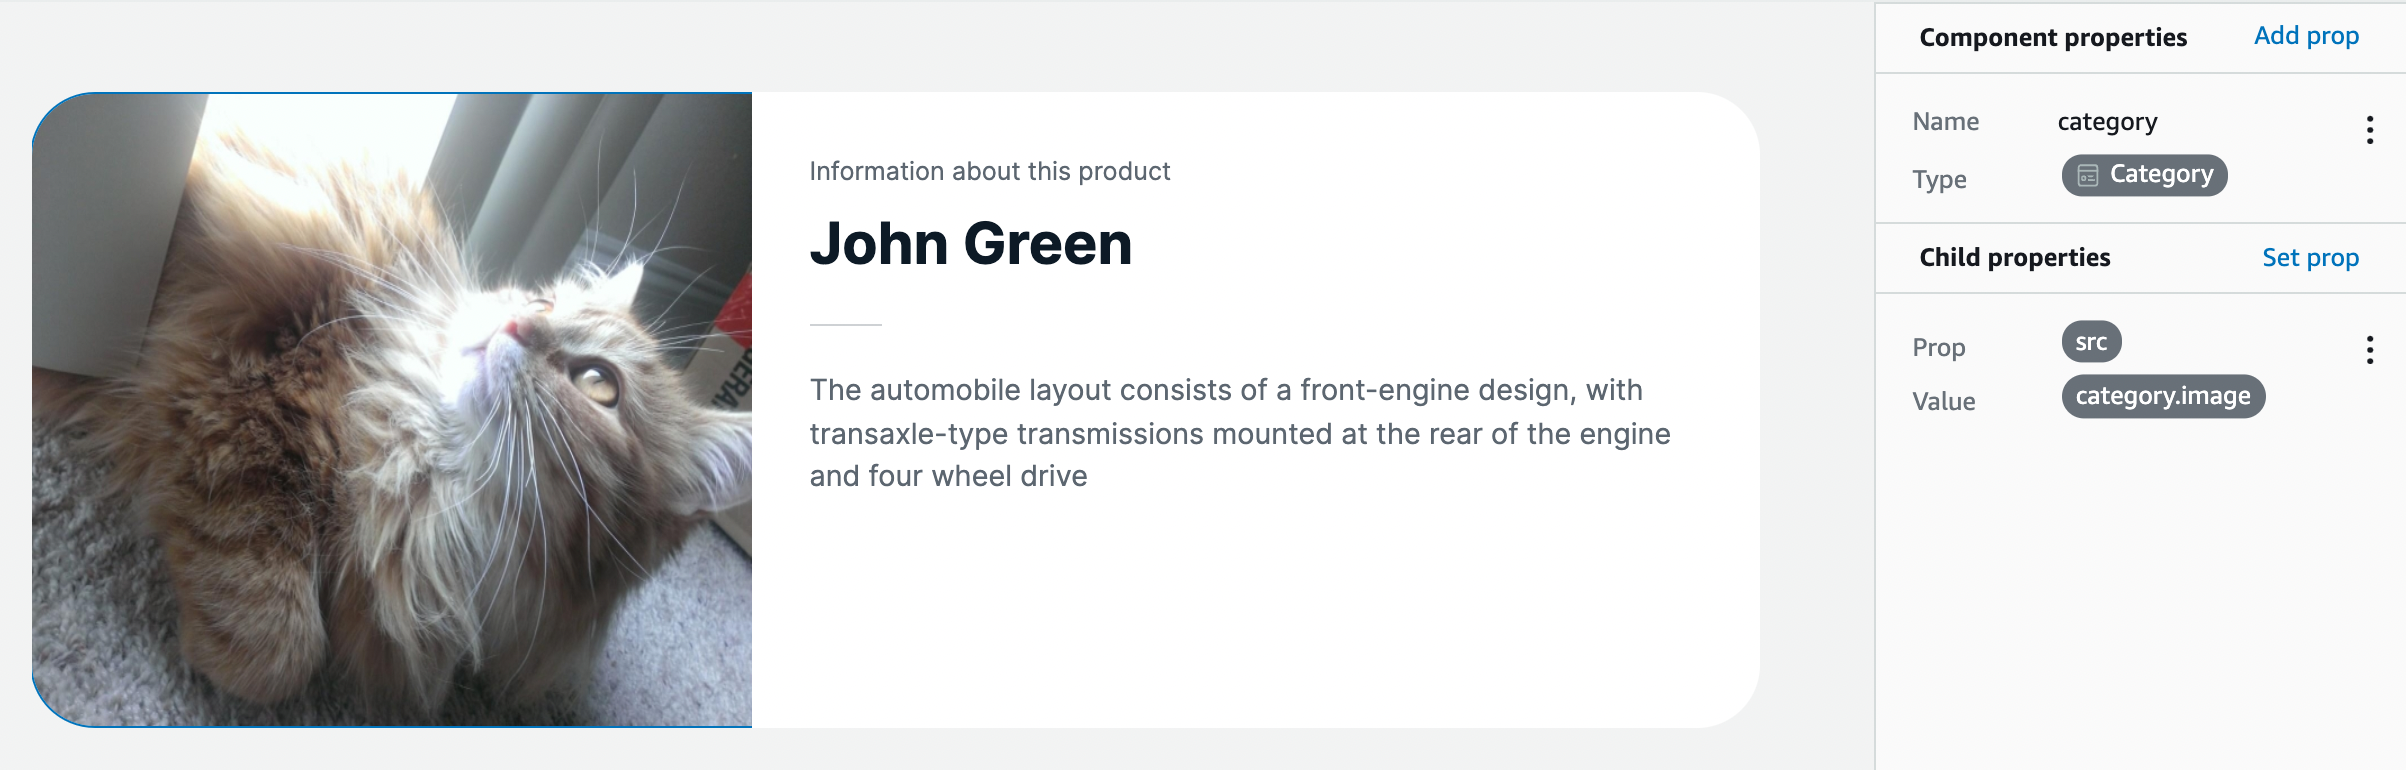
Do the same for the title and the description, just select “label” as the property and assign it the correct value of the category. When all properties are set, click “Create collection” to have it display a list of categories. As the collection consists of a component with a category as property it already selects the Category as the data source. Next you can either change the visual display of the list or alter the data collection itself. After you are done the component is ready to be used in your React frontend.

To use it in your own application you need to create a React app. Here we will set up a very minimal app with React and Amplify.
npx create-react-app pet-store
cd pet-store
npm install aws-amplify @aws-amplify/ui-react
Next in the src/index.js file we add:
import Amplify from 'aws-amplify';
import "@aws-amplify/ui-react/styles.css";
import  from "@aws-amplify/ui-react";
import awsconfig from './aws-exports';
Amplify.configure(awsconfig);
and wrap the App component with the newly imported AmplifyProvider. Now we need to get this project connected to the one we created in Amplify Studio. This can be done by issuing an amplify pull command. For the initial pull you need to specify your appId and environment. These can be found in the top right corner of AWS Amplify Studio when you click on “Local setup instructions”. This will connect the React project to the Amplify Studio and pull in the generated React components.
To use the imported models you can take a look at some of the example code that they give you in the “Get component code” section when you configure a component or collection. In this example I have imported the CategoryProductionCard and the NavBar from the Figma design and the CategoryProductionCardCollection that we created in the Amplify UI Library. Change the contents of src/App.js to:
import    from '@aws-amplify/ui-react';
import '@aws-amplify/ui-react/styles.css';
import { CategoryProductCardCollection, NavBar } from './ui-components';

function App() {
 return (
   <div className="App">
     <NavBar />
     <Flex
       justifyContent="center"
       margin=
     >
       <CategoryProductCardCollection />
     </Flex>
   </div>
 );
}

export default App;
and run ‘npm start’ to see your new collection in action!
Please note that you should not alter the ui-components directly in the source since those changes might be overwritten when running ‘amplify pull’. To change components you can use the component overrides, like for example:
const categoryOverrides = {
 'Collection.CategoryProductCard[0]': {
   onClick: () => {
     console.log("Category clicked!")
   },
   style: {
     cursor: 'pointer'
   }
 },
}

...

<CategoryProductCardCollection overrides= />
If you need more advanced changes you can also make a copy of the component, give it another name and make your changes in the copy.
The onClick override given in the example code above can also be used to start navigating in the application. For example to open the category and show the products in the category. However I will leave that as an exercise for the reader.
Conclusion
In this blog post I mainly focussed on using the new UI Library section of AWS Amplify Studio to show what it can currently do. Please note that it is still in preview and will probably gain more and more features in the coming period. Still, even in this phase the new UI Library looks really promising, making it very easy to convert Figma components into ready to use React components with automated data fetching using Amplify Datastore. Not only can this improve development speed but might also allow your designer to join the team and make changes to the application without them needing to learn how to code.
More information on the new UI Library/Builder can be found on Figma to code/.
Written by
Andrès Koetsier
Andrès is our cloud native development hero, who likes to play basketball and crash MTBs and (virtual) racing cars.


Contact