Blog
Using Kotlin in a Java project: 10 lessons learned

One of the best ways to improve your developer experience when coming from Java, is to start using Kotlin. The benefits are numerous, but the huge benefit of null safety is (in my opinion) already enough to make the switch. Because of the great interoperability between Java and Kotlin, it is not difficult to start using Kotlin in a Java project. Rewriting all existing code is not necessary. You can start by writing all new code in Kotlin, and keep existing code in Java.
As you start using Kotlin in your existing Java project, you will very likely run into several issues, which require addressing. In this blog I want to share several lessons learned, in the hope they might help you as you embark on this journey.
0 – Defining a migration strategy
In the introduction, the first migration strategy was already mentioned: keep existing code in Java and only write new code in Kotlin. But that is just one suggestion, it might be good to consider what suits your needs the best.
If your codebase is small, you might consider to rewrite all existing Java code to Kotlin. IntelliJ has a feature to do this for you automatically via Code → Convert Java File to Kotlin File. This will only get you partly there though, the generated Kotlin code is often still very Java-ish and needs some refactoring to become clean and idiomatic Kotlin code. Since this strategy can be really time consuming, depending on the size of your codebase, ask yourself if it’s worth the time. It may be worth it, if the code you rewrite is in constant development. However, it probably is not worth it, if the code is hardly ever touched.
Another approach is to take smaller steps. In this case you write all new features in Kotlin and additionally rewrite all existing Java code touched by this new feature, but not any other existing Java code. With this strategy you avoid having to spend a lot of time upfront to rewrite your whole codebase. Instead, having a completely rewritten codebase is an end goal you work towards in small increments.
You can also distinguish what code to keep in Java and what code to rewrite to Kotlin, by looking at its function from an architectural perspective. For example, if you use the hexagonal architecture (also known as ‘ports and adapters’), it makes sense you want to have the inner part, your core business logic, rewritten to Kotlin. This way it can benefit from all Kotlin has to offer, and you can keep the outside code written in Java.
These are just some suggestions for your migration strategy. Whatever strategy you choose, it is at least good to consciously choose one. Just starting out and seeing where you end up, is probably a bad idea.
1 – You can mix Kotlin and Java files
There are two ways to structure your Kotlin and Java source code in your project. One is to have a separate src/main/java and src/main/kotlin package. One containing only Java files and the other only Kotlin files. However, and this was surprising to me, you don’t have to do this. You can also have your Kotlin files mixed with your Java files, both existing in the src/main/java folder.
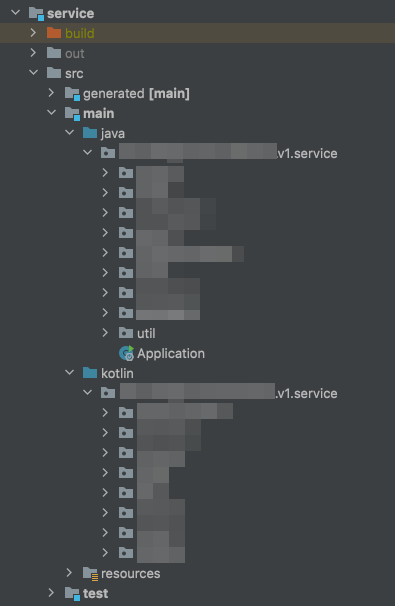 Java and Kotlin code in separate packages
 Java and Kotlin code mixed in the same package
Your IDE and the compiler can determine whether a file is a Java or a Kotlin file by looking at the file extension. Also, eventually both types of files will be compiled to JVM bytecode anyway. Therefore, the fact that the files are mixed is not a problem.
You can debate what is a more clean solution, separating your Java and Kotlin code, or have them mixed? Some would argue mixing is fine, because you want to organise your codebase by functionality, not by type of language used. Others like the clear distinction, to keep the ‘old’ and ‘new’ code separated in a way. This can also help when you transition to a new architecture, for example from a more layered architecture to a hexagonal architecture.
2 – Calling nullable Java code from Kotlin
If your codebase is still largely Java and partly Kotlin, it is likely you need to call a method written in Java from your Kotlin code. The return type of the Java method is nullable, because everything in Java can be null, but this is not directly obvious in your Kotlin code, where you call it. This can be a cause of NullPointerExceptions, when the Java method returns null and your Kotlin code does not expect this.
The return type of the following Java method can be either of type Supplier or null:
public Supplier getSupplier(String uid) {
  return [...]
}
One way to make this more obvious is to add the org.jetbrains.annotations.Nullable annotation above the Java method which is called and can return null. This will inform your IDE that you should use a safe call operator ?. on the result.
Another way to deal with this, is assign the result of the Java method to a variable in Kotlin, and explicitly define its type as nullable:
val supplier: Supplier? = supplierService.getSupplier(uid)
Of course this is more verbose than you would normally want to write your code, as you often will just write val or var and the variable name and let the compiler infer the type. However, in this case it might be better to explicitly define the nullable type.
3 – Lombok does not mix well with Kotlin
If your Java code has classes which heavily rely on Lombok, for example, using the @Builder annotation, this becomes tricky when calling this Lombok-generated code in Kotlin.The reason for this has to do with the compile dependency. If you run gradle build --dry-run in your project, you will see what tasks will be performed in which order. You will see that the step compileKotlin comes before compileJava. This means if your Kotlin code uses a method which first needs to be generated from a Lombok annotation to JVM bytecode, this will not be ready at the compileKotlin step yet.
You could change this compilation order around, but then you would not be able to reference Kotlin code from your Java code anymore.
2023-01-26: Since Kotlin 1.8.0 there now is support for certain Lombok annotations in Kotlin.
How to fix this?
There are several solutions. The easiest (quickest and maybe dirties) solution is just to de-lombok-ify the code you are calling from Kotlin. For example, if you have a Java class with a @Getter annotation and you call two of those getters on properties in your Kotlin code, explicitly add getter methods to the Java code again. In IntelliJ it is easy to generate these using the Generate action. I often add a comment above them explaining they are necessary for calling from my Kotlin code:
// needed for Kotlin code
public String getEmailAddress() {
  return emailAddress;
}
Other solutions include using the Lombok compiler plugin, which it is still experimental, or use kapt (kotlin annotation processor), which should be able to process Lombok annotations for you, so you can use that generated code from Kotlin.
Of course you can also opt to completely replace your Lombok-annotated Java classes by Kotlin data classes. That way you won’t have the issue of mixing Lombok and Kotlin. Just note that if you go for this approach, you might need to change a lot of existing Java code which, for example, used Lombok-generated builders and need some refactoring to work with the new Kotlin data classes.
4 – Using constructors instead of builders
If you are used to having (Lombok) builders in your Java code, you will probably need to get used to the Kotlin style of having an all arguments constructor instead. Of course you could manually write builders in your Kotlin code, but that is such a time-consuming laborious job, I don’t think you would want to go down that route. The nice thing is, you don’t really need to, because using named parameters, using an all arguments constructor in Kotlin is just as readable as a builder in Java.
To quickly write the all arguments constructor with named parameters, it is helpful to use the Kotlin Fill Class in IntelliJ.
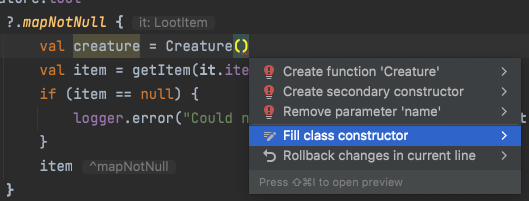 Using the ‘Fill class constructor’ action eases instantiating Kotlin objects
Unit tests
For unit tests, it can be quite cumbersome to fill the constructor for large domain objects. Often you only need a few of the parameters of the object for your test, and you will end up filling dummy data for most of the parameters. In these cases it can be useful to create a mock instead of a real instantiation of that large domain object, where you provide just the parameters you need in your test. This also makes your test a lot more focused, as it is free of clutter.
In Kotlin there are various testing frameworks as alternative to the widely used Mockito in Java. A good framework for this purpose is mockk. Mocking a large domain object can look like this:
val order = mockk<Order> {
  every { uid } returns "someOrderUid"
  every { entries } returns listOf(
    mockk {
      every { productCode } returns "123456"
      every { quantity } returns 3
    }
  )
}
Now you don’t have to define the 14 arguments of an order and the 13 arguments of an order entry, while you are only interested in the basic information of an order in this test. Expressing the parameters of your mock this way is very readable, especially when you have nested parameters.
An alternative approach would be to use template objects in your tests, which have some defaults set. In the test where you need them, you only change certain values needed for the test using the copy(…) function. This works well in two ways:
- in the test you clearly see which attributes are relevant – since you adjust them explicitly;
- a lot of mock behaviour boilerplate can be omitted leading to clean and readable tests.
5 – Kotlin alternative to Spotless for formatting
In Java you can use Spotless for code style checking. Using it helps to have a standardised way of formatting the code across your team. Before committing code to VSC one has to run the gradle command spotlessApply, and during the build in the CI/CD server, the gradle task spotlessCheck will be executed, which will fail the build if the code is not correctly formatted.
Although Spotless also supports Kotlin, it has some weird limitations. For example, it does not allow trailing commas in your Kotlin code and will fail with a cryptic error:
Step 'ktlint' found problem in 'src/main/java/[...]/YourKotlinClass.kt':
Expecting a parameter declaration
com.pinterest.ktlint.core.ParseException: Expecting a parameter declaration
      at com.pinterest.ktlint.core.KtLint.format(KtLint.kt:357)
Therefore, for the purely Kotlin projects you can opt to use an implementation of ktlint, the ktlint-gradle plugin. It offers a similar experience to Spotless. You need to execute the ktlintFormat task before committing code and ktlintCheck will be executed in the CI/CD during the build.
Taking the following, poorly formatted, code snippet as an example:
private    fun foobar( )   : Unit {
    val    baz="some poorly formatted code"
  if(true){
    println("hahahaha")
   }
}
Running the gradle task ktlintCheck will result in:
> Task :ktlintMainSourceSetCheck FAILED
/Main.kt:40:13 Unnecessary space(s)
/Main.kt:40:26 Unexpected spacing after "("
/Main.kt:40:29 Unnecessary space(s)
/Main.kt:40:30 Unexpected spacing before ":"
/Main.kt:40:32 Unnecessary "Unit" return type
/Main.kt:41:13 Unnecessary space(s)
/Main.kt:41:18 Missing spacing around "="
/Main.kt:42:1 Unexpected indentation (6) (should be 8)
/Main.kt:42:9 Missing spacing after "if"
/Main.kt:42:15 Missing spacing before "{"
/Main.kt:43:1 Unexpected indentation (10) (should be 12)
FAILURE: Build failed with an exception.
* What went wrong:
Execution failed for task ':ktlintMainSourceSetCheck'.
> A failure occurred while executing org.jlleitschuh.gradle.ktlint.worker.ConsoleReportWorkAction
   > KtLint found code style violations. Please see the following reports:
     - /SomeProject/build/reports/ktlint/ktlintMainSourceSetCheck/ktlintMainSourceSetCheck.txt
6 – (De)serialising polymorphic classes
In Java you can have an abstract class, with multiple concrete implementations. If you want to serialise this class to JSON and then deserialise it back to Java from JSON again, you need a mechanism to not lose the information which concrete class was used.
If you are familiar with Jackson, this can be done using annotations like this:
@JsonTypeInfo(use = JsonTypeInfo.Id.NAME, include = JsonTypeInfo.As.PROPERTY)
@JsonSubTypes({
    @JsonSubTypes.Type(value = Dog.class, name = "Dog"),
    @JsonSubTypes.Type(value = Cat.class, name = "Cat")
})
public abstract class Animal {
    private String name;
}
public class Dog extends Animal {}
public class Cat extends Animal {}
This will add an extra parameter in the JSON output, which is used by the deserialisation to know which concrete class to instantiate.
In Kotlin you can keep doing this, using Jackson, but Kotlin also has its own Kotlin Serialisation framework. One added benefit is the compatibility it has with Sealed classes. It can be really useful to use Sealed classes, as you can use pattern matching (using the when expression) in your Kotlin code to implement logic for all its subclasses.
There is also less configuration required, as you just add the @Serializable annotation on your sealed- and subclasses. Technically it works very similar to Jackson, it adds a parameter called ‘type’ to the JSON output, which contains the subclass name, which is used during the deserialisation of the JSON text.
One caveat, if the code which deserialises your JSON is not using the Kotlin Serialisation framework, it won’t automatically know how to handle the type information in the JSON.
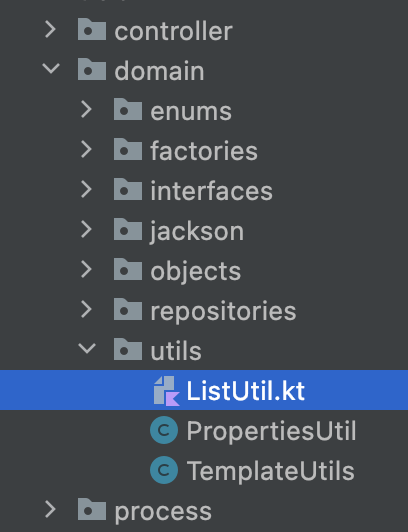
7 – Type alias
Sometimes a function has an argument as input or output, which is not obvious. For example, the output of grouping a list can result in an argument with type Map<String, List<Long>>. From this type it can be tricky to read and understand what data it really points to.
You can improve this by defining an alias for this type, using for example:
typealias SomeMeaningfulTypeName = Map<String, List<Long>>
Now you can use SomeMeaningfulTypeName in your code, which will make the places where it is used more readable.
This is syntactic sugar, which can only be applied in some specific cases, but still a nice feature.
8 – Expressive test assertions
Talking about syntactic sugar, you can make use of a feature to write your test assertions more expressive and readable.
You are probably used to write test assertions in the form of: assertEquals(expected, actual) or alternatively assertThat(actual).isEqualTo(expected).
Kotlin allows an alternative way to write this, using a format: actual shouldBe expected. This reads more as natural language a human could say. For example: customer.name shouldBe "John Doe".
How does this work?
Well, shouldBe is a function you have to define yourself. It can be implemented in the following way, if you use JUnit 5:
import org.junit.jupiter.api.Assertions.assertEquals
infix fun  T.shouldBe(actual: T) = assertEquals(this, actual)
It makes use of the infix notation, which allows this syntactic sugar of omitting the dot and the parenthesis in a function call.
You can make several other variations of the shouldBe function, like shouldNotBe or shouldBeNull. You will have to write these yourself though, possibly placed in some test utilities file. Also, considering you are probably already quite familiar with the assertEquals notation and not very familiar with seeing infix functions, it might take some time before this actually improves readability and not confuse you.
9 – Using Coroutines
Some services don’t do a lot of computation themselves, but are mainly waiting for the result of calling multiple other services. In these cases you might have used CompletableFutures or Reactor (in combination with spring-boot-webflux), with all the streaming, mapping and zipping of Monos and Fluxes involved.
When having to write this kind of code in Kotlin, it makes a lot of sense to do it using Coroutines. Writing this kind of code using Coroutines is a lot cleaner, as the concept is built into the language, so you don’t have to rely on a library. Note, you need a separate dependency to use Coroutines in your project.
When first starting to use Kotlin coroutines, there is a slight learning curve, as you need to learn some new language syntax and understand how it works, like using the correct dispatcher for IO operations. If you don’t know what you’re doing, you might end up writing code which blocks your main threads, which you probably don’t want. For example, in a lot of examples you will see the construct runBlocking, which you actually want to avoid using in your actual code. But once you learned how to correctly use coroutines, it allows you to write very readable concurrent code.
Conclusion
Hopefully reading this blog has encouraged you to start using Kotlin in your Java project, as I truly believe it is the right move to make. By considering these lessons learned, you are better prepared to embark on this journey. Feel free to reach out if there are still concerns holding you back to start using Kotlin. In any case I would say, just give it a try and see what it brings you!
Written by

Benjamin Komen
Our Ideas
Explore More Blogs


Contact