Wish to learn more about Git and/or Power BI?
Come check out our Git courses here and our Power BI courses here!
Introduction
You sit down, make yourself a cup of coffee, and in a fit of enthusiasm decide to overhaul your Power BI report: we can do better. The first modifications don’t work out exactly as intended right off the bat, but the results are encouraging. You tweak a measure here, fix a visual there, while the dopamine hits of problem-solving keep you going. Then, suddenly it hits you: this rabbit hole went deeper than expected and having spent over an hour you actually are not any closer to your goal than when you started. In fact, now your DAX is a jumbled mess. A sinking feeling sets in as visuals are broken and ... no backup.
Sound familiar?
This blog is for anyone who’s lived through that exact scenario, or came frighteningly close. We present you the solution: Using source control with Power BI. It enables all users to experiment free of charge and manage change sans the chaos. Let’s talk about what it means, why it matters, and how you can get started.
The what and why of source control
Source control is a way of tracking and managing changes to files. It makes it especially easy to collaborate with a team on the same file. The term source control has become synonymous with Git, which presides as the most prominent tool to ensure seamless compilation and integration of changes different users wish to apply to the same code. Moreover, Git allows for tracking the history of changes. You see where this is going? You can always easily revert to a previous version when a pesky bug has slipped through the cracks after all.
Git now integrates with Power BI, whose reports are also just collections of code. However, unearthing that code is not immediately straightforward. Power BI traditionally relies on .pbix files. These are great for packaging reports but awkward for version control; if two people edit the same .pbix, there’s no easy way to compare changes, resolve conflicts, or even understand what changed. Not quite the result we are looking for ...
Enter .pbip (Power BI Project) files. When saving a report in a .pbip format, Power BI stores every element as JSON and creates two folders: a .Report and a .SemanticModel. The former contains all the code for the visuals, pages and metadata and the latter contains all code on the dataset, such as tables, measures and relationships (See step 2 for a visual example). In addition, Microsoft has introduced the Tabular Model Definition Language (.tmdl) to break the model into separate objects, so instead of one huge JSON, you might have a folder containing separate files for e.g. each table. As such, source control applies at the object level meaning if you change one DAX measure or add a new calculated column, only that specific part changes, and Git will highlight exactly that difference.
Through the combination of Git integration, .pbip and .tmdl your datasets, measures, relationships, and visuals can live as structured text that is readable and trackable.
Thus, source control enhances Power BI’s workflow, enabling care-free development. This especially pays off when shifting from solitary development to collaborative efforts; a team of BI developers can now in parallel start iterating on the same dashboard to their heart’s content! Let’s find out how you can set up.
Setting Up Power BI Source Control (Step-by-Step)
Now for the practical part. How do you actually implement this? In this section, we’ll provide a detailed walkthrough for setting up Power BI with Git source control. We assume you have a basic familiarity with Git concepts (commit, push, branch, etc.), but even if not, we’ll explain the necessary steps in context. For even more knowledge gains on Git, we refer you to this blog or consider checking out our course on it.
For now, let’s start from scratch:
Prerequisites
A couple of items need to be in place before we can truly kick-off.
- .pbip and TMDL – Ensure these features are enabled. Depending on the version of Power BI Desktop you have installed, they might still be part of the set of preview features that you’ll have to separately activate.
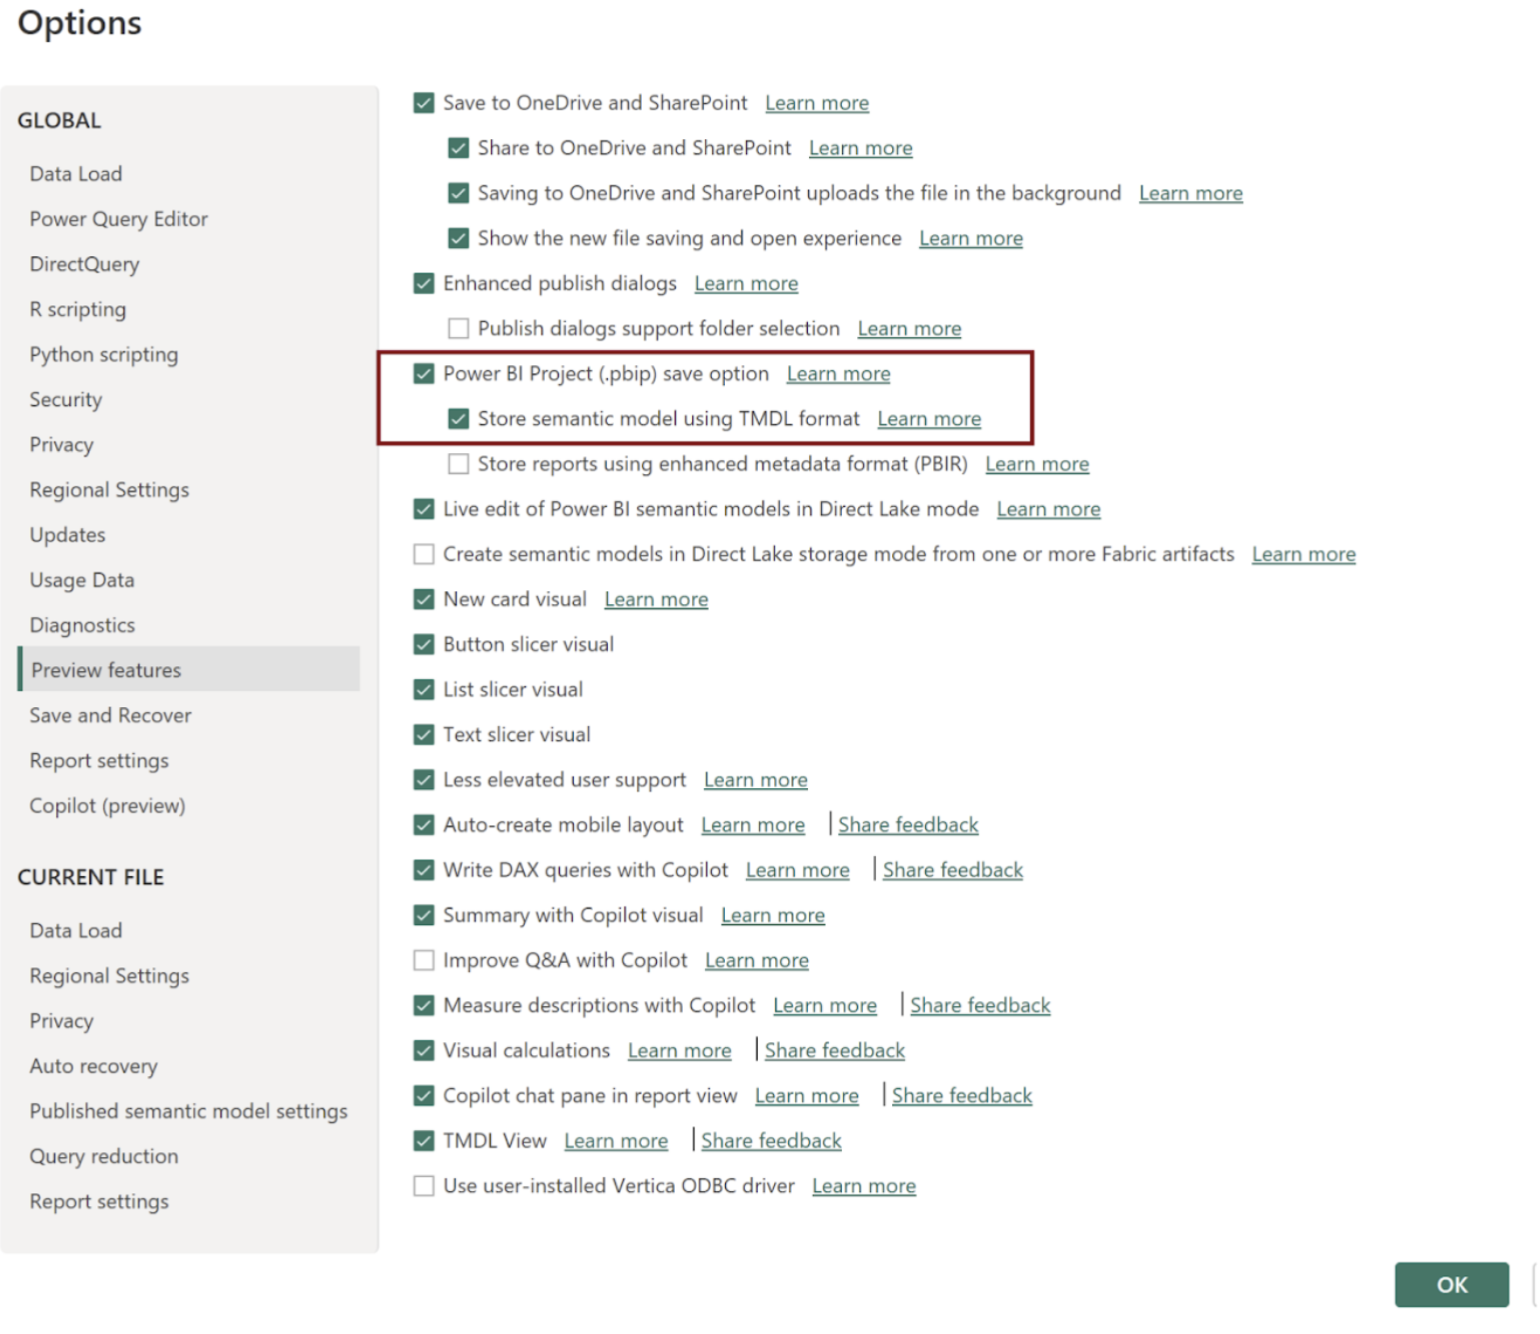
-
Git – You should have Git installed on your machine. Don’t have it? You can download it here.
-
A Git Repository – This can be on a service like GitHub or Azure DevOps where you can store your code. For this guide, let’s assume you have access to a Git repo (for example, https://github.com/YourOrg/PowerBI-Reports)
-
An IDE, like Visual Studio Code – While not strictly necessary, using an IDE with Git Integration will greatly help you execute the workflow, so I advise you to install VS Code and familiarize yourself with its Source Control panel.
Step 1: Prepare or Clone a Git Repository
Once you have these bases covered, we can move onto cloning our Git repository. First, decide where your Power BI project will live in source control:
-
New project? Create a new repository (on GitHub, Azure DevOps, etc.) and clone it to your local machine. In VS Code, use Source Control > Clone Repository, and paste the repo URL.
-
Existing project? If you have an existing .pbix file you want to place under source control, you can create a repo for it as above. Or if a repo already exists, just ensure you have it cloned locally.
For demonstration, let’s say we have a new GitHub repo named PowerBI-SalesAnalysis. We clone it to C:\Repos\PowerBI-SalesAnalysis. Initially, this folder might be empty (except maybe a README or .gitignore).
Tip: If you create a fresh repo for a Power BI project, you might want to add a .gitignore (text file telling Git which files to ignore). However, Power BI Desktop will actually help by generating a .gitignore when you save a project, ignoring cache and local settings files automatically. We’ll cover that soon.
Step 2: Save Your Power BI File as a Project (.pbip)
Now, let’s get your Power BI content into that repository in the new format:
-
If you’re starting from scratch, open Power BI Desktop and create a new report. If you have an existing .pbix you want to use, open that .pbix file in Power BI Desktop.
-
Go to File > Save As. In the Save dialog, navigate to your local Git repo folder (e.g., C:\Repos\PowerBI-SalesAnalysis).
-
In the file type dropdown, choose Power BI project files (*.pbip) instead of the default .pbix. Provide a name for your project, like “SalesAnalysis.pbip” and save the file.
Power BI Desktop will create a folder under that directory. For example, if you saved as SalesAnalysis.pbip in C:\Repos\PowerBI-SalesAnalysis, the folder will now contain:
-
SalesAnalysis.pbip – a small pointer file that represents the project.
-
SalesAnalysis.Report – a folder containing your report definition (e.g., Report\report.json, Report\mobileState.json, etc.).
-
SalesAnalysis.SemanticModel – a folder containing the dataset/semantic model (e.g.SemanticModel\definition folder)
-
A .pbi hidden folder with local caches (Power BI created this internally, containing things like cache.abf).
-
A .gitignore file that Power BI Desktop auto-generated to exclude the cache and local settings from source control.
At this point, if you look at VS Code (or your file explorer), you should see the files. In VS Code it would now look something like this:
REPOS
├── SalesAnalysis.Report

│   ├── report.json

│   ├── ... (Here you may have other folders, such as CustomVisuals)

│   └── semanticModelDiagramLayout.json

├── SalesAnalysis.SemanticModel

│   ├── definition\\ ... (containing tables, cultures, roles, expressions, model and relationships)

│   ├── diagramLayout.json

├── .gitignore

└── SalesAnalysis.pbip
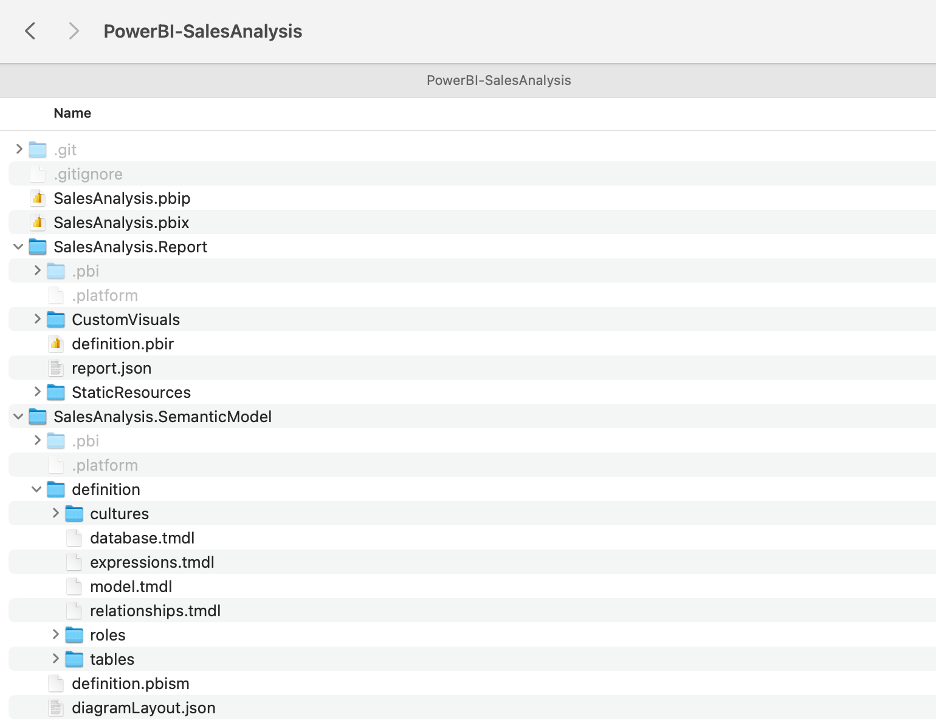 (an actual example of the folder structure generated by the .pbip file format)
The .pbip file is what you open in Power BI to load the project. But in source control, the important parts are the folders with JSON/TMDL files. Have a peek at the JSON files, for instance. Don’t worry if they look complex; the point is they’re text and can be versioned.
Step 3: Initialize Git (if not already done) and Make an Initial Commit
Have you newly cloned an empty repository? Then you’ll need to initialize it using the command git init. However, if you cloned from an existing remote, Git is already initialized in that folder. The key now is to get your new Power BI project files committed:
-
In VS Code, go to the Source Control panel (the icon that looks like a branch or use Ctrl+Shift+G on Windows or ^+Arrow up+G on Mac). You should see all the new files listed as changes.
-
Notice that the
.gitignorefile created by Power BI already listed .pbi\cache.abf and .pbi\localSettings.json to be ignored, so those heavy or machine-specific files won’t show up for commit. Good. -
Stage the changes (in VS Code, hover over the changed files list and click the plus sign, or use command line
git add .to add all). -
Commit the changes with a message, e.g., “I want to use source control with Power BI”. In VS Code, after staging, type the message in the text box and hit Ctrl+Enter (or click the checkmark).
Congratulations, your Power BI report is now under source control! 🎉 From now on, any changes you make in Power BI (and save) will result in changes to these files, which you can commit and eventually push to your remote for others to use, which we’ll address now.
Step 4: Collaborating!
Speaking of others, if you’re working with a team, using branches is a good practice. You’ll likely have a main branch that represents the validated and stable version of your report. From here we can create other feature branches for development work. I’ll tell you how!
Let’s say our repository’s default branch is main (which now contains our initial commit). For a new feature or change you wish to develop, you should follow a few steps:
-
Create a branch for the work: e.g.
git checkout -b add-new-measures. In VS Code, you can also do this from the branch menu at the bottom-left (main > Create new branch… > input name of your branch + ENTER ). Now you’re on the add-new-measures branch. -
Make your changes in Power BI Desktop (add those new measures, etc.), save, see the changes in VS Code, and commit them on this branch.
-
So far, so good and in line with what we had already practised in Step 3. Now for the added value! After committing we’ll push the branch to the remote repository (remember the GitHub repository you created or cloned in Step 1?). Now others who are shared in this repository will be able to check out your newly added feature!
Don’t know exactly how to push after committing? Just follow the images below and eventually press Publish Branch. Your new branch and new feature will now reside in your remote repository, where others can review it and eventually have it merge to the main branch from which you can create new branches for other features.
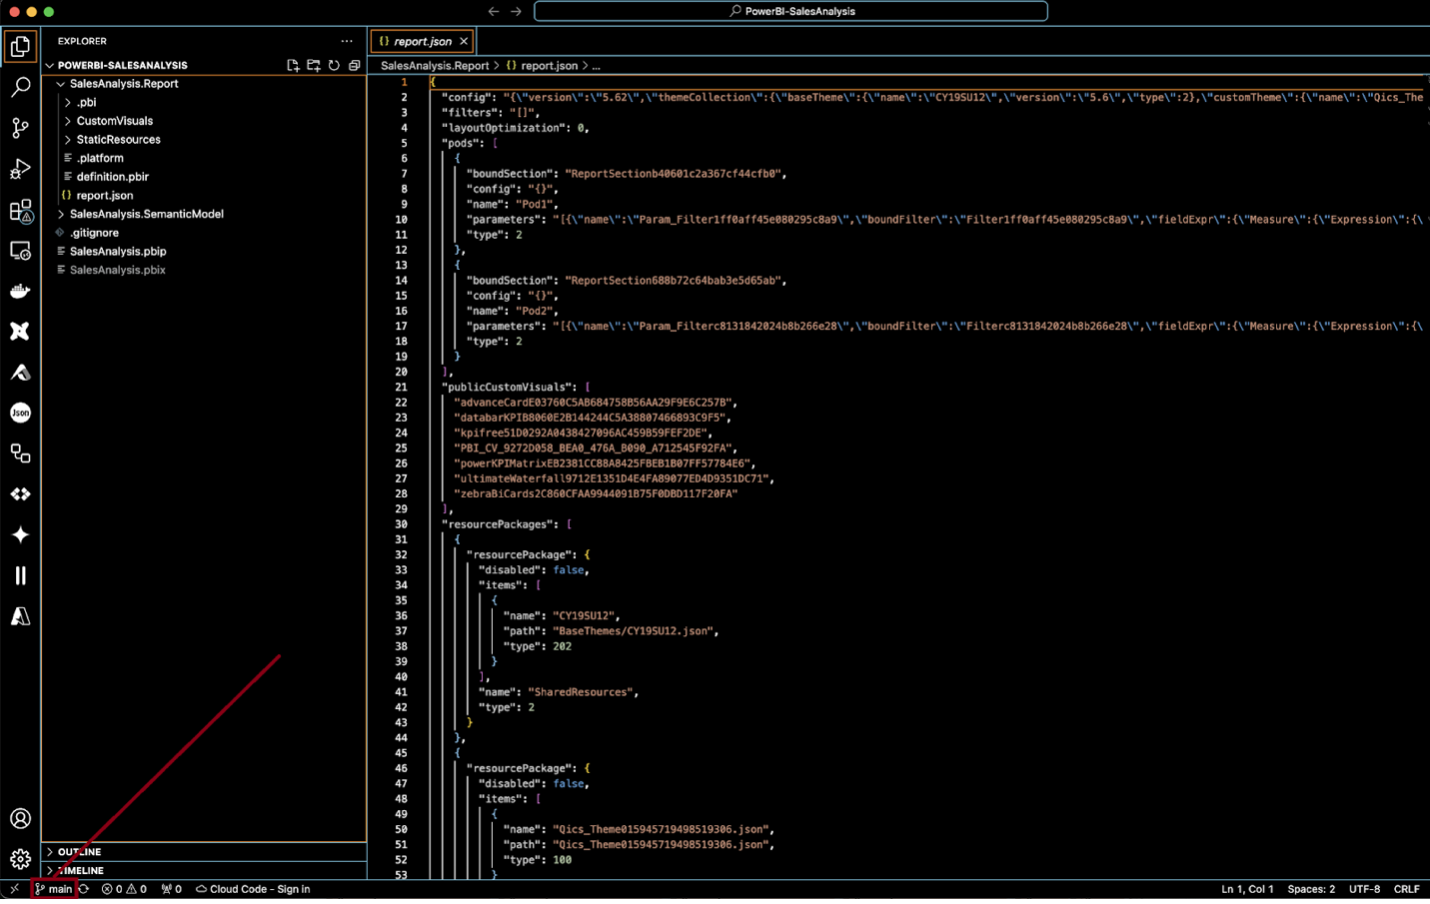 (Step 1. Bottom left shows what branch we’re on - ‘main’ it is!)
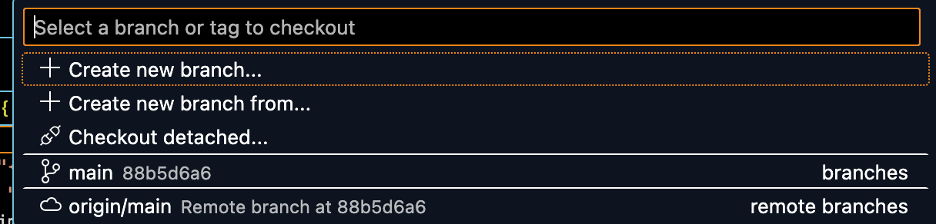 (Step 1. Clicking this branch opens up the menu to check out or create other branches. I’ll create a new branch called ‘feature/add-new-measures’)
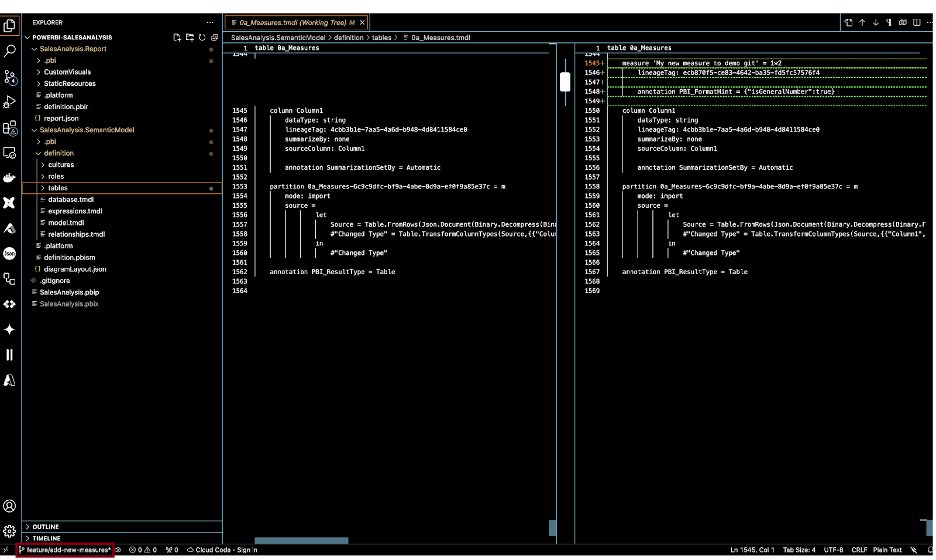 (Step 2. I have opened my SalesAnalysis.pbip report and created a new measure ‘My new measure to demo git’ and saved it. Notice how VS Code noticed there’s been a change to my measure table ‘0a_Measures.tmdl’ in green? Also, bottom-left shows I am now working on my feature/add-new-measures branch. Looks like the git integration is working!)
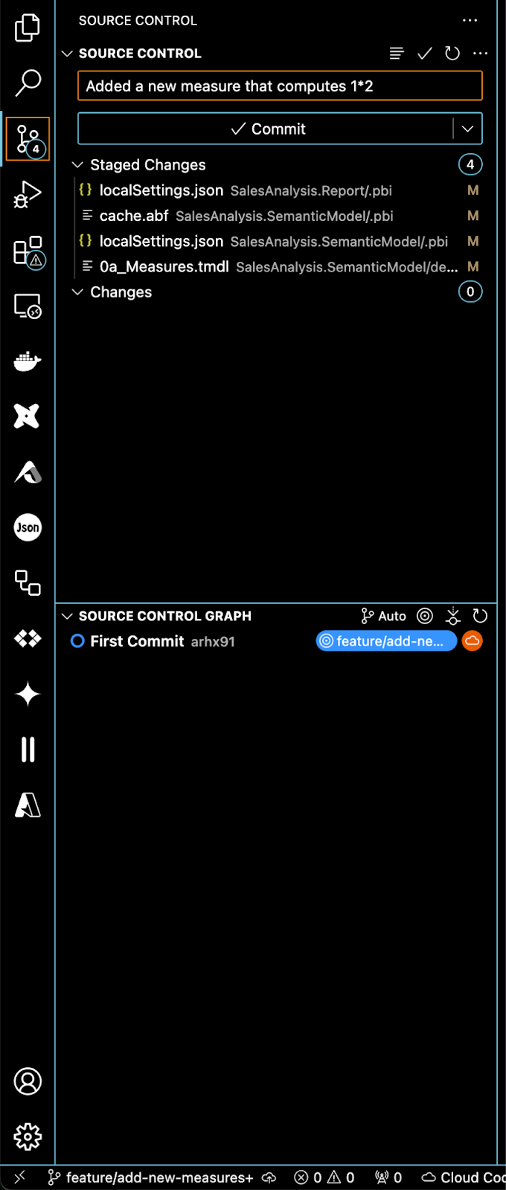 (Step 2. Opening up the ‘Source Control’ pane on the left-hand side confirms that there have been four changes, most importantly to 0a_Measures.tmdl. Checks out, so I have staged all of these changes and written a commit message. Go ahead and press ‘Commit’!)
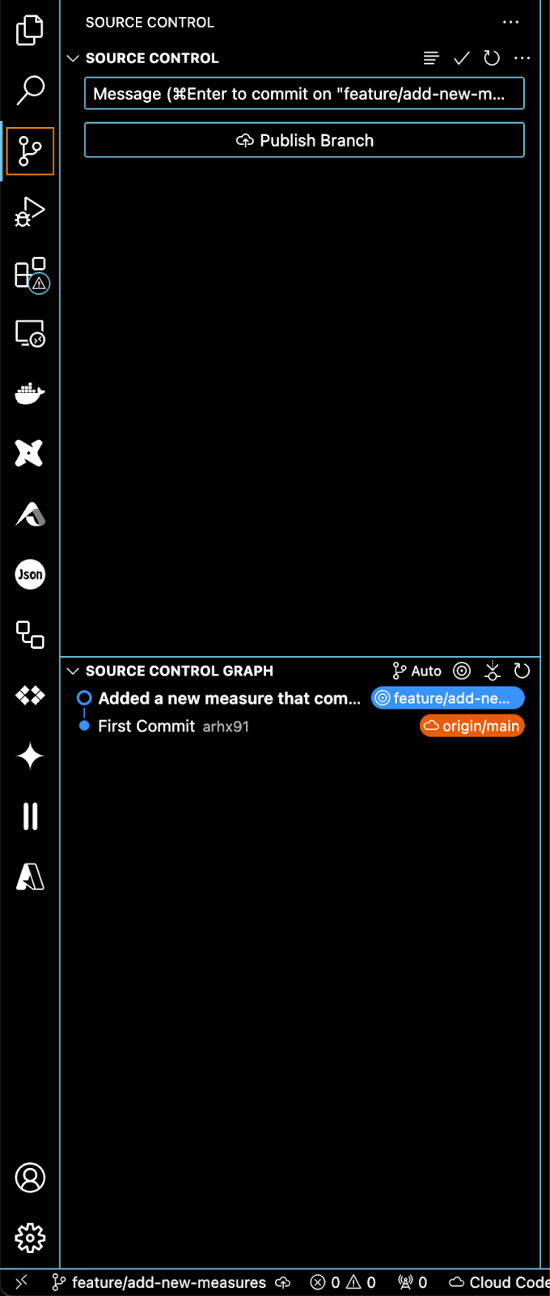 (Step 3. Nearly done. Press ‘Publish Branch’ and it will be published to your remote repository)
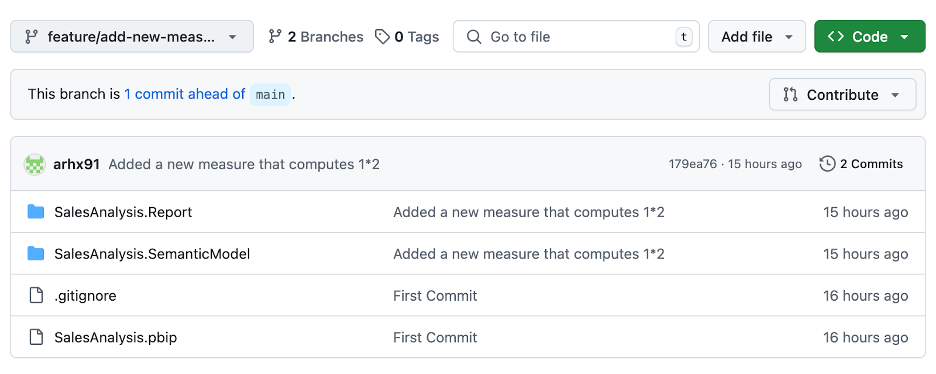 (Step 4. Exciting! Go ahead and check out the remote repository. Up top it shows the ‘feature/add-new-measures’ now and below we can view its content including my new commit.)
Let’s tie it all together. On a day-to-day basis using Power BI with source control will look like:
-
Making changes to the report or model
-
Saving these changes as .pbip
-
Committing and pushing changes from your feature branch (in VS Code)
-
Merging changes back to the main branch
-
Create a feature branch from main
-
Rinse and repeat
Conclusion
Power BI’s Git integration and the .pbip project format marks a turning point in BI development. Gone is the wild west of files along the lines of “_v2_final_final”. We now have a structured, team-friendly process at our disposal. By embracing this, you receive all the benefits of software development workflow: transparency, accountability, collaboration, and safety nets.
On the daily, this means no longer a fear of breaking something irreversibly. If a change doesn’t work out, you just revert to a previous version! Experimenting in tandem also no longer poses any problems. Just branch off, lift off and deliver a better product!
Happy reporting and happy versioning! 🎉
Thanks for reading! I hope this was helpful. Have any more questions? Feel free to contact me here
Written by

Ruben Huidekoper
Analytics Engineer
Ruben is an Analytics Engineer with Xebia Data, passionate about automating workflows and advancing BI in the process.
Our Ideas
Explore More Blogs

AI Revolution in Data Extraction: Structuring Emails, PDFs, and Videos
Let us explore some of the real-world use cases, emerging from this conversation, showing how generative AI is redefining what's possible.
Klaudia Wachnio


Contact