
Maybe you’ve read about Git for a long time and use it for your private projects. Maybe you want to migrate your project’s TFS Version Control to Git, either with TFS Git or elsewhere, but don’t know how. Or maybe you’ve read Dennis Doomen’s post about ‘Why you should abandon TFS and adopt Git’ and though: ‘I really need to move over right now, but how?’ If you are using TFS you will probably have a history that you want to have in Git also.
This post is based on the post ‘TFS to Git migration: step by step’ from Natalia An which can be found here. Below is an up-to-date version of all the steps which works for our projects.
This post tells you how to migrate your TFS Version Control to Git while maintaining history, step by step. The migration takes along the history, but not the branches in TFS.
This post was not possible without the help of ALM MVP Terje Sandstrøm.
Prerequisites
The following tools will be used:
- Git for Windows https://git-scm.com/download/win
- Git TF
- You can use chocolatey to install this tool. Just follow the steps described here: https://chocolatey.org/ Website
- Type:
cinst Git-TF to install Git TF
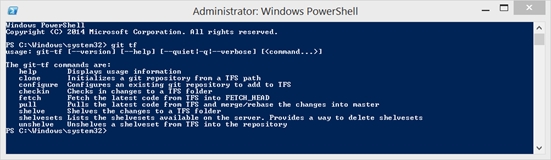
- Check if Git TF is added to your System Path variables by executing the exe: git tf. The result should look like this:
- I like to use Git Shell, which you can get by installing GitHub for Windows. GitHub Desktop
- Optionally: IFix (from Terje Sandstrøm) can be used to update the ignore file. The IFix tool
Steps for the migration
- Open up a command prompt to the directory where your GIT repositories are located. By default, this is the path: c:users<username>sourcerepos
- Clone all files from TFS to Git while preserving history. The git repository will be created if it doesn’t exists.
Type:
git tf clone <tfs collection URL> <tfs team project path> <git repository name> --deep
If you don’t want to bring along the history to Git. Than leave out the –deep parameter.
- Select the new repository by changing the directory.

- Update the gitignore file with the latest from github and add it to the repository. This can be done with Ifix or manually. When using ifix follow the following steps:
- Type:
ifix gitignore –s –f
- Add the file to the repository:
git add *
- Commit the file with a comment:
git commit –m “updated gitignore”
The result looks like this:
- Type:
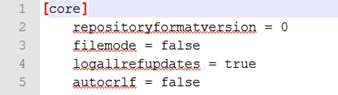
- Remove the old connection to TFS VC in the configuration of git
- Open the config file in directory .git.
- Make sure the file only contains the following information:
- Cleanup the repository
The gitignore file will prevent us from adding dll’s to the repo. Because of the use of nuget packages, we want to make sure there are no dll’s in our repository. If there are dll’s, delete them from the repository and history. If there are dll’s found. Also delete pdb’s. Finally we don’t want to have packages folders also in our repository.
-
git filter-branch --force --index-filter 'git rm --cached --ignore-unmatch *.dll'

- In this case no dll’s were found because the master is unchanged. So it was not needed to execute the following command in this sample to delete the pdb’s also.
git filter-branch --force --index-filter 'git rm --cached --ignore-unmatch *.pdb’
- Delete the packages folders:
git filter-branch --force --index-filter "git rm -rf --cached --ignore-unmatch packages"

- Clean up git and run garbage collection:
git reflog expire --all
git  gc --aggressive --prune
-
- If you want to make changes to the solution. It can be done in this step. In our case we are splitting the solution into multiple solutions. So we are deleting projects from the solution and instead of project references use nuget references.
- Add the local repository to the remote Git repository.
- Navigate to the directory of the repository
- Execute the following commands:
git remote add origin <url of the remote git repo>
git push –u origin –-all


![]()
Written by
Pascal Naber
Contact