Implementing interactive draggable sorting functionality in your React Native app can be cumbersome and tricky to set up. Using this blog I will showcase how you can implement the draggable sorting behaviour in a relative simple way.
Draggable sort
Draggable sorting is a functionality that allows users to rearrange items in a list by dragging and dropping them into different positions. With draggable sorting, users can easily change the order of items according to their preference. It provides a convenient and intuitive way to change the order in a list.
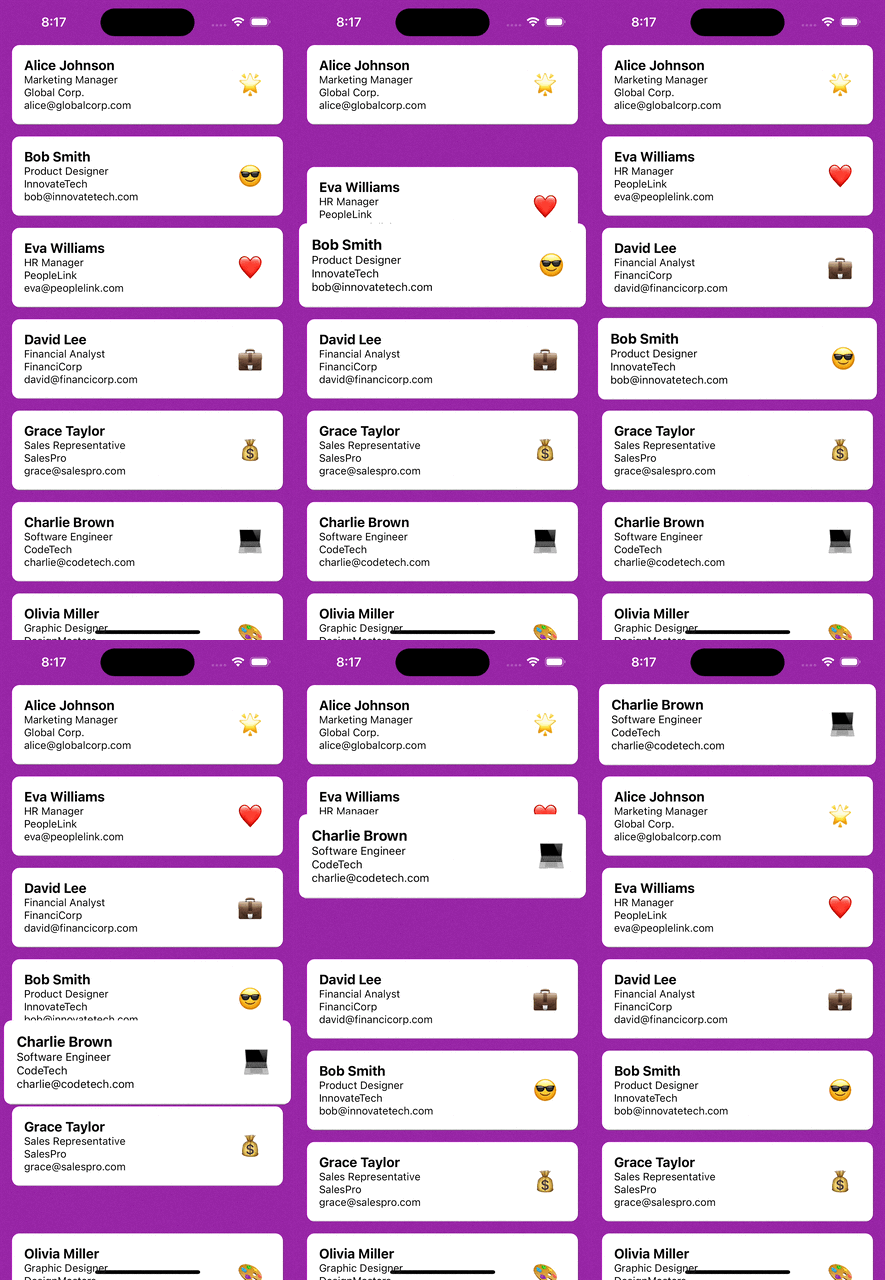
The following example showcases draggable sorting in a list.


React-native-animated complexity
There are libraries available that will add draggable sort in React Native, for example using <a href="https://github.com/computerjazz/react-native-draggable-flatlist">react-native-draggable-flatlist</a> . This library is build upon the animation library <a href="https://github.com/software-mansion/react-native-reanimated">react-native-animated</a>. Compared to React Native’s own Animation library, this library adds speed improvements, for example by using worklets. This results in fast and fluit animations even for complex interfaces, but the libraries installation process is relatively complex and has a lot of open issues. I tried installing the library to my example app, but couldn’t get it to work due to a crash during startup. To me, the library isn’t stable, too complex and if integrated will result in a maintenance cost.
Another option is to use <a href="https://github.com/fivecar/react-native-draglist">react-native-draglist</a>, which chosen for a simpler approach to implement draggable sorting. It’s simpler because it uses React Native’s Animated library and is a drop-in replacement for React Native’s FlatList. Let’s dive into the code to show how to use it to show a list of business cards.
<code>const renderItem = ({
  item,
  onDragStart,
  onDragEnd,
  isActive,
}: DragListRenderItemInfo<BusinessCard>) => (
  <Card
    data={item}
    isScalingActive={isActive}
    onLongPress={onDragStart}
    onPressOut={onDragEnd}
  />
);

...

function BusinessCardList(): JSX.Element {
return (
    <DragList
      contentContainerStyle={styles.dragListContainer}
      data={sortedBusinessCards}
      keyExtractor={(item: BusinessCard) => item.id}
      renderItem={renderItem}
      onReordered={onReordered}
      style={styles.dragListStyle}
    />
  );
}
Doesn’t this code looks familiar? Yes, and that’s because the library uses the same props as React Native’s FlatList. To support sorting, we implement the following steps:
- Drag. Let the module know when dragging starts. When the user presses the card for a second, the
onLongPressis being called to notify the module that sorting can starts. This will result in the dragging behaviour will be started. - Drop. User can start dragging the card. When he’s done, he can drop the card at the correct location. At this moment
onPressOutwill be called. - Sort. To know to which location the card has been moved,
onReorderedwill be called. Using this information, we can save this information as the new sorting state.
Scaling effect
Wouldn’t it be nice to add a scaling effect when we start sorting? This would help the user to indicate which card it will be sorting in an intuitive way.


The library <a href="//github.com/fivecar/react-native-draglist>">react-native-draglist</a> offers the prop isActive for this, which will turn true when the card is being dragged. This is useful to use in an animation to scale the card. The following code snippet shows how scaling is implemented in the example app.
const CARD_SORT_ACTIVE = 1.06;
const SCALE_DURATION = 200;

...

const scaleValue = React.useRef(new Animated.Value(1)).current;

useEffect(() => {
  if (isScalingActive) {
    Animated.timing(scaleValue, {
      toValue: CARD_SORT_ACTIVE,
      duration: SCALE_DURATION,
      useNativeDriver: true,
    }).start();
  } else {
    Animated.timing(scaleValue, {
      toValue: 1,
      duration: SCALE_DURATION,
      useNativeDriver: true,
    }).start();
  }
  }, [scaleValue, isScalingActive]);

...

<Pressable
  onLongPress={onLongPress}
  onPress={onPress}
  onPressOut={onPressOut}
>
  <Animated.View
    style={{
      transform: [
        {
          scale: scaleValue,
        },
      ],
    }}
  >
    {children}
  </Animated.View>
</Pressable>
Haptic feedback
To complete the user experience, it would nice to also add haptic feedback. This would provide an additional feel-able indication that the user is starting to sort the list. Together with the visual scaling, the combination with haptic feedback this offers a complete experience to the user.
To add haptic feedback, we make use of <a href="https://github.com/mkuczera/react-native-haptic-feedback">react-native-haptic-feedback</a> which adds haptic capabilities. Because the feedback needs to be subtle but noticeable, I use impactMedium. When wanting to apply haptics to your apps, be sure to read on the best practices on when and which haptic to apply. The iOS haptic guidelines is a good source, where you can also play the different haptic types.
In our example app we use haptic feedback when sorting starts and has ended. Together with the equivalent scaling effect, this offers a complementary user experience.
The following snippet shows how the code looks like to implement haptic feedback.
if (beginningToLongPress || endOfLongPress) {
  trigger(HapticFeedbackTypes.impactMedium);
}
Conclusion
To sum up, implementing draggable sorting in React Native adds a dynamic element to list management. While advanced libraries like react-native-draggable-flatlist exist, their complexity may not be suitable every project.
In this post, we explored a simpler alternative, react-native-draglist, offering a straightforward integration with React Native’s Animated library. This balance between functionality and simplicity makes it a viable choice for projects where a lighter solution is preferred.
We also discussed adding a scaling effect and haptic feedback to enhance user experience. The combination of visual and haptic feedback creates a more immersive and engaging sorting experience.
Happy coding!
Example BusinessCards project: GitHub RN-BusinessCards


