Blog
Deploying MLflow on the Google Cloud Platform using App Engine

MLOps platforms delivered by GetInData allow us to pick best of breed technologies to cover crucial functionalities. MLflow is one of the key components in the open-source-based MLOps platforms as it acts both as an experiment tracker as well as a centralized model registry.
In my previous blog post I wrote about deploying serverless MLflow in GCP using Cloud Run. This solution has its benefits as well as some drawbacks due to the complexity in the authorization layer. There are other options - one of such is using Google App Engine Flexible environment to host the MLflow and benefit from out-of-the-box Identity-Aware-Proxy integration, which will handle authorization transparently. In this blog post I will explain how to deploy such a configuration - this time, with much fewer manual steps as the solution will be deployed using Terraform.
Prerequisites
- Access to the Google Cloud Platform, including: CloudSQL, GCS, Secret Manager, App Engine, Artifact Registry
- Terraform >= 1.1.7
- Docker (for building the image, but can also be done in CI)
Target setup
The final setup described in this blog post will look like this: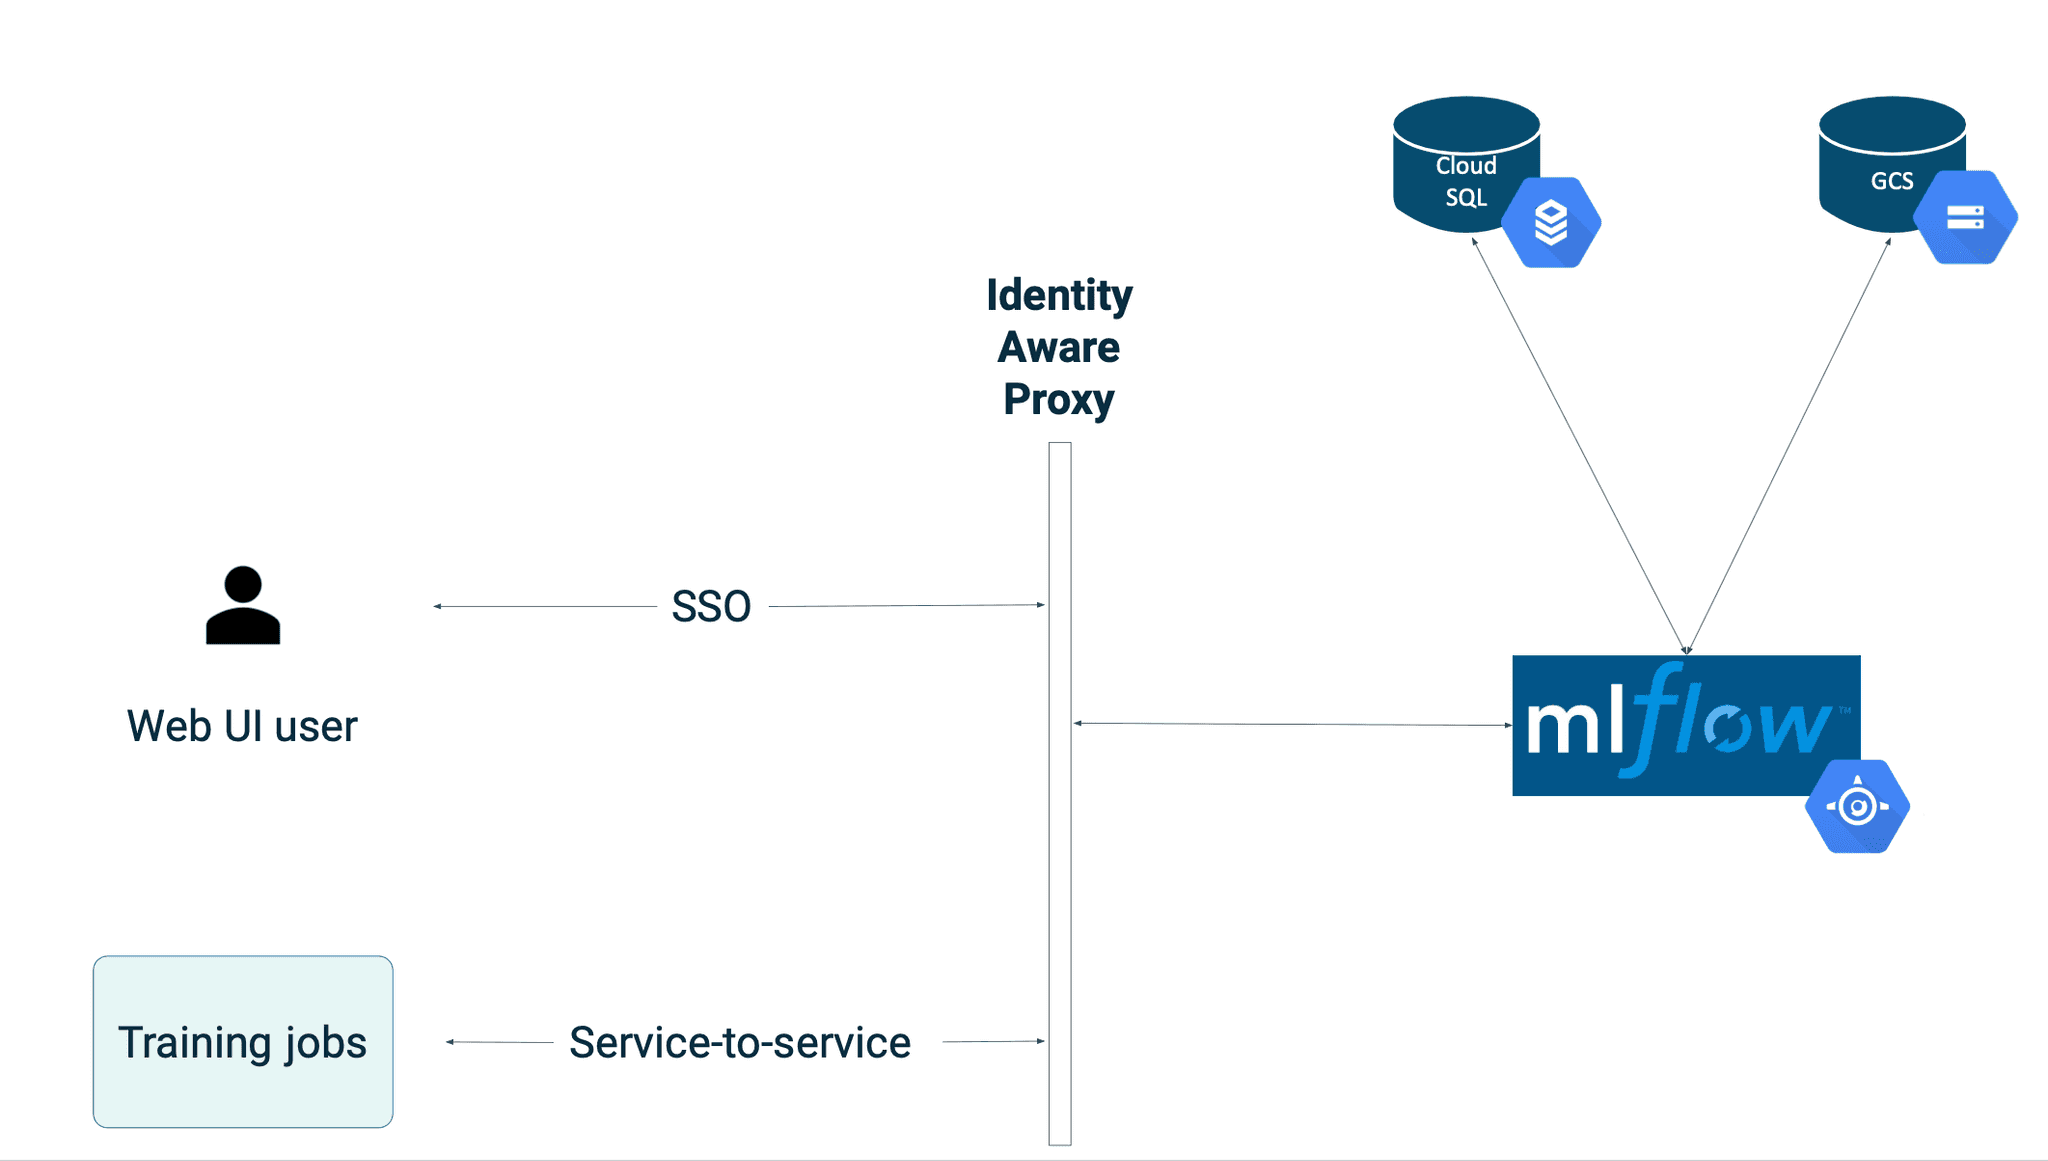
Step 1: Pre-configuring OAuth 2.0 Client
App Engine-based MLflow will use Identity Aware Proxy as its authorization layer. In order to configure it, you need to obtain OAuth 2.0 Client ID and Client Secret. Follow the official guide here or refer to the previous blog post (step #2).
Once the OAuth 2.0 credentials are created, make sure that Authorized redirect URIs field has a value following the pattern (usually this value gets pre-filled with the correct value, but you should verify this):
https://iap.googleapis.com/v1/oauth/clientIds/<CLIENT ID>:handleRedirect
This is required for the IAP proxy to work properly with the App Engine.
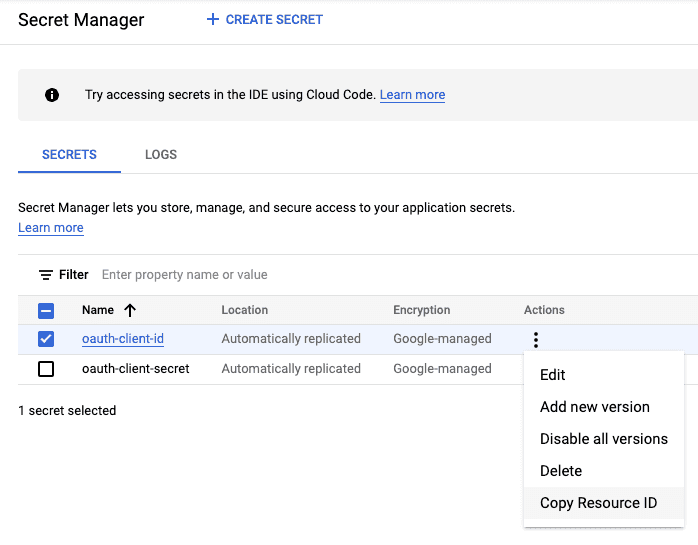
Store the Client ID and Client Secret in 2 separate secrets within the Secret Manager and save the Resource ID of each secret - it will be passed to the App Engine.
Step 2: Build the docker image for MLflow on App Engine
The docker image for MLflow will be similar to the GetInData’s public MLflow Docker image from https://github.com/getindata/mlflow-docker, with the difference being the base image with the gcloud SDK installed. The reason behind this requirement is that there is no built-in mechanism to mount secrets from the Secret Manager (with a database password) in the App Engine service natively, which shifts the responsibility of obtaining the secret to the actual application code / container entrypoint.
Dockerfile
FROM google/cloud-sdk:385.0.0
ARG MLFLOW_VERSION="1.26.0"

ENV LC_ALL=C.UTF-8
ENV LANG=C.UTF-8

RUN echo "export LC_ALL=$LC_ALL" >> /etc/profile.d/locale.sh
RUN echo "export LANG=$LANG" >> /etc/profile.d/locale.sh

ENV TINI_VERSION v0.19.0
ADD https://github.com/krallin/tini/releases/download/${TINI_VERSION}/tini /tini
RUN chmod +x /tini

RUN pip3 install --no-cache-dir --ignore-installed google-cloud-storage && \
    pip3 install --no-cache-dir PyMySQL mlflow==$MLFLOW_VERSION pyarrow

COPY start.sh start.sh
RUN chmod +x start.sh


ENTRYPOINT ["/tini", "--", "./start.sh"]
start.sh
#!/usr/bin/env bash
set -e
echo "Obtaining credentials"
DB_PASSWORD=$(gcloud secrets versions access --project=${GCP_PROJECT} --secret=${DB_PASSWORD_SECRET_NAME} latest)
BACKEND_URI=${BACKEND_URI:-"mysql+pymysql://${DB_USERNAME}:${DB_PASSWORD}@/${DB_NAME}?unix_socket=/cloudsql/${DB_INSTANCE_CONNECTION_NAME:-"NOT_SET"}"}

mlflow server \
  --backend-store-uri ${BACKEND_URI} \
  --default-artifact-root ${GCS_BACKEND} \
  --host 0.0.0.0 \
  --port ${PORT}
Build the image and push it to the Google Artifact Registry, preferably to the same region in which you will deploy the App Engine app.
Step 3: Prepare the Terraform inputs
The full Terraform module which handles deployment of MLflow to App Engine is shared in the repository linked below.
Here are the required inputs:
- project - Google Cloud Platform Project ID
- env - environment name (of your choice)
- prefix - additional prefix for resources (such as CloudSQL, GCS buckets etc.)
- region - region for CloudSQL, Secret Manager and GCS buckets
- app_engine_region - region for App Engine (follow the official documentation)
- docker_image - full URI of the docker image with MLflow (see Step 2 above)
- machine_type - machine type for the Cloud SQL (e.g. db-n1-standard-1)
- availability_type - availability type for Cloud SQL instance (defaults to ZONAL)
- secret_for_oauth_client_secret - Secret Manager Resource ID of Client Secret obtained in Step 1
- secret_for_oauth_client_id - Secret Manager Resource ID of Client ID obtained in Step 1
MLflow Terraform Module details
App Engine
Secrets will be passed securely with the use of data sources:
data "google_secret_manager_secret_version" "oauth_client_id" {
  secret = var.secret_for_oauth_client_id
}

data "google_secret_manager_secret_version" "oauth_client_secret" {
  secret = var.secret_for_oauth_client_secret
}

resource "google_app_engine_application" "mlflow_app" {
  project     = var.project
  location_id = var.app_engine_region
  iap {
    enabled              = true
    oauth2_client_id     = data.google_secret_manager_secret_version.oauth_client_id.secret_data
    oauth2_client_secret = data.google_secret_manager_secret_version.oauth_client_secret.secret_data
  }
}
The App Engine app definition contains autoscaling, Cloud SQL connection configuration as well as a few required environment variables (note that only the Secret ID is passed, the DB password will not be exposed).
⚠️ If your project already contains an App Engine app, you will need to import it before applying the changes in terraform, as only one single App Engine app per project is allowed. Using the service name default will block you from deleting the app using terraform destroy, so you might want to change this parameter.
resource "google_app_engine_flexible_app_version" "mlflow_default_app" {
  project    = var.project
  service    = "default"
  version_id = "v1"
  runtime    = "custom"

  deployment {
    container {
      image = var.docker_image
    }
  }

  liveness_check {
    path = "/"
  }

  readiness_check {
    path = "/"
  }

  beta_settings = {
    cloud_sql_instances = google_sql_database_instance.mlflow_cloudsql_instance.connection_name
  }

  env_variables = {
    GCP_PROJECT                 = var.project
    DB_PASSWORD_SECRET_NAME     = google_secret_manager_secret.mlflow_db_password_secret.secret_id,
    DB_USERNAME                 = google_sql_user.mlflow_db_user.name
    DB_NAME                     = google_sql_database.mlflow_cloudsql_database.name
    DB_INSTANCE_CONNECTION_NAME = google_sql_database_instance.mlflow_cloudsql_instance.connection_name
    GCS_BACKEND                 = google_storage_bucket.mlflow_artifacts_bucket.url
  }

  automatic_scaling {
    cpu_utilization {
      target_utilization = 0.75
    }

    min_total_instances = 1
    max_total_instances = 4
  }

  resources {
    cpu       = 1
    memory_gb = 2
  }

  delete_service_on_destroy = true
  noop_on_destroy           = false

  timeouts {
    create = "20m"
  }

  depends_on = [
    google_secret_manager_secret_iam_member.mlflow_db_password_secret_iam,
    google_project_iam_member.mlflow_gae_iam
  ]

  inbound_services = []
}
CloudSQL instance
The module generates a random password for the database and stores it in the Secret Manager. MySQL 8.0 database flavor is used by default, but can be changed to any MLflow-supported one.
The database will be backed up by the disk with an auto-resize option to handle scaling up while keeping the initial costs to minimum.
resource "random_password" "mlflow_db_password" {
  length  = 32
  special = false
}

resource "random_id" "db_name_suffix" {
  byte_length = 3
}

resource "google_sql_database_instance" "mlflow_cloudsql_instance" {
  project = var.project

  name             = "${var.prefix}-mlflow-${var.env}-${var.region}-${random_id.db_name_suffix.hex}"
  database_version = "MYSQL_8_0"
  region           = var.region

  settings {
    tier              = var.machine_type
    availability_type = var.availability_type

    disk_size       = 10
    disk_autoresize = true

    ip_configuration {
      ipv4_enabled = true
    }

    maintenance_window {
      day          = 7
      hour         = 3
      update_track = "stable"
    }

    backup_configuration {
      enabled            = true
      binary_log_enabled = true
    }

  }
  deletion_protection = false
}

resource "google_secret_manager_secret" "mlflow_db_password_secret" {
  project   = var.project
  secret_id = "${var.prefix}-mlflow-db-password-${var.env}-${var.region}"

  replication {
    user_managed {
      replicas {
        location = var.region
      }
    }
  }
}

resource "google_secret_manager_secret_version" "mlflow_db_password_secret" {
  secret      = google_secret_manager_secret.mlflow_db_password_secret.id
  secret_data = random_password.mlflow_db_password.result
}
MLflow requires the database to be created.
resource "google_sql_database" "mlflow_cloudsql_database" {
  project  = var.project
  name     = "mlflow"
  instance = google_sql_database_instance.mlflow_cloudsql_instance.name
}

resource "google_sql_user" "mlflow_db_user" {
  project    = var.project
  name       = "mlflow"
  instance   = google_sql_database_instance.mlflow_cloudsql_instance.name
  password   = random_password.mlflow_db_password.result
  depends_on = [google_sql_database.mlflow_cloudsql_database]
}
Google Cloud Storage
Lastly, the GCS bucket for MLflow artifacts will be created - by default, it will use a MULTI_REGIONAL class for the highest availability. Adjust the configuration to your preference, e.g. enable object versioning.
resource "google_storage_bucket" "mlflow_artifacts_bucket" {
  name                        = "${var.prefix}-mlflow-${var.env}-${var.region}"
  location                    = substr(var.region, 0, 2) == "eu" ? "EU" : "US"
  storage_class               = "MULTI_REGIONAL"
  uniform_bucket_level_access = true
}

resource "google_storage_bucket_iam_member" "mlflow_artifacts_bucket_iam" {
  depends_on = [google_app_engine_application.mlflow_app]
  bucket     = google_storage_bucket.mlflow_artifacts_bucket.name
  role       = "roles/storage.objectAdmin"
  for_each   = toset(["serviceAccount:${var.project}@appspot.gserviceaccount.com", "serviceAccount:service-${data.google_project.project.number}@gae-api-prod.google.com.iam.gserviceaccount.com"])
  member     = each.key
}
Step 4: Deploy MLflow on App Engine using terraform
First, make sure that you have enabled the following APIs in your project: App Engine Flexible API, Cloud SQL Admin API.
Provided that you have cloned the repository with the MLflow terraform module (link in Summary below), run the following commands in the mlflow directory. Alternatively, integrate the module with your existing Infrastructure-as-a-Code project.
- Make sure that you have access to the target google project (e.g. by logging using
gcloud auth application-default login) terraform init- Create
terraform.tfvarsfile, example:
project_id="<my project>"
env="dev"
prefix="abc"
region="us-central1"
app_engine_region="us-central"
docker_image="us-central1-docker.pkg.dev/<artifact path>/mlflow:latest"
machine_type="db-f1-micro"
secret_for_oauth_client_secret="projects/<projectid>/secrets/oauth-client-secret"
secret_for_oauth_client_id="projects/<projectid>/secrets/oauth-client-id"
4. ⚠️ (optional) If your project already contains an App Engine app, you need to import it using the following command:terraform import google_app_engine_application.mlflow_app <my project>
5. terraform plan -out mlflow.plan
6. Verify the plan
7. terraform apply mlflow.planDepending on the settings, region etc. it can take from 5 to 15 minutes to deploy the whole stack.
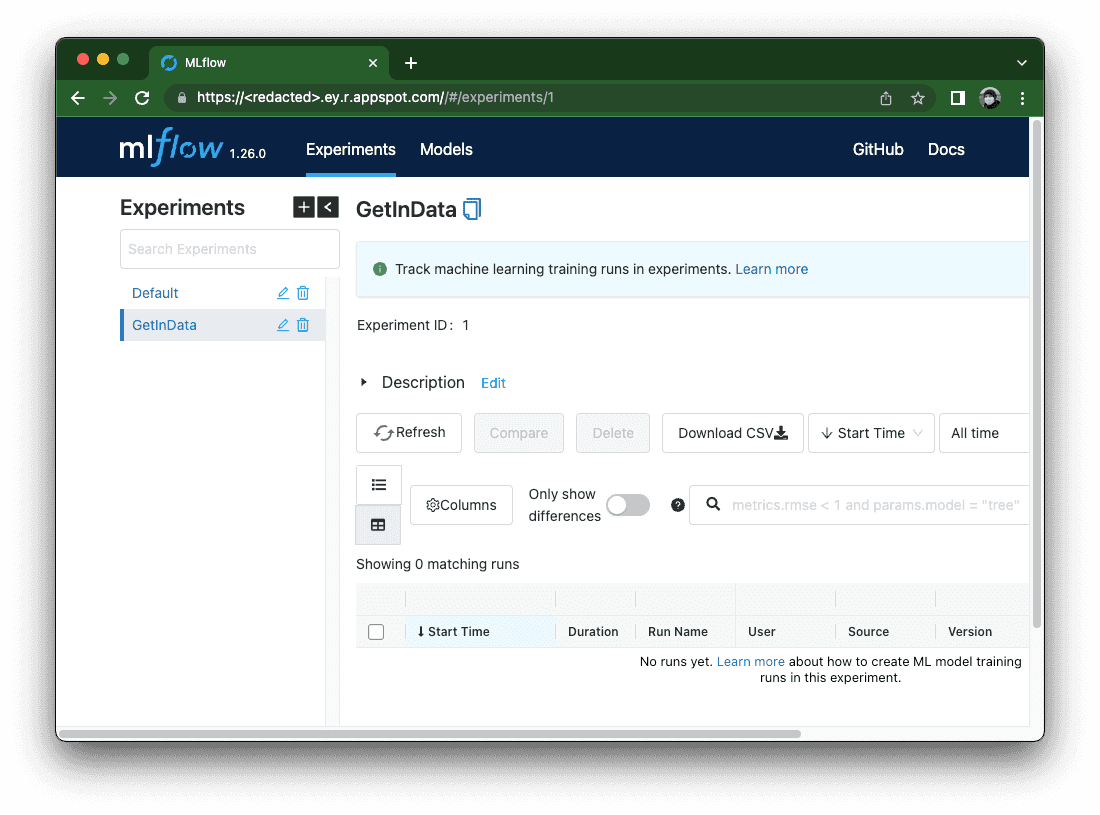
Accessing serverless MLflow behind Identity Aware Proxy
Once deployed, the MLflow service can be accessed either from the browser or from a backend service.
Browser
All user accounts (or the whole domain) needs to have an IAP-secured Web App User role in order to be able to access the MLflow. Note that applying the permissions does not have an immediate effect and you will probably have to wait a few minutes before the user will be able to access the MLflow UI.
Visiting the deployed App Engine URL will automatically redirect you to the SSO page for your Google Account.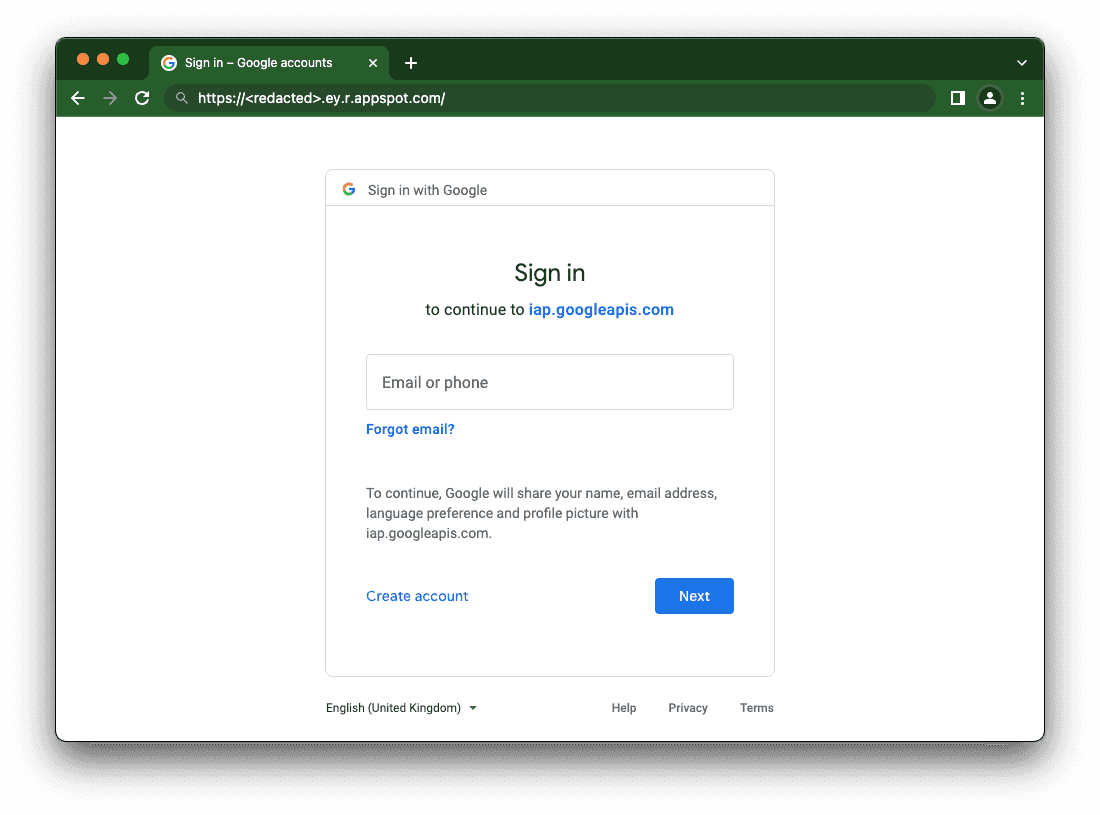
Service-to-service
Whether in CI/CD scripts or in Python code, you can access an MLflow instance by URL with the addition of the Authorization HTTP header.
First, make sure that the service account you will be using has the following roles:
- IAP-secured Web App User
- Service Account Token Creator
Once the roles are set up, use one of the following options:
You have the service account json key.
gcloud auth activate-service-account --key-file=./path-to/key.jsonexport TOKEN=$(gcloud auth print-identity-token --audiences="${OAUTH_CLIENT_ID}")
You are running on a Compute Engine VM / Cloud Run / GKE / other GCP-backed service which uses a service account natively
export TOKEN=$(curl -s -X POST -H "content-type: application/json" -H "Authorization: Bearer $(gcloud auth print-access-token)" -d "{\"audience\": \"${OAUTH_CLIENT_ID}\", \"includeEmail\": true }" "https://iamcredentials.googleapis.com/v1/projects/-/serviceAccounts/$(gcloud auth list --filter=status:ACTIVE --format='value(account)'):generateIdToken" | jq -r '.token')You want to verify whether a given service account can generate a token (using impersonation)
export TOKEN=$(gcloud auth print-identity-token --impersonate-service-account="<service account email>" --include-email --audiences="${OAUTH_CLIENT_ID}")You are using Python to make requests
- Make sure that `google-cloud-iam` package is installed
- Obtain the token
from google.cloud import iam_credentials
import requests
client = iam_credentials.IAMCredentialsClient()
sa = "<Service Account Email>"
client_id = "<OAuth 2.0 Client ID>"
token = client.generate_id_token(
            name=f"projects/-/serviceAccounts/{sa}",
            audience=client_id,
            include_email=True,
).token

result = requests.get("https://<redacted>.r.appspot.com/api/2.0/mlflow/experiments/list",
                     headers={"Authorization": f"Bearer {token}"})
print(result.json())
You are using MLflow Python SDK
Set MLFLOW_TRACKING_TOKEN environment variable to the token value (obtained using any of the above methods).
Alternatively, you can re-use the Python code above and implement the mlflow.request_header_provider plugin.
Summary
I hope this guide helped you to deploy secure, serverless MLflow instances on the Google Cloud Platform using App Engine. Happy (serverless) experiment tracking!
A special thank you to Mateusz Pytel for the initial configuration.
Repository with MLflow App Engine Terraform module is here.
If you have any questions or concerns about deployment of MLflow on Google Cloud Platform, we encourage you to contact us.
Written by
Marcin Zabłocki
Our Ideas
Explore More Blogs

AI Revolution in Data Extraction: Structuring Emails, PDFs, and Videos
Let us explore some of the real-world use cases, emerging from this conversation, showing how generative AI is redefining what's possible.
Klaudia Wachnio


Contact