Blog
Deploy a custom Docker image on Azure ML using a blue-green deployment with Python

Introduction
Azure Machine Learning (Azure ML) is a popular machine learning service. Azure ML provides a lot of predefined functionality for deploying machine learning model endpoints, which is great. However, when you are trying to create a more custom solution, it can be quite difficult!
In this blogpost we'll dive into such a custom solution. We'll do the following:
- Deploy our ML model using a custom Docker image.
- Use a blue-green deployment strategy to ensure there is no downtime when deploying our model.
- Run smoke tests to see if our deployment is working as expected, before we replace our previous model.
- Use the Azure ML Python SDK to configure and manage deployment to Azure ML.
That's a lot of content, so let's get started!
Prerequisites
We recommend readers to write the code themselves to get the most out of this blogpost. To do so, you need the following:
- Python 3.12, which our code is written with
- Docker, so we can build, test and push our custom Docker image
- An existing Azure ML Workspace
- An existing Azure Container Registrey
Also, the following Python packages are required. You can install them using pip:
pip install fastapi=="0.109.2" azure-ai-ml=="1.13.0" azure-identity=="1.15.0"
Why use a custom Docker image on AzureML?
Azure provides many prebuilt Docker images. These images use common Python packages and are built with a Flask server.
However, these prebuilt images are not always suitable for our needs. We might want to use a different web framework, do extensive data validation before we process the data, or use models from outside of Azure ML.
For this example, we'll use FastAPI. FastAPI uses Pydantic, which allows us to enforce a schema on our API. This is useful for validating incoming requests and responses.
Why use Python and not the Azure CLI?
It's likely you've used the Azure CLI for tasks such as authentication and deploying resources to Azure. The Azure CLI is nice for experimenting with Azure resources, but it can be difficult to reason about when using the CLI to deploy multiple resources that depend on each other. This can be especially painful when deploying to Azure ML from within CI/CD pipelines: The logic often has to be implemented in bash scripts or in the YAML syntax of the pipeline itself.
Using Python gives us a couple of benefits:
- Easier to read
- Easier to write
- Easier to reason about
- Enables us to create a command line interface (CLI), allowing us to pass custom arguments to it
- Integration with our editors, which can provide hints on what to write
Using Python, we'll also make it easier to add a special touch to our deployment: a blue-green deployment strategy.
What is blue-green deployment and why use it?
In a straightforward deployment process, a running server application is replaced immediately with its new version. This can result in some downtime, or even worse: The application might not work at all! In this situation, the only way to recover is to redeploy the old version, or fix the problem and deploy an even newer version. But there is a better way.
Blue-green deployment is a process in which we deploy our new changes to a server (green) separately from the running server (blue). This allows us to deploy our changes, test them and apply them to our application only when our tests are succesful. This final step is done by switching all traffic from the blue to the green application. To be able to do this, we have a separate layer between our users and our application.
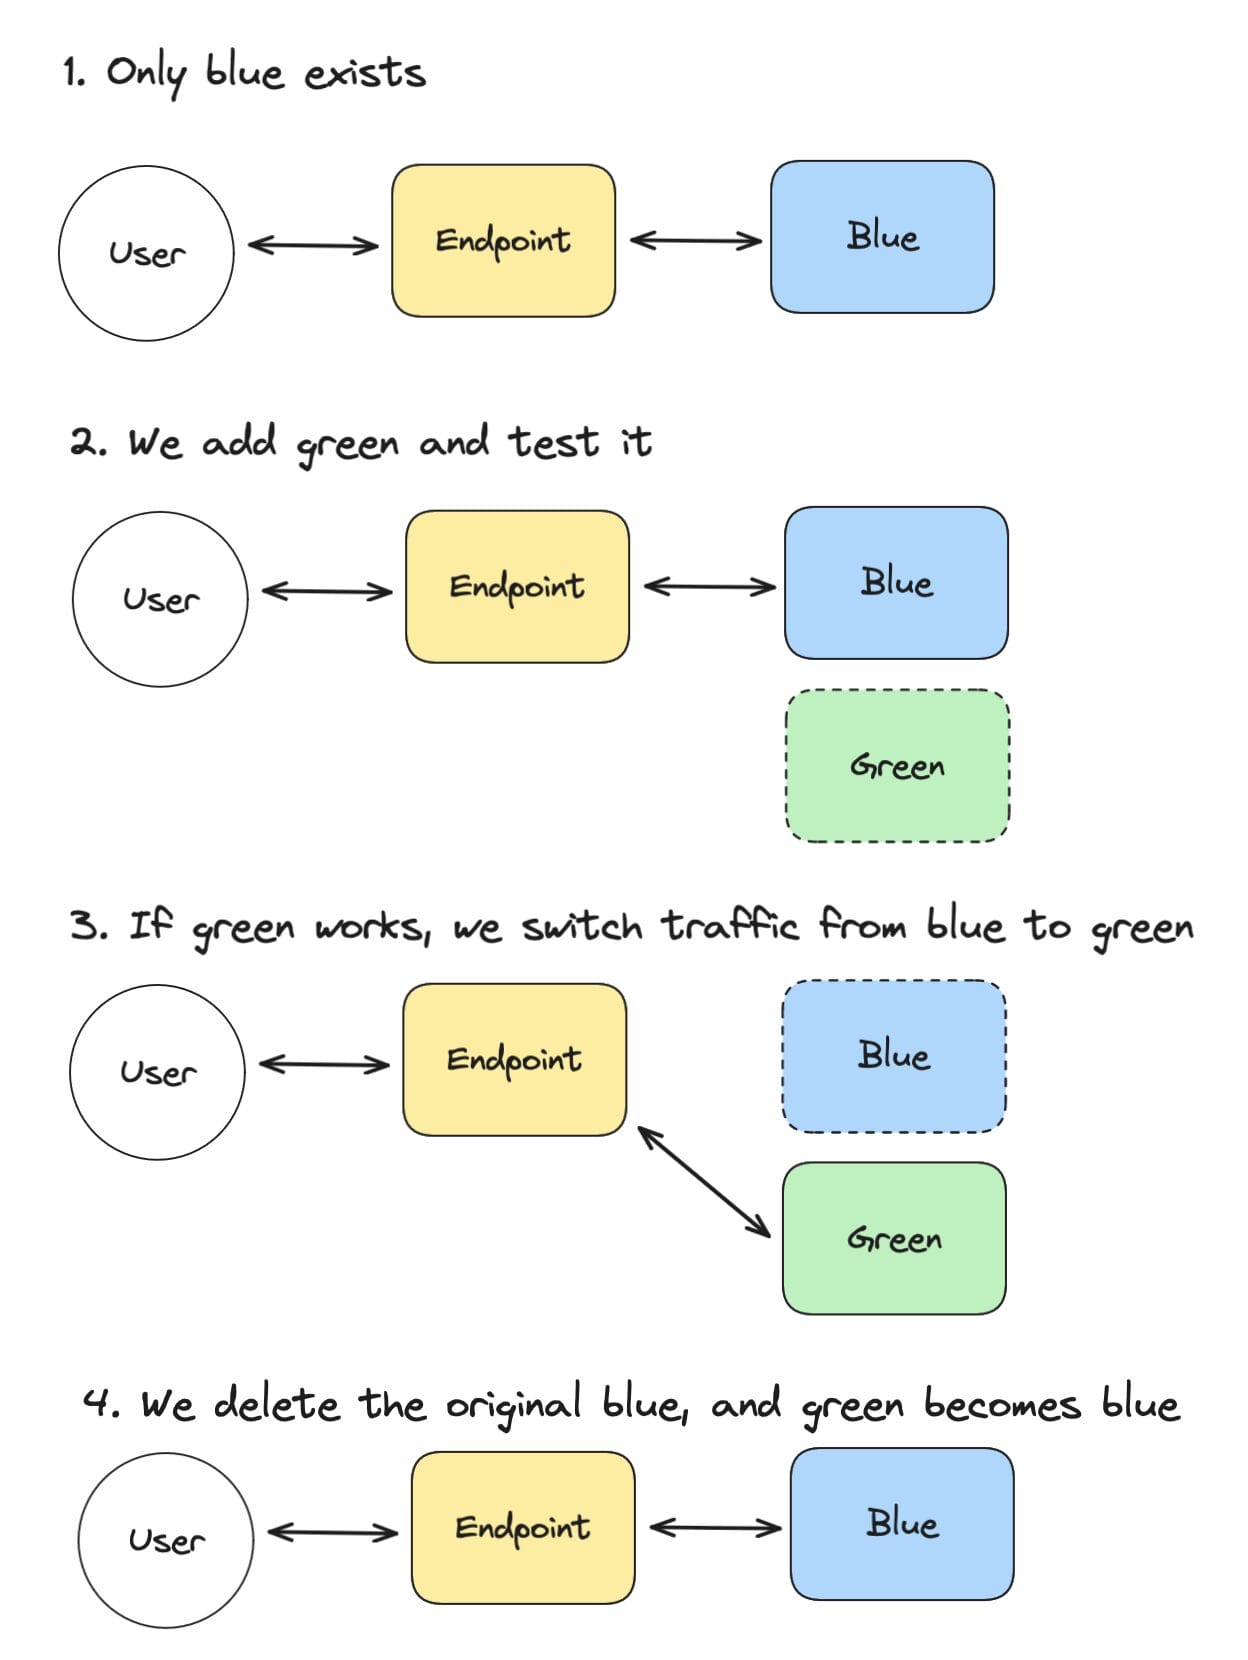
In steps, this works like this:
- We have only the blue application. The endpoint directs users to the blue application.
- We add a green application, which we tests separately. Users still communicate with the blue application via the endpoint.
- If our green application works as expected, we switch all endpoint traffic from blue to green. Users will now start using the green application.
- We delete the original blue application. Our green application becomes the new blue. Now the whole process can start again for new changes.
Set up custom Docker image using FastAPI
The FastAPI application
For this example, we'll create a small FastAPI application. This application will contain a linear regression model, which can provide predictions. We'll put the code in a Docker image that we will deploy as an Azure ML deployment.
Our FastAPI application will do the following: - Set up the FastAPI app: with a health check route and a prediction route. - Create request and response models using Pydantic, which will do automatic data validation for us. These models are used in the FastAPI endpoints. - Train a simple linear regression model. Note that the model is trained immediately when we run the file. In a real-world scenario, you would train your model separately and load it in your application.
Here is the code for our FastAPI application, which we'll put in a file called api.py:
from fastapi import FastAPI
from pydantic import BaseModel
from sklearn import linear_model

# We train a very simple model, since this is just an example
model = linear_model.LinearRegression()
X = [[0, 0], [1, 1], [2, 2]]
y = [0, 1, 2]
model.fit(X, y)

app = FastAPI(title="ML Endpoint")

class PredictionRequest(BaseModel):
    values: list[list[float]]

class PredictionResponse(BaseModel):
    predictions: list[float]

@app.get("/health")
def health():
    return {"status": "ok"}

@app.post("/predict", response_model=PredictionResponse)
def predict(request: PredictionRequest):
    y_pred = model.predict(request.values)
    return PredictionResponse(predictions=y_pred)
Note that the FastAPI code needs to match the environment configuration
Building with Docker
With Docker, we can build our FastAPI application into a Docker image. This ensures our application works the same everywhere. We'll use the following Dockerfile to do this:
FROM python:3.12-slim

WORKDIR /app

ADD requirements.txt .
RUN pip install --no-cache-dir -r requirements.txt

ADD api.py .

EXPOSE 8000
CMD ["uvicorn", "api:app", "--host", "0.0.0.0", "--port", "8000"]
Testing the Docker container locally
For testing purposes, you can build the container as follows:
docker build -t my-fastapi-app .
You can run it with the following command:
docker run -p 8000:8000 my-fastapi-app
Then connect to http://localhost:8000/docs to see the documentation of your local endpoint.
When we've confirmed it works as expected, we can build the image and push it to the Azure Container Registry.
Building and pushing the Docker image to Azure Container Registry
To build and push our Docker image, we need to do the following: 1. Login to Azure Container Registry (ACR) 2. Build our image with the right tag 4. Push our image
Login to Azure Container Registry (ACR)
az acr login --name $ACR_NAME
Build our image
docker build -t $ACR_NAME.azurecr.io/$IMAGE_NAME:$IMAGE_TAG .
Push our image
docker push $ACR_NAME.azurecr.io/$IMAGE_NAME:$IMAGE_TAG
Now that our image has been pushed, we can start deploying it to Azure ML.
Create Azure ML endpoint and deployment
Import your dependencies
To make the examples more clear, we import all our dependencies at the beginning:
from azure.ai.ml import MLClient
from azure.ai.ml.entities import (
  Environment,
  ManagedOnlineDeployment,
  ManagedOnlineEndpoint,
)
from azure.identity import DefaultAzureCredential
Get and set your variables
To be able to configure Azure ML correctly, you need the following variables:
SUBSCRIPTION_ID="..."
WORKSPACE_NAME="..."
RESOURCE_GROUP="..."
ACR_NAME="..."

INSTANCE_TYPE="..."
IMAGE_NAME="..."
IMAGE_TAG="..."
You can find these variables by going to the Azure Portal.
- SUBSCRIPTION_ID: See the Azure Docs.
- WORKSPACE_NAME: In Azure Portal, search for "Azure Machine Learning", click on it and copy the name you see in the list.
- RESOURCE_GROUP: Same as Workspace name, but copy the resource group.
- ACR_NAME: In Azure Portal, search for "Container registries", click it and copy the name of your container registry.
Set up the Azure ML Client
To configure Azure ML resources, we use the MLClient from the Azure ML library.
# The credential is required
credential = DefaultAzureCredential()

# The MLClient configures Azure ML
ml_client = MLClient(
    credential=credential,
    subscription_id=SUBSCRIPTION_ID,
    resource_group_name=RESOURCE_GROUP,
    workspace_name=WORKSPACE_NAME,
)
What are Endpoints and Deployments?
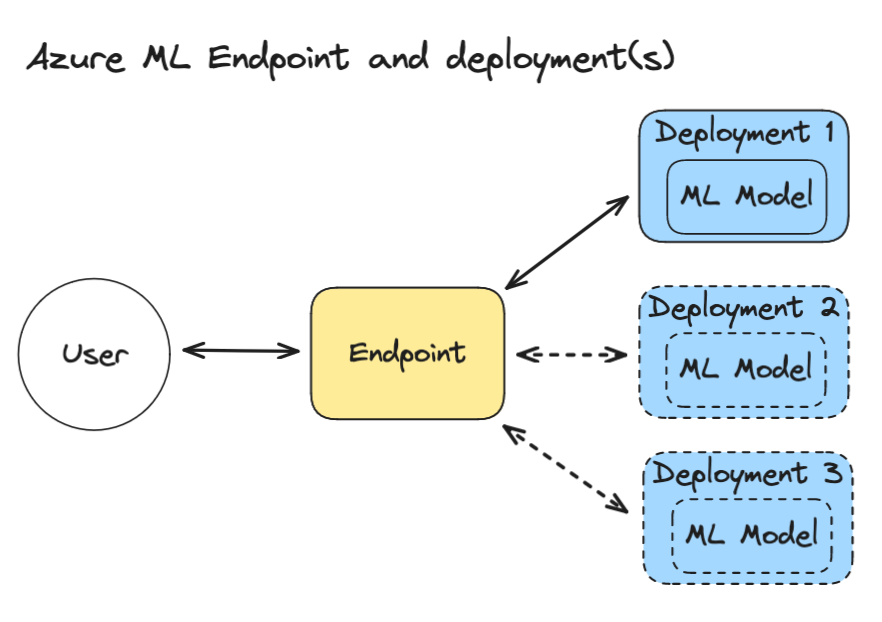
An Azure ML Endpoint is a web server that your users or applications can talk to. The endpoint handles incoming requests and authentication. Behind the endpoint, there can be one or multiple deployments. Deployments run your models or code that do calculations based on the data that comes in.
Create an endpoint
We create an endpoint as follows. If the endpoint already exists, it will be updated.
endpoint = ManagedOnlineEndpoint(
    name="my-endpoint-1234abc",  # Choose your own name; Note that it has to be unique across the Azure location (e.g. westeurope)
    auth_mode="key",  # We use a key for authentication
)

# Create the endpoint
ml_client.online_endpoints.begin_create_or_update(endpoint).result()
Note that the create_or_update method is asynchronous, so we use .result() to actually wait for it to finish. If you don't add this, you have to write additional code to check its status. The same technique is used in other deployment steps.
When we have our endpoint, we can start adding deployments to it.
Create a deployment
An Azure ML endpoint can have many deployments and you can configure how the endpoint splits traffic between different endpoints. Before we can create our deployment, we need to create an environment:
Create an environment
Before deploying a custom Docker container, we need to configure a custom Azure ML Environment. The environment requires:
- a name
- a link to the docker image
- an inference configuration, which configures how to route certain calls. This must match the routes of the FastAPI code we wrote earlier.
Here's how to create it in code:
# Configure a model environment
# This configuration must match with how you set up your API`
environment = Environment(
    name=f"{image_name}-env",
    image=f"{ACR_NAME}.azurecr.io/{IMAGE_NAME}:{IMAGE_TAG}",
    inference_config={
        "scoring_route": {
            "port": 8000,
            "path": "/predict",
        },
        "liveness_route": {
            "port": 8000,
            "path": "/health",
        },
        "readiness_route": {
            "port": 8000,
            "path": "/ready",
        },
    },
)
The variable environment can now be passed to the creation of the deployment:
Create deployment with environment
Set up a deployment with:
# Configure the deployment
deployment = ManagedOnlineDeployment(
    name=f"dp-{datetime.now():%y%m%d%H%M%S}",  # Add the current time to make it unique
    endpoint_name=endpoint.name,
    model=None,
    environment=environment,
    instance_type=INSTANCE_TYPE,
    instance_count=1,  # we only use 1 instance
)

# create the online deployment.
# Note that this takes approximately 8 to 10 minutes.
# This is a limitation of Azure. We cannot speed it up.
ml_client.online_deployments.begin_create_or_update(deployment).result()
Now that we've created our deployment, we should test if it works!
Run smoke tests to see if the deployment is working
Smoke testing is process to check if you can accept or reject a deployment. This fits in with blue-green deployment, because we can test our new deployment before we switch all traffic to it. This makes sure everything remains operational.
Test the deployment
Where there's smoke there's fire, so let's see if our deployment works as expected! We'll do the following: 1. We retrieve the endpoint URI 2. We retrieve the endpoint token, which we use to authenticate 3. We set the request headers with the token and the deployment name (if we don't, the request goes to the default deployment) 4. We'll create some test data, which matches the expected input of our FastAPI application 5. We send a request with the data to the endpoint using the httpx library
import httpx

test_data = {"values": [[0, 1], [1, 2]]}
endpoint_token = ml_client.online_endpoints.get_keys(name=endpoint.name).primary_key
headers = {
    "Authorization": f"Bearer {endpoint_token}",
    "Content-Type": "application/json",
    "azureml-model-deployment": deployment.name,
}

response = httpx.post(endpoint.scoring_uri, json=test_data, headers=headers)
We've sent our request and got a response, now let's check if it as expected:
Validate the response
httpx provides a raise_for_status method, which raises an exception if the response is not successful:
response.raise_for_status()
This code will also crash our program in case of an unsuccesful response. This is not what we want, because this will keep the failed deployment active. To resolve this, we can add a try-except block to catch the exception and delete the deployment if it fails. If this happens, we can also quit the program, because we cannot go any further.
try:
    response.raise_for_status()
except Exception:
    # When our test fails, we delete the deployment and stop the program
    print(f"Endpoint response error {response.status_code}: {response.text}")

    # Retrieve the logs for the failed deployment, so we can see what happened
    logs = ml_client.online_deployments.get_logs(
        name=deployment.name, endpoint_name=endpoint.name, lines=50
    )
    print(logs)

    # Delete the failed deployment
    ml_client.online_deployments.begin_delete(
        name=deployment.name, endpoint_name=endpoint.name
    ).result()

    # Quit the program
    raise SystemExit("Deployment failed.")
Switch traffic to the new deployment
If our new deployment works as expected, we can switch 100% of the endpoint traffic to it. We can do this as follows:
endpoint.traffic = {deployment.name: 100}
ml_client.online_endpoints.begin_create_or_update(endpoint).result()
Delete old deployments
After all the traffic has switched to the new deployment, we can delete all our old endpoints. Of course, you can also keep them around, if you want to have a fallback in case of unforeseen issues with your new deployment.
Delete your old deployments:
for existing_deployment in ml_client.online_deployments.list(endpoint_name=endpoint.name):
    if existing_deployment.name != deployment.name:
        ml_client.online_deployments.begin_delete(
            endpoint_name=endpoint.name,
            name=existing_deployment.name
        ).result()
Write a command line interface (CLI) to deploy your endpoint
Until now, all the code we've written is executed manually. In the spirit of MLOps, we should automate this process. We can do this by creating a CLI script that takes arguments and deploys our endpoint with one command. This CLI can be integrated into our CI/CD pipeline, such as Github Actions or Azure DevOps Pipelines.
We'll use argparse for this. We choose argparse because 1) our CLI is simple and 2) argparse is built into Python, so it requires no installation. This can save time, especially when rerunning the script often in our deployment pipeline, where dependencies often have to be reinstalled.
We setup our argument parsing like this:
import argparse

arg_parser = argparse.ArgumentParser(description="Deploy an Azure ML endpoint and deployment.")

arg_parser.add_argument("--subscription-id", type=str, required=True, help="Azure subscription ID")
arg_parser.add_argument("--resource-group", type=str, required=True, help="Azure resource group name")
arg_parser.add_argument("--workspace-name", type=str, required=True, help="Azure ML workspace name")
arg_parser.add_argument("--endpoint-name", type=str, required=True, help="Azure ML endpoint name")
arg_parser.add_argument("--acr-name", type=str, required=True, help="Azure Container Registry name")
arg_parser.add_argument("--image-name", type=str, required=True, help="Docker image name")
arg_parser.add_argument("--image-tag", type=str, required=True, help="Docker image tag")
arg_parser.add_argument("--instance-type", type=str, required=True, help="Azure ML instance type")

args = arg_parser.parse_args()
Now you can use the args variable to access the arguments you passed to the script. For example, you can use args.subscription_id to access the subscription ID you passed to the script. It will look something like this:
python deploy.py
  --subscription-id "..."
  --resource-group "..."
  --workspace-name "..."
  --endpoint-name "..."
  --acr-name "..."
  --image-name "..."
  --image-tag "..."
  --instance-type "..."
Make sure to fill in the right values for each argument.
Conclusion
In this blogpost, we managed to do a lot:
- We deployed a custom Docker image to Azure ML, giving us full control of the API and the models we use.
- We avoided downtime of our endpoint by using a blue-green deployment strategy.
- We used the Azure ML Python SDK to configure and manage deployment to Azure ML, making it easier to reason about our deployment.
- We created a command line interface that deploys our endpoint with one command, for use in CI/CD pipelines.
We hoped you enjoyed this blogpost!
Photo by Ivan Bandura on Unsplash
Written by
Timo Uelen
Timo Uelen is a Machine Learning Engineer at Xebia.


Contact