
In the first post of this three-part series, we described elementary cellular automata and modeled them in the Rust programming language. In this post, the second of the three-part series, we describe the theory underlying entity-component-system (ECS) architecture, how the Bevy game engine operationalizes this into practice, how to set up and streamline Bevy for cross-platform development, and how to build a static user interface using Bevy. You may want to keep the fully-worked project handy while you read.
Entity-component-system (ECS) architecture
We started with theory, moved to practice, and now it’s time for some more theory. Before we dive into using Bevy, let’s first make a pit stop to learn about entity-component-system (ECS) architecture.
In ECS architecture, a discrete event simulator subjects numerous entities to systems that govern their lifecycles and mediate their interactions through operations on their stateful components.
- An entity is an opaque atom of identity. Typically devoid of any intrinsic properties, it can usually be represented with a simple integer.
- A component ascribes a role to an entity and encapsulates any data necessary to model that role. Components may be affixed to entities permanently or transiently, and are usually maintained extrinsically, i.e., mapped onto an entity through an external data structure. In a physics simulation, a “rigid body” component might adorn every entity that represents a physical object; the “rigid body” component could include state to model mass, linear drag, angular drag, and so forth.
- A system embodies a process that acts only on entities that instantaneously possess some target combination of components. Systems can: inject entities into the simulation; delete entities from the simulation; attach components to entities; detach components from entities; modify the state inside components; manage global resources; and interface with other application modules.
ECS is common in video games and simulations, but works well whenever applications are founded upon data-oriented design principles. It fits snugly alongside other paradigms, like object-oriented or functional programming, taking an orthogonal approach to solving related problems of structure and composition.
Bevy
Bevy is a data-driven game engine with a fast, flexible ECS. It’s relatively new, but it’s also powerful and cross-platform, with support for 2D and 3D render pipelines, scene persistence, cascading style sheets (CSS), and hot reloading. Its build system permits fast recompilation, so you spend more time testing than waiting. It also integrates smoothly with numerous popular crates, like Serde (for serialization) and egui (for building immediate-mode graphic user interfaces). We’re barely going to scratch the surface of what Bevy can do in this project.
Bevy’s entities are generational indices. Its components are structs and enums: ordinary data types for which you can implement the Component trait, which you typically do just by deriving Component. Its systems are ordinary functions whose signatures are built-in up from types that implement the SystemParam trait; these types are provided by the Bevy framework, and many of them are generic over (your own) component types.
If this is too abstract, don’t worry. We’ll put it together one piece at a time with concrete examples.
Setting up cross-platform Bevy
Let’s get Bevy wired up for both native and web development and deployment. We’ll go through it step-by-step, but if you need more instructions, you can check out the official or unofficial Bevy setup tips.
In Cargo.toml, we add not one, but two dependencies for Bevy.
[dependencies.bevy]
version ="0.12.0"
[target.'cfg(not(target_family = "wasm"))'.dependencies.bevy]
version ="0.12.0"
features =["dynamic_linking"]
The first section brings Bevy into the project using the default set of features, so long as there isn’t an override for a more specific configuration. Naturally, the second section is such an override; in particular, this override enables dynamic linking of the Bevy crate, which speeds up your application development cycle. Dynamic linking is only available for native targets, not WebAssembly (WASM), hence the conditionality.
Now we need to instruct Cargo to benefit from dynamic linking. In .cargo/config.toml, we provide the various platform-specific configurations.
[target.x86_64-unknown-linux-gnu]
linker ="clang"
rustflags =["-Clink-arg=-fuse-ld=lld"]
[target.x86_64-apple-darwin]
rustflags =[
 "-C",
 "link-arg=-fuse-ld=/usr/local/opt/llvm/bin/ld64.lld"
]
[target.aarch64-apple-darwin]
rustflags =[
 "-C",
 "link-arg=-fuse-ld=/opt/homebrew/opt/llvm/bin/ld64.lld"
]
[target.x86_64-pc-windows-msvc]
linker ="rust-lld.exe"
[target.wasm32-unknown-unknown]
runner ="wasm-server-runner"
We support Linux, macOS, and Windows on x86; macOS on AArch64; and web on WASM. As recommended by the folks behind Bevy, we use lld, the linker supplied with LLVM. You don’t have to get lld, but it’s recommended for fastest link-time performance, which translates directly into less time waiting for builds to complete. If you don’t have lld already and don’t want to install it, you can just replace the paths to your preferred linker. If you do want to install lld, you can follow the installation instructions provided by Bevy.
The runner key in the WASM section at the end specifies a Cargo plugin, wasm-server-runner, that enables you to use cargo run --target wasm32-unknown-unknown to test a WASM build. You can install it with cargo install wasm-server-runner.
It took a little bit of work, but Bevy is ready to go — on five platforms.
Cross-platform program arguments
It would be nice to let the user set the initial conditions for the evolution. There are two interesting configuration parameters:
- The first generation of the cellular automaton.
- The rule by which the cellular automaton will evolve from one generation to the next.
As we saw above, we can describe a cellular automaton with a u64 and a rule with a u8, and use from to obtain our model types. But there’s enough complexity to parsing command-line arguments that we want to delegate that responsibility to a mature third-party crate: Clap. Let’s bring it into the project by adding this to Cargo.toml:
[target.'cfg(not(target_family = "wasm"))'.dependencies.clap]
version ="4.4.8"
features =["derive"]
Back in src/main.rs, we bundle our configuration parameters into a struct with a declarative strategy, letting Clap do the hard work for us:
/// Fun with cellular automata! Set the first generation with a known seed
/// and/or rule, or let the program choose randomly. Watch the automaton evolve,
/// and influence its evolution with the keyboard and mouse.
#[derive(Debug,Default)]
#[cfg_attr(not(target_family ="wasm"), derive(Parser))]
structArguments
{
 /// The rule, specified as a Wolfram code between 0 and 255, inclusive. If
 /// unspecified, the rule will be chosen randomly.
 #[cfg_attr(not(target_family ="wasm"), arg(short, long))]
 rule:Option<u8>,
 /// The first generation, specified as a 64-bit integer that represents the
 /// complete population. Lower numbered bits correspond to cells on the
 /// right of the visualization. If unspecified, the first generation will be
 /// chosen randomly.
 #[cfg_attr(not(target_family ="wasm"), arg(short, long))]
 seed:Option<u64>
}
There’s some apparent complexity, so let’s unpack:
- We derive
DebugandDefault, because both are handy. - When the target isn’t WASM, we derive
clap::Parser, which will generate all the necessary boilerplate to parse our arguments from the command line. - When the target isn’t WASM, we supply the
argattribute from theClapcrate. This primes the generated parser with a short form, long form, and description of the argument; the description is taken directly from the doc comment, which is why I included it in the excerpt. You want to avoid relying on any fancy Rustdoc formatting, because Clap will dump that formatting directly to standard output when the program is run with--help. ruleandseedare both optional. We randomize whatever the user doesn’t specify.- Clap also emits the doc comment for the struct itself as the summary of the program, so the same caveats apply as above; keep it simple and address the user directly.
That handles the native case, but the web doesn’t have command line arguments. It does, however, have a query string comprising search parameters, which play an analogous role to command-line arguments. We pop over to Cargo.tml one more time to register a conditional dependency on web-sys:
[target.'cfg(target_family = "wasm")'.dependencies.web-sys]
version ="0.3.65"
features =["Location","Url","UrlSearchParams"]
web-sys partitions the enormous web API using crate features. We need to access the Location, Url, and UrlSearchParams types in order to build our own simple search parameter parser, so we specify the eponymous features.
Oh, while we’re still looking at the build file, we might as well do one more thing. We promised randomization, so let’s bring in the rand crate to handle that. We’ll insert it right before ringbuffer, to keep things alphabetized.
[dependencies]
rand ="0.8.5"
ringbuffer ="0.15.0"
We can implement the two cases now. Back over to src/main.rs now! For native, we just wrap the result of Clap-generated parse in a Some:
#[cfg(not(target_family ="wasm"))]
fn arguments()->Option<Arguments>
{
 Some(Arguments::parse())
}
For web, we do a little bit more work, but it closely tracks the web APIs:
#[cfg(target_family ="wasm")]
fn arguments()->Option<Arguments>
{
 let href = web_sys::window()?.location().href().ok()?;
 let url = web_sys::Url::new(&href).ok()?;
 let params = url.search_params();
 let rule = params.get("rule").and_then(|rule| rule.parse().ok());
 let seed = params.get("seed").and_then(|seed| seed.parse().ok());
 Some(Arguments{ rule, seed })
}
We called the function arguments in both cases, and exercised care to give it the same signature, so we can use the same name and conventions to call it on native and web.
Giving control to Bevy
We have the arguments now, so it’s time to use them. Let’s see how main initializes Bevy and hands over control to its engine loop.
fn main()
{
 let args = arguments().unwrap_or(Arguments::default());
 let rule = args.rule
 .and_then(|rule|Some(AutomatonRule::from(rule)))
 .unwrap_or_else(|| random::<u8>().into());
 let seed = args.seed
 .and_then(|seed|Some(Automaton::<AUTOMATON_LENGTH>::from(seed)))
 .unwrap_or_else(|| random::<u64>().into());
 App::new()
 .insert_resource(
 History::<AUTOMATON_LENGTH, AUTOMATON_HISTORY>::from(seed)
 )
 .insert_resource(rule)
 .add_plugins(AutomataPlugin)
 .run();
}
Here we see the call to arguments, which binds to the correct implementation based on compilation target. As promised, there’s nothing special about the call — it’s a perfectly ordinary function call. If it fails for any reason, we plug in the default Arguments, which will cause both the rule and first generation to be randomized.
App is our gateway into the Bevy framework. We won’t be referring to it directly after initialization, but it holds onto the world, the runner, and the plugins. The world is the complete collection of system elements that compose the application model. The runner is the main loop that processes user input, evolves the world over time, and controls rendering. And plugins are pre-packaged mini-worlds: collections of resources and systems that can be reused across many projects.
A resource is a global singleton with a unique type. Systems access resources via dependency injection. We use insert_resource to register both the rule and the history, making them available for dependency injection into our systems. Anything that derives Resource can be used as a resource. In the first blog post of the series, we derived Resource for both AutomatonRule and History, and now you know why!
AutomataPlugin is the plugin that bundles together all of our other resources and systems. We attach it via add_plugins. Finally, we call run to hand control over to Bevy. From here on, the engine’s main loop is responsible for all execution.
Modular composition with plugins
Perhaps surprisingly, our plugin is entirely stateless. Over in src/ecs.rs, where we’re going to spend the rest of our time, we see:
pubstructAutomataPlugin;Stateless is fine, because we only care about the plugin’s behavior, which is to finish initializing the application. For that, we implement the Plugin trait:
implPluginforAutomataPlugin
{
 fn build(&self, app:&mutApp)
 {
 let _seed = app.world.get_resource::<History>()
 .expect("History resource to be inserted already");
 let rule = app.world.get_resource::<AutomatonRule>()
 .expect("AutomatonRule resource to be inserted already");
 letmut window =Window{
 resolution:[1024.0,768.0].into(),
 title: rule.to_string(),
 ..default()
 };
 set_title(&mut window,*rule);
 app
 .add_plugins(DefaultPlugins.set(WindowPlugin{
 primary_window:Some(window),
 ..default()
 }))
 .add_plugins(FrameTimeDiagnosticsPlugin)
 .insert_resource(EvolutionTimer::default())
 .insert_resource(AutomatonRuleBuilder::default())
 .add_systems(Startup, add_camera)
 .add_systems(Startup, build_ui)
 .add_systems(Update, maybe_toggle_instructions)
 .add_systems(Update, accept_digit)
 .add_systems(Update, maybe_show_fps)
 .add_systems(Update, maybe_toggle_cells)
 .add_systems(Update, update_next_rule)
 .add_systems(Update, maybe_change_rule)
 .add_systems(Update, evolve)
 .add_systems(Update, update_fps);
 }
}
There’s no requirement for a plugin to be stateless, so build borrows both the plugin and the App. We use the statically polymorphic get_resource to extract the seed and the rule that we registered in main. Note that we pull these resources using their static types only, which is why every resource needs a unique static type. This is not a problem, because if we want to register, say, 20 strings, we can wrap each in a disparate newtype first; newtypes have zero runtime cost, and also provide better semantics, so this restriction guides us toward better modeling decisions. We don’t use the seed at all, but its availability is an assertable precondition for installing our plugin, so we extract it anyway.
We use the rule to set the title for the Window. On native systems, this affects the title bar of the window. But in WASM, Window maps onto a canvas, which doesn’t have a title bar. We’ll need a cross-platform mechanism to handle this properly, so we’ll revisit this below.
DefaultPlugins aggregates the standard plugins that are widely useful across most projects:
LogPlugin, a logging plugin built on top of the populartracing-subscribercrate.TaskPoolPlugin, for managing task poolsTypeRegistrationPlugin, which provides low-level support for the type-based resource registration that we saw aboveFrameCountPlugin, for counting framesTimePlugin, which adds support for discrete time and timersTransformPlugin, to enable entity placement and transformationHierarchyPlugin, for building component hierarchiesDiagnosticsPlugin, for collecting various execution and performance metricsInputPlugin, which provides access to keyboard, mouse, and gamepad inputWindowPlugin, for cross-platform windowing supportAccessibilityPlugin, a plugin to manage and coordinate integrations with accessibility APIs
The set method on DefaultPlugins lets us replace one of these plugins. We manually supply window, which we already created and customized, to serve as the primary window for the application.
After adding the basic plugins, we insert two more resources, one to manage the evolution rate and the other to buffer user input when entering a new rule. Finally, we pour in all the systems that together define the behavior of our application. Bevy groups systems together into predefined schedules. The Startup schedule runs exactly one time, during initialization of the application, so systems may be recorded here to perform some nonrecurring setup logic. The Update schedule runs once per iteration of the engine loop. add_systems associates a system with a schedule, and incorporates that association into the world.
Setting the window title
Before diving into the various systems, let’s take a short detour to reach catharsis about window titles. We abstracted the logic out to set_title, so that we could specialize behavior differently for native and web.
The native implementation is quite trivial. We already have a Window, and the Window has a title bar, so it’s a simple matter of updating a field:
#[cfg(not(target_family ="wasm"))]
fn set_title(window:&mutWindow, rule:AutomatonRule)
{
 window.title = rule.to_string();
}
The web implementation isn’t too much harder, but it does require remembering how web works. At the root of the namespace is window, which holds onto a complete browser window. A window has a document, which is the root for the page nodes, organized according to the web’s Document Object Model (DOM). A document has a title, which is displayed in the document tab or window title bar (for rare non-tabbed browsers). web-sys models the web APIs closely, so we can follow this chain of custody directly:
#[cfg(target_family ="wasm")]
fn set_title(_window:&mutWindow, rule:AutomatonRule)
{
 web_sys::window().unwrap().document().unwrap().set_title(&rule.to_string());
}
unwrap is safe here because our host application is a web browser. Either call would fail only for a headless host, like Node.js, where a graphical cellular automaton simulator wouldn’t even make sense.
Camera
Bevy is a game engine that supports multiple scenes, so it serves a broader, more general purpose than a run-of-the-mill UI toolkit. Entities don’t just appear in our window because we place them, we need to watch them through a camera. If you don’t add a camera, then you’ll be staring at a pitch black window.
fn add_camera(mut commands:Commands)
{
 commands.spawn(Camera2dBundle::default());
}
add_camera is a system that we added to the Startup schedule. Its argument, Commands, is our interface to the Bevy command queue, which allows us to spawn entities, add components to entities, remove components from entities, and manage resources.
spawn creates a new entity with the specified component attached. The argument can be anything, so long as it represents a bundle. A bundle is just a batch of components, and any component can be construed as a batch of one. In terms of traits, spawn expects an implementation of the trait Bundle, and every type that implements the trait Component also automatically implements the trait Bundle. Bevy implements Bundle for tuples of components, so this makes it handy to spawn an entity with multiple components attached.
Camera2dBundle aggregates the many components that together provide a view onto some scene. The default instance provides an orthographic projection, so lines and parallelism are preserved at the expense of distances and angles. For our purposes, this ensures that all cells will appear congruent regardless of their distance to the lens.
The user interface
There are essentially four user interface elements in our application:
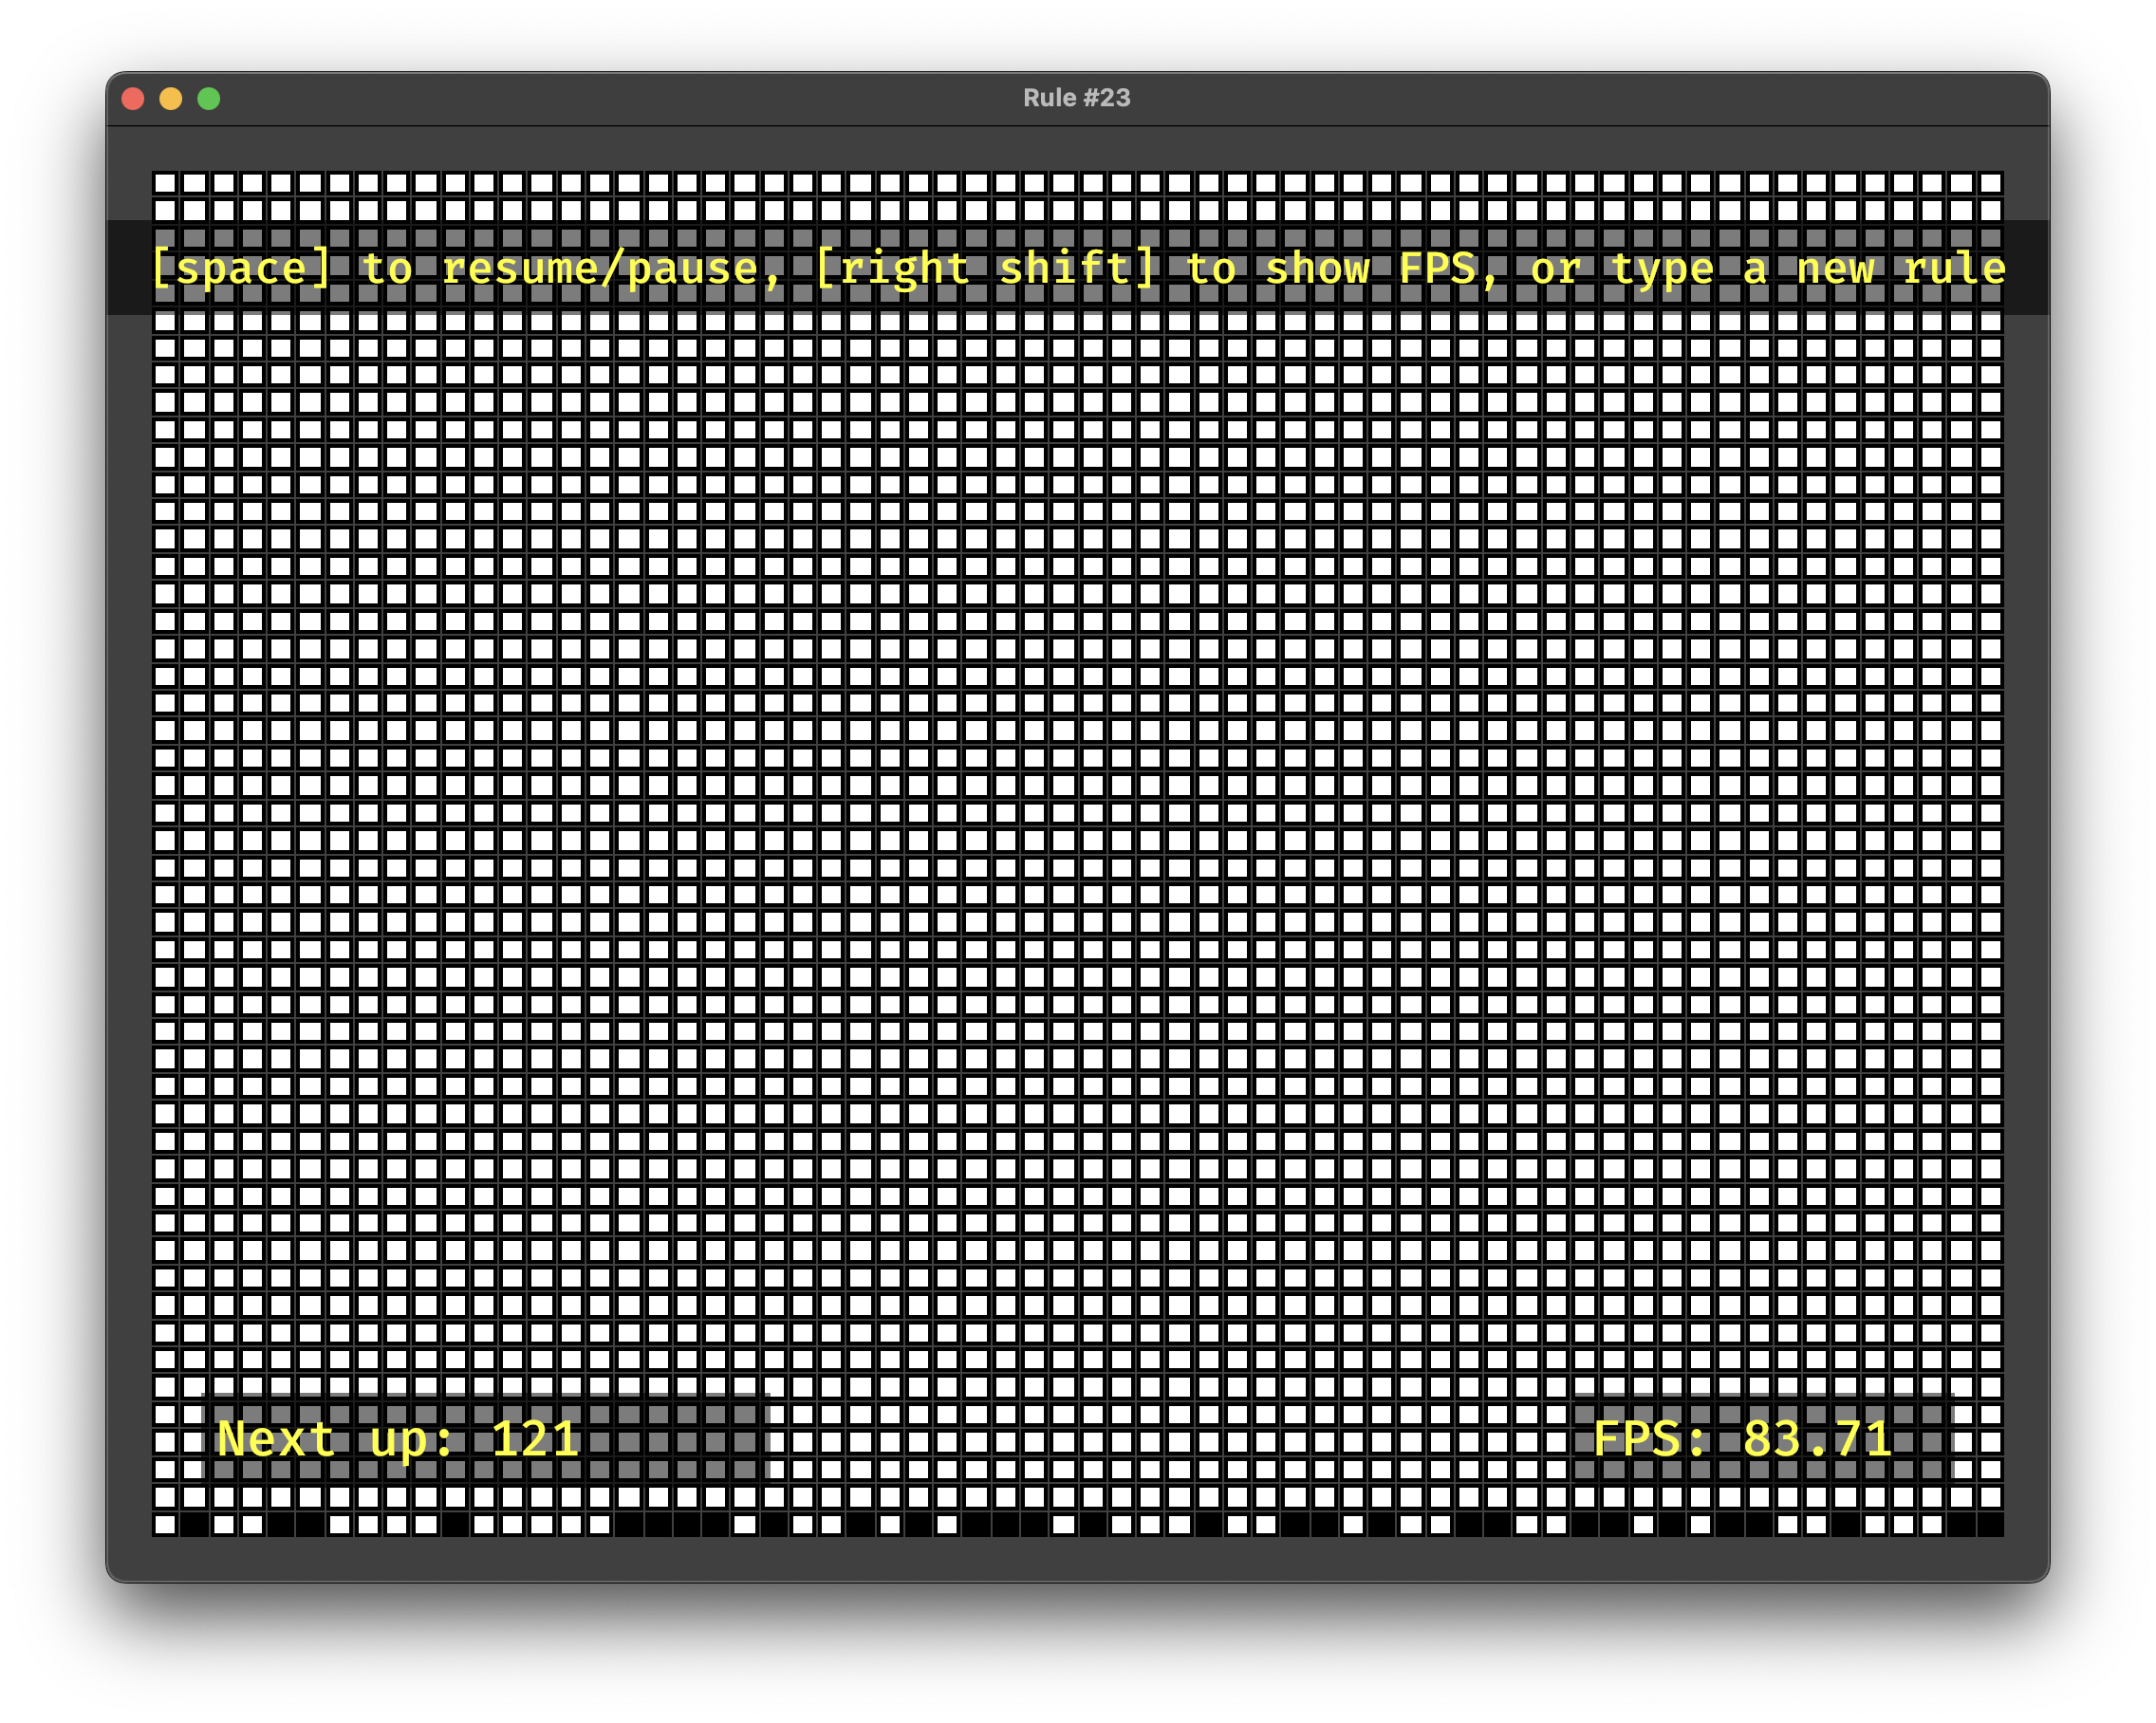
- The most obvious is the grid of cells that represents the history of the cellular automaton. As mentioned before, each automaton comprises 64 cells, and we retain 50 generations. Each cell has a black border, and is filled black if it’s “on” and white if it’s “off”. The bottom row represents the newest generation, so the generations scroll bottom-to-top over time as the evolution runs. We want to let the user toggle the newest generation between “on” and “off”, so we use clickable buttons for the last row, and we fill the button with yellow when hovered, as a discoverable indication of interactivity. None of the other cells are interactive, so mere rectangles suffice.
- The semitransparent banner near the top of the grid contains abbreviated instructions to guide the user toward supported keyboard interactions. This banner is shown only when the simulator is paused. Naturally, the simulator begins paused so that the user can see the banner a learn a bit about what behaviors are supported.
- The semitransparent banner in the lower left shows the next rule that will run. This banner appears when the user presses a digit, either on the number row or on the number pad, remains on the screen while the user is typing additional digits, and disappears when the user is finished. So if the user types “121”, the banner will first show “1”, then “12”, and finally “121”. If the user types an invalid rule number, like “500”, then the banner will show “Error”.
- The semitransparent banner in the lower right shows the instantaneous frames per second (FPS), which is the rendering rate for the graphical pipeline, i.e., how often the view redraws. The iteration rate for the engine loop is measured in ticks per second (TPS), where a tick is a single iteration. Some game engines separate these two concepts, but Bevy ties them together directly, so $FPS = TPS$. FPS therefore gives us a coarse performance metric. This banner only appears while the user holds down the right shift key.
The build_ui system belongs to the Startup schedule. We are going to create the UI elements only once, then mutate them in place from our systems. Only the call graph rooted at build_ui will spawn entities, and these entities survive until the application terminates.
fn build_ui(history:Res<History>,mut commands:Commands)
{
 commands
 .spawn(NodeBundle{
 style:Style{
 height:Val::Percent(100.0),
 width:Val::Percent(100.0),
 ..default()
 },
 background_color:BackgroundColor(Color::DARK_GRAY),
 ..default()
 })
 .with_children(|builder|{
 build_history(builder,&history);
 build_instruction_banner(builder);
 build_next_rule_banner(builder);
 build_fps_banner(builder);
 });
}
This system also receives access to the command queue, but something new is happening. Res is the injection point for the History that we registered as a resource. Res acts like an immutable borrow, here providing us read access to the whole History. Just by including this parameter, Bevy knows statically to inject the History that we registered. Of course, it’s possible to forget to register a resource; in this case, Bevy will panic at runtime prior to invoking a system that requires the missing resource. You generally find such problems immediately when you run the application, so it’s not a big deal that the registration check happens at runtime.
build_ui spawns an entity to represent the whole user interface. That entity serves as the root of the containment hierarchy that includes the four major elements mentioned above, each of which encompasses its own constituent sub-elements. NodeBundle is the component type that serves as the basic UI element. Style supports a sizable subset of the features of Cascading Style Sheets (CSS), including Flexbox and Grid. Here we ensure that the element will occupy all available space in the window.
Bevy passes a ChildBuilder to with_children, which permits hierarchical composition of entities. We pass it into each of our subordinate UI element builders.
History view
In build history, we lay out the grid that visualizes the evolution of our cellular automaton over the last fifty generations:
fn build_history(builder:&mutChildBuilder, history:&History)
{
 builder
 .spawn(NodeBundle{
 style:Style{
 display:Display::Grid,
 height:Val::Percent(100.0),
 width:Val::Percent(100.0),
 aspect_ratio:Some(1.0),
 padding:UiRect::all(Val::Px(24.0)),
 column_gap:Val::Px(1.0),
 row_gap:Val::Px(1.0),
 grid_template_columns:RepeatedGridTrack::flex(
 AUTOMATON_LENGTH as u16,1.0),
 grid_template_rows:RepeatedGridTrack::flex(
 AUTOMATON_HISTORY as u16,1.0),
 ..default()
 },
 background_color:BackgroundColor(Color::DARK_GRAY),
 ..default()
 })
 .with_children(|builder|{
 for(row, automaton) in history.iter().enumerate()
 {
 for(column, is_live) in automaton.iter().enumerate()
 {
 cell(builder,CellPosition{ row, column },*is_live);
 }
 }
 });
}
We use CSS Grid to ensure that the cells are uniformly sized. In the closure passed to with_children, we iterate through the complete history to emit the cells. CellPosition is a custom component:
#[derive(Copy,Clone,Debug,Component)]
structCellPosition
{
 row: usize,
 column: usize
}
Just as deriving Resource is sufficient to permit a type’s use as a resource, deriving Component is sufficient to permit a type’s use as a component. As the placement loop illustrates, row increases top-to-bottom, while column increases left-to-right.
fn cell(builder:&mutChildBuilder, position:CellPosition, live: bool)
{
 builder
 .spawn(NodeBundle{
 style:Style{
 display:Display::Grid,
 padding:UiRect::all(Val::Px(2.0)),
 ..default()
 },
 background_color: liveness_color(true),
 ..default()
 })
 .with_children(|builder|{
 if position.is_active_automaton()
 {
 builder.spawn(
 (
 ButtonBundle{
 background_color: liveness_color(live),
 ..default()
 },
 position
 )
 );
 }else{
 builder.spawn(
 (
 NodeBundle{
 background_color: liveness_color(live),
 ..default()
 },
 position
 )
 );
 }
 });
}
We emit a visual cell with the eponymous cell function. We indulge in some CSS Grid chicanery to surround our cell with a 2px border. is_active_automaton answers true if and only if the row corresponds to the newest generation, so we use it choose whether to attach a clickable ButtonBundle component or an inactive NodeBundle component. We set the cell color with liveness_color, which produces black for “on” cells and white for “off” cells.
If you look carefully, you’ll see that spawn is receiving 2-tuples — the UI bundle and our CellPosition. The resultant entity will have both components attached. This will end up being important when we run the evolve system.
Instruction banner
Building the instruction banner is very similar, but contains a few new pieces:
fn build_instruction_banner(builder:&mutChildBuilder)
{
 builder
 .spawn(
 (
 NodeBundle{
 style:Style{
 display:Display::Flex,
 position_type:PositionType::Absolute,
 height:Val::Px(50.0),
 width:Val::Percent(100.0),
 padding:UiRect::all(Val::Px(8.0)),
 top:Val::Px(50.0),
 justify_content:JustifyContent::Center,
 ..default()
 },
 background_color:BackgroundColor(
 Color::rgba(0.0,0.0,0.0,0.8)
 ),
 ..default()
 },
 Instructions
 )
 )
 .with_children(|builder|{
 builder.spawn(
 TextBundle::from_section(
 "[space] to resume/pause,[right shift] to
 show FPS, or type a new rule",
 TextStyle{
 font_size:28.0,
 color: LABEL_COLOR,
 ..default()
 }
 )
 .with_style(Style{
 align_self:AlignSelf::Center,
 ..default()
 })
 );
 });
}
Since we are creating an overlay, we use absolute positioning. We make the background mostly opaque to provide enough contrast to read the instructional text label. We attach a custom Instructions component to the overlay. This is a stateless marker component that tags the overlay for easy access later.
#[derive(Component)]
structInstructions;
Inside the overlay, we place a TextBundle that holds and styles the desired text. A TextBundle comprises multiple sections, each of which sports different text. This supports easy piecemeal substitution — your label can have static and dynamic portions, and you just swap out the dynamic portions whenever they change. Nothing needs to change in this label, however, so we employ but a single section.
While there are several centering strategies that ought to have worked, there are shortcomings in the CSS implementation, and I only found one strategy that worked reliably in all cases:
- In the parent entity’s
Style, setdisplaytoDisplay::Flex. - In the parent entity’s
Style, setjustify_contenttoJustifyContent::Center. - In the child entity’s
TextBundle‘sStyle, setalign_selftoAlignSelf::Center.
Save yourself some time and follow those steps if you want to center text in Bevy!
Next-rule banner
The next-rule banner presents the buffered user input that contributes toward ingestion of the next rule. It’s so similar to build_instruction_banner that we can ignore most of the code, focusing just on what’s different:
fn build_next_rule_banner(builder:&mutChildBuilder)
{
 builder
 .spawn(
 (
 NodeBundle{
 style:Style{
 display:Display::None,
 position_type:PositionType::Absolute,
 height:Val::Px(50.0),
 width:Val::Px(300.0),
 padding:UiRect::all(Val::Px(8.0)),
 bottom:Val::Px(50.0),
 left:Val::Px(50.0),
 ..default()
 },
 background_color:BackgroundColor(
 Color::rgba(0.0,0.0,0.0,0.8)
 ),
 ..default()
 },
 NextRule
 )
 )
 .with_children(|builder|{
 builder
 .spawn(
 (
 TextBundle::from_sections([
 TextSection::new(
 "Next up: ",
 TextStyle{
 font_size:32.0,
 color: LABEL_COLOR,
 ..default()
 },
 ),
 TextSection::from_style(TextStyle{
 font_size:32.0,
 color: LABEL_COLOR,
 ..default()
 })
 ]),
 NextRuleLabel
 )
 );
 });
}
We attach a custom NextRule component instead of an Instructions component, but it serves the same purpose — to give this entity a systemic identity that is uniquely addressable within the application.
#[derive(Component)]
structNextRuleLabel;
This time we hand an array of TextSections to TextBundle::from_sections. The first we treat as static text, and the second as dynamic. In particular, we update the second section to show the currently buffered next rule. We attach another custom marker component, NextRuleLabel, to the TextBundle.
#[derive(Component)]
structNextRuleLabel;
FPS banner
The FPS banner is identical to the next-rule banner except for position, specific text, and marker components. We substitute "FPS: " for "Next up:", the Fps component for the NextRule component, and the FpsLabel component for the NextRuleLabel component.
#[derive(Component)]
structFps;
#[derive(Component)]
structFpsLabel;
fn build_fps_banner(builder:&mutChildBuilder)
{
 builder
 .spawn(
 (
 NodeBundle{
 style:Style{
 display:Display::None,
 position_type:PositionType::Absolute,
 height:Val::Px(50.0),
 width:Val::Px(200.0),
 padding:UiRect::all(Val::Px(8.0)),
 bottom:Val::Px(50.0),
 right:Val::Px(50.0),
 ..default()
 },
 background_color:BackgroundColor(
 Color::rgba(0.0,0.0,0.0,0.8)
 ),
 ..default()
 },
 Fps
 )
 )
 .with_children(|builder|{
 builder
 .spawn(
 (
 TextBundle::from_sections([
 TextSection::new(
 "FPS: ",
 TextStyle{
 font_size:32.0,
 color: LABEL_COLOR,
 ..default()
 },
 ),
 TextSection::from_style(TextStyle{
 font_size:32.0,
 color: LABEL_COLOR,
 ..default()
 })
 ]),
 FpsLabel
 )
 );
 });
}
Sweet, we are done with building up the user interface. In the next and final part of this three-part blog series we will add dynamism — evolution and user interactivity.
Written by

Todd Smith
Rust Solution Architect at Xebia Functional. Co-maintainer of the Avail programming language.
Our Ideas
Explore More Blogs


Contact