Blog
Autoscaling Azure DevOps Pipelines Agents with KEDA

1. Introduction
As organizations scale their DevOps practices, the need for efficient resource management and automation becomes critical. One of the key challenges in large-scale CI/CD environments is managing the availability of build agents, especially when working with hundreds of specialized pipelines that require custom tools and configurations.
In our case, we manage hundreds of security scan pipelines that need to be executed regularly. These pipelines require a complex set of tools installed on self-hosted Azure DevOps agents. Managing the lifecycle of these agents manually or with static configurations can lead to inefficiencies, resource wastage, and increased costs. To address these challenges, our architect proposed using Kubernetes Event-Driven Autoscaling as an auto-scaling solution for our Azure DevOps Agent Pools.
In this article, we'll explore how KEDA can be integrated with Azure Kubernetes Service (AKS) environment to efficiently manage Azure DevOps Agent Pools. We'll cover the differences between KEDA's ScaledObject and ScaledJob mechanisms and provide code example with configurations to help you implement a robust, auto-scaling solution for your Azure DevOps agents.
2. Understanding KEDA: A Brief Overview
2.1 What exactly is KEDA?
KEDA (Kubernetes Event-Driven Autoscaling) is an open-source project that brings event-driven capabilities to Kubernetes, enabling applications to scale dynamically based on events, rather than just traditional CPU or memory metrics. It acts as a lightweight component that integrates seamlessly with Kubernetes, making it easy to scale workloads such as builds or deployments.
KEDA extends the standard Kubernetes Horizontal Pod Autoscaler (HPA) to support scaling based on a variety of external metrics, such as queue length in messaging systems (e.g., Azure Service Bus, RabbitMQ), database events, HTTP requests, and many more. This event-driven scaling mechanism allows Kubernetes workloads to respond instantly to changes in demand, ensuring resources are used efficiently and cost-effectively.
2.2 How does KEDA Works?
KEDA operates by monitoring external event sources and metrics, which are defined through triggers. Each trigger defines a specific event or metric that KEDA watches to determine when to scale your Kubernetes deployments or jobs up or down. When a trigger threshold is met, KEDA adjusts the number of replicas or jobs accordingly.
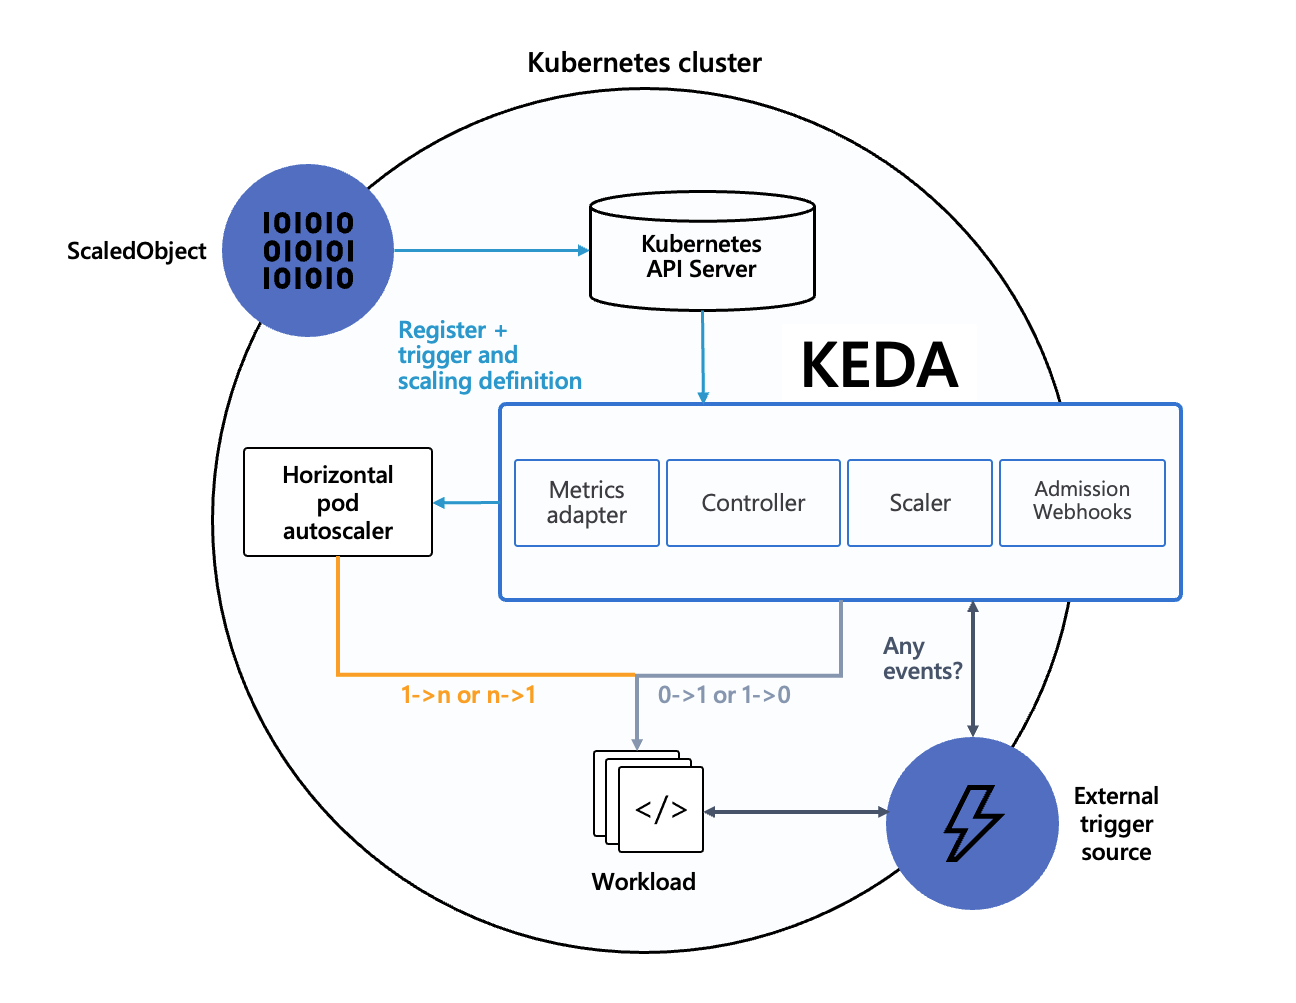
2.2.1 Core Components of KEDA
- KEDA Controller: responsible for reconciling KEDA custom resources like ScaledObject and ScaledJob. It monitors these resources and ensures that the desired state is reflected in the Kubernetes cluster. It manages the lifecycle of scaling resources based on triggers defined in the ScaledObject or ScaledJob.
- Metrics Adapter: KEDA includes a built-in Metrics Server that extends the Kubernetes Metrics API. It provides external metrics to the Kubernetes Horizontal Pod Autoscaler (HPA), enabling scaling decisions based on custom metrics from external event sources like message queues, databases, or HTTP endpoints.
- ScaledObject: This object defines how a Kubernetes deployment or stateful set should scale based on a specific metric or event. It is suitable for long-running processes that need to scale based on load.
- ScaledJob: This object is designed for short-lived jobs or batch processing tasks. It creates Kubernetes Jobs based on external events, such as a message in a queue, and scales the number of jobs to match the demand.
- Scaler: specialized component that communicate with external event sources or metrics systems (e.g., message queues, databases) to fetch metrics and events. Each type of scaler is responsible for interacting with a specific external service.
- Triggers define the external event sources or metrics that KEDA monitors to make scaling decisions. KEDA supports over 40 different triggers, including: Message Queues (Azure Service Bus, RabbitMQ, Kafka), Databases (Redis, PostgreSQL, MySQL), Monitoring Systems (Prometheus, Azure Monitor, HTTP requests)
- Admission Webhooks: Validates and mutates KEDA-related resources before they are applied to the cluster.
2.3 Key Benefits of Using KEDA
- Event-Driven Scaling: KEDA provides the ability to scale Kubernetes workloads based on real-world events and metrics, such as the number of messages in a queue or the length of a processing backlog.
- Flexible Trigger Support: KEDA supports over 40 different event sources, including Azure Monitor, Prometheus, Kafka, Redis, and more, making it a versatile choice for various use cases.
- Seamless Integration with Kubernetes: KEDA extends Kubernetes-native capabilities without requiring major changes to your existing architecture. It works alongside the Kubernetes Horizontal Pod Autoscaler (HPA) to provide fine-grained control over scaling behaviour.
- Cost Efficiency: By scaling resources up and down based on actual demand, KEDA helps reduce costs associated with over-provisioning, especially in environments with fluctuating workloads.
2.4 Example Use Cases for KEDA
- CI/CD Pipelines: Automatically scale agents in response to job queues, as we’re doing with Azure DevOps Agent Pools.
- Message Processing: Scale consumers dynamically based on the number of messages in a queue (e.g., Azure Service Bus, Kafka).
- Scheduled Scaling: Scale up or down based on scheduled events, such as batch processing tasks or maintenance windows.
2.5 KEDA in the Context of Azure DevOps Agent Pools
For scenarios like my own. described in the introduction, KEDA allows us to dynamically provision agents based on the number of queued jobs in Azure DevOps. By leveraging either a ScaledObject or a ScaledJob configuration, KEDA can scale the agent pool up or down, ensuring that resources are available when needed and conserved when they are not.
3. ScaledObject vs. ScaledJob in KEDA
KEDA provides two primary mechanisms for scaling Kubernetes workloads: ScaledObject and ScaledJob. Both serve different purposes and have unique characteristics that make them suitable for specific use cases. In this section, we will explore the differences between those two, their use cases, and their application in managing Azure DevOps Agent Pools.
3.1 ScaledObject: Managing Long-Running Workloads
A ScaledObject is a KEDA custom resource that scales Kubernetes deployments, stateful sets, or other long-running resources based on external metrics or events. It works by integrating with the Kubernetes Horizontal Pod Autoscaler (HPA) to adjust the number of replicas of a target resource based on predefined triggers.
Key Characteristics:
- Suitable for Long-Running Processes: ScaledObjects are ideal for workloads that need to run continuously and adjust their scale in response to varying loads. Examples include web applications, APIs, or background services.
- Real-Time Scaling: They provide real-time scaling capabilities by monitoring metrics like queue length, CPU usage, or custom metrics among others.
- Integration with HPA: ScaledObjects directly modify the replica count of deployments or stateful sets using the native HPA mechanism, ensuring seamless integration with existing Kubernetes autoscaling features.
- Object requirement: Requires configuration of Deployment resource to be defined because it scales the number of replicas in the Deployment.
Example Use Case for Azure DevOps Agent Pools
In scenarios where Azure DevOps pipelines have a steady or predictable load of jobs, a ScaledObject can be used to scale the number of self-hosted agents up or down based on the length of the job queue. This ensures that there are always enough agents to handle incoming jobs without over-provisioning resources.
3.2 ScaledJob: Managing Short-Lived, Batch Workloads
A ScaledJob is a KEDA custom resource designed to create and manage Kubernetes Jobs based on external events. Unlike ScaledObject, which scales long-running processes, ScaledJob is focused on short-lived tasks that can be processed independently.
Key Characteristics
- Best for Batch Processing: ScaledJobs are ideal for scenarios where tasks are discrete and stateless, such as processing messages from a queue or executing scheduled jobs.
- Dynamic Job Creation: It dynamically creates Kubernetes Jobs to handle workload spikes, ensuring that each unit of work is processed as soon as resources become available.
- Automatic Cleanup: Jobs created by ScaledJobs are automatically cleaned up after finishing processing, based on the configured successfulJobsHistoryLimit and failedJobsHistoryLimit.
Example Use Case for Azure DevOps Agent Pools
For scenarios where the job load is highly variable or bursty, and each pipeline run can be considered an independent task, using a ScaledJob can dynamically create short-lived agents that register themselves to the Azure DevOps pool, execute the assigned task, and terminate. This approach is particularly useful when the pipelines are short-lived and do not require persistent agents.
3.3 Choosing Between ScaledObject and ScaledJob
When deciding between ScaledObject and ScaledJob for managing Azure DevOps Agent Pools, consider the following factors:
Workload Type
- Use ScaledObject if the agents need to run continuously and handle a steady stream of tasks. This is suitable for long-running workloads where the agent is not terminated between jobs.
- Use ScaledJob if each pipeline job can be treated as an independent, short-lived task. This approach creates a new agent for each job, which is ideal for bursty or batch workloads.
Agent Lifecycle
- ScaledObject agents remain active even if no jobs are running, which is useful for reducing job start latency.
- ScaledJob agents are created and destroyed for each job, minimizing resource usage when no jobs are queued but potentially introducing a slight delay when starting new jobs.
Resource Optimization
- ScaledObject is better when you need to maintain a minimum number of agents to quickly handle new jobs.
- ScaledJob is more resource-efficient for intermittent or unpredictable workloads, as it only creates agents when jobs are present.
By understanding the unique features and capabilities of ScaledObject and ScaledJob, you can select the right approach for your specific Azure DevOps Agent Pool requirements.
4. Pre-requisites and Setup for implementation of KEDA with Azure DevOps Agent Pools
We will cover the necessary prerequisites, including setting up Azure Kubernetes Service (AKS) and Azure Container Registry (ACR) using Terraform, along with building image for our Agents with Docker.
Tools needed for this section:
- Helm (Kubernetes Package Manager) - [Install Guide]
- Azure CLI - [Install Guide]
- Kubernetes Command Line - [Install Guide]
- Terraform (Infrastructure as Code) - [Install Guide]
- Docker Desktop - [Install Guide]
4.1. Setting Up Azure Kubernetes Service (AKS) and Azure Container Registry (ACR)
In our example we will use simplest configuration for our Kubernetes Cluster, with only one node and no additional networking or security configurations, as this is only a presentation of concept.
4.1.1. Terraform Configuration for AKS and ACR
Below Terraform code will create few necessary resources on your Azure subscription:
- Resource Group (azurerm_resource_group): A resource group to hold all Azure resources.
- Azure Container Registry (azurerm_container_registry): The registry to store Docker images for your Azure DevOps agents.
- Azure Kubernetes Service (azurerm_kubernetes_cluster): An AKS cluster with a default node pool to deploy your workloads.
- Azure Role Assignment (azurerm_role_assignment): Necessary role assignment to ensure that the AKS cluster can pull images from the ACR.
Ensure your Terraform project has the following files:
├── main.tf
├── providers.tf
└── variables.tf  (optional, if using variables)
################
# providers.tf #
################
terraform {
required_version = ">=1.5"
required_providers {
azurerm = {
source = "hashicorp/azurerm"
version = "~>4.0"
}
azuread = {
source = "hashicorp/azuread"
version = "~>2.0"
}
}
}
provider "azurerm" {
features {
resource_group {
prevent_deletion_if_contains_resources = false
}
}
}
provider "azuread" {
# Azure AD provider can be used for advanced configuration if needed
}###########
# main.tf #
###########
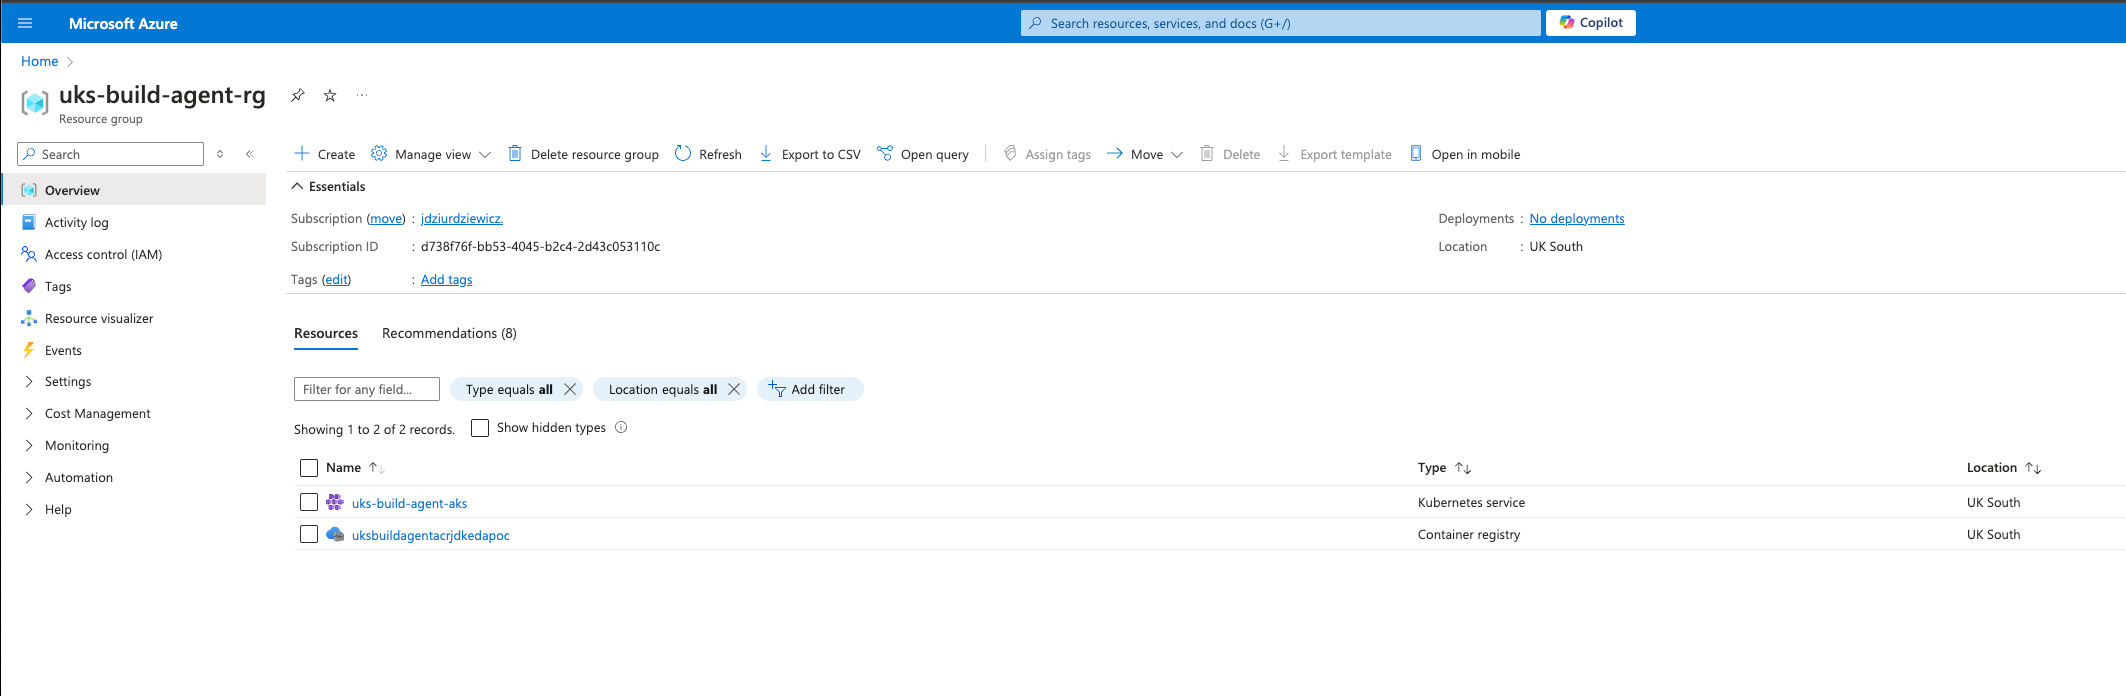
resource "azurerm_resource_group" "build-agent-rg" {
name = "uks-build-agent-rg"
location = "UK South"
}
resource "azurerm_container_registry" "build-agent-registry" {
name = "uksbuildagentacrjdkedapoc"
resource_group_name = azurerm_resource_group.build-agent-rg.name
location = azurerm_resource_group.build-agent-rg.location
sku = "Basic"
admin_enabled = "true"
}
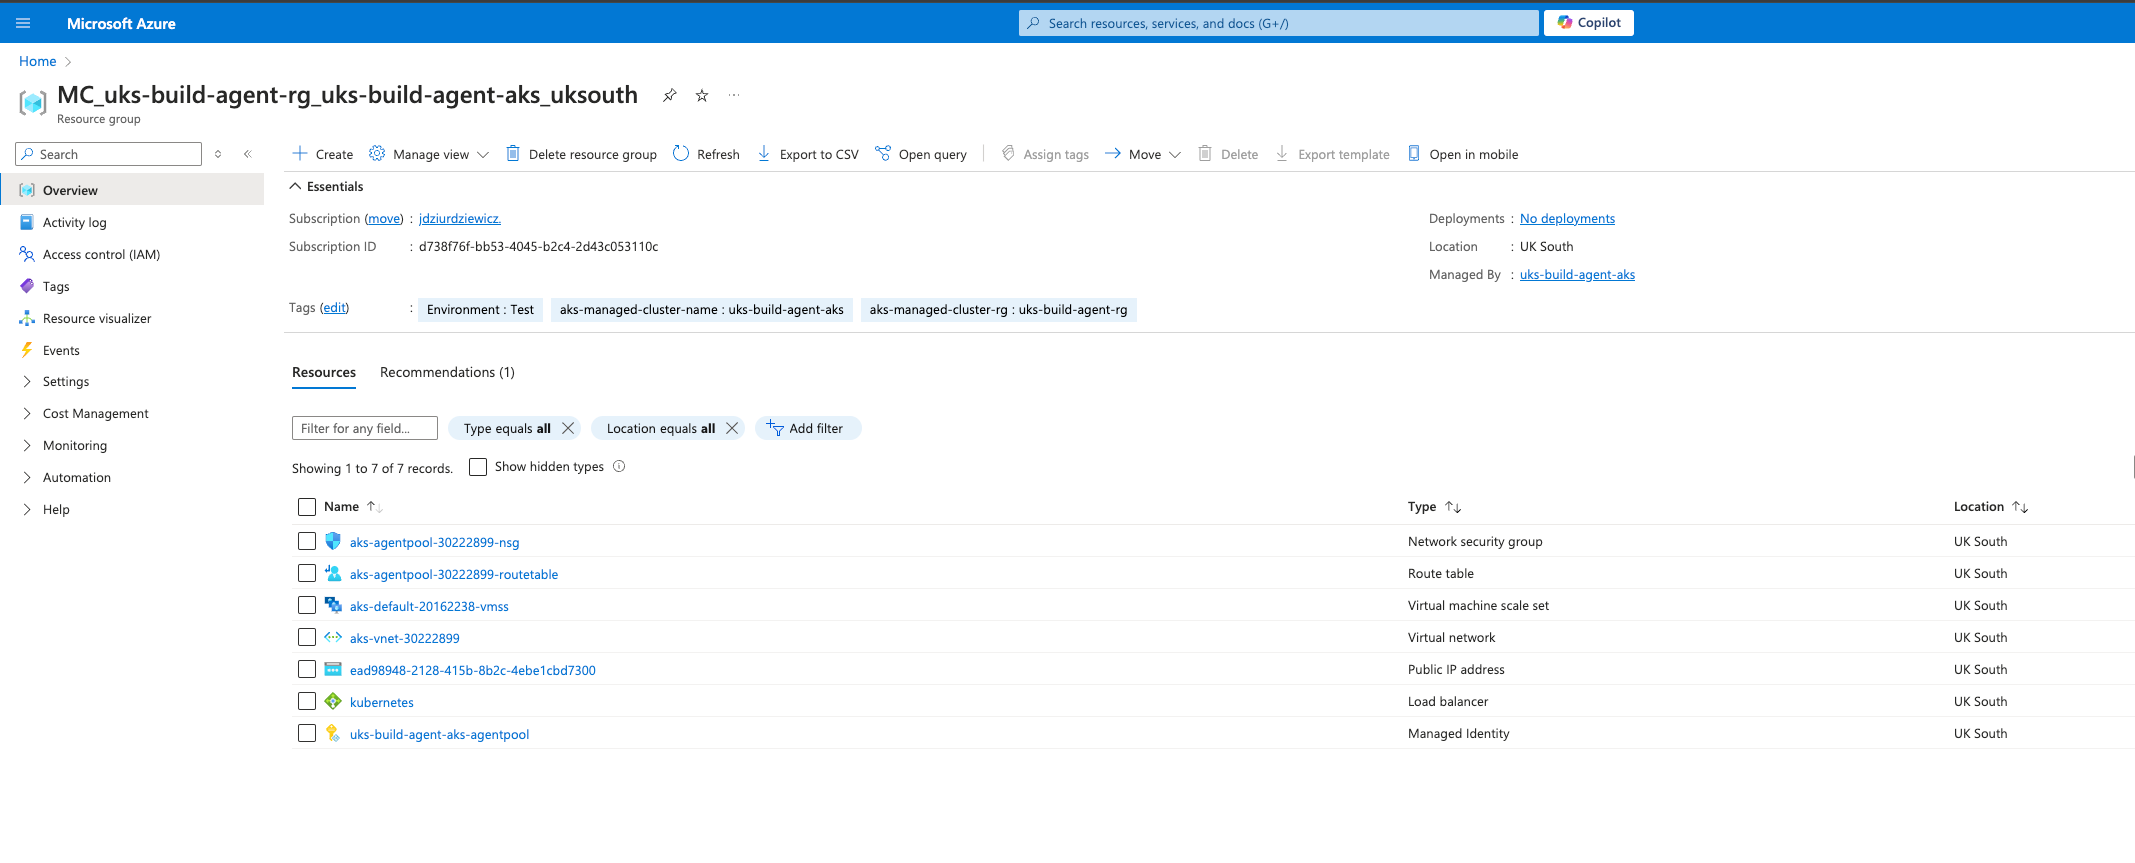
resource "azurerm_kubernetes_cluster" "build-agent-cluster" {
name = "uks-build-agent-aks"
location = azurerm_resource_group.build-agent-rg.location
resource_group_name = azurerm_resource_group.build-agent-rg.name
dns_prefix = "uks-build-agent-aks"
default_node_pool {
name = "default"
node_count = 1
vm_size = "Standard_D2_v2"
}
identity {
type = "SystemAssigned"
}
tags = {
Environment = "Test"
}
}
resource "azurerm_role_assignment" "acr-role-assignment" {
principal_id = azurerm_kubernetes_cluster.build-agent-cluster.kubelet_identity[0].object_id
role_definition_name = "AcrPull"
scope = azurerm_container_registry.build-agent-registry.id
skip_service_principal_aad_check = true
}Run the following commands in your Terraform directory to deploy the infrastructure:
# Initialize the Terraform working directory
terraform init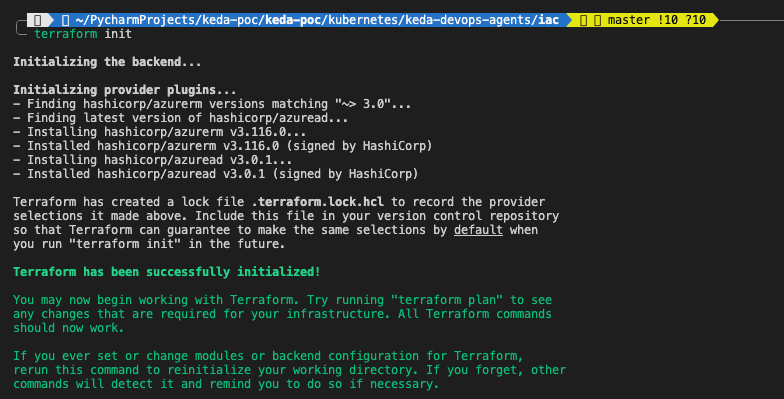
# Check plan configuration to be applied
terraform plan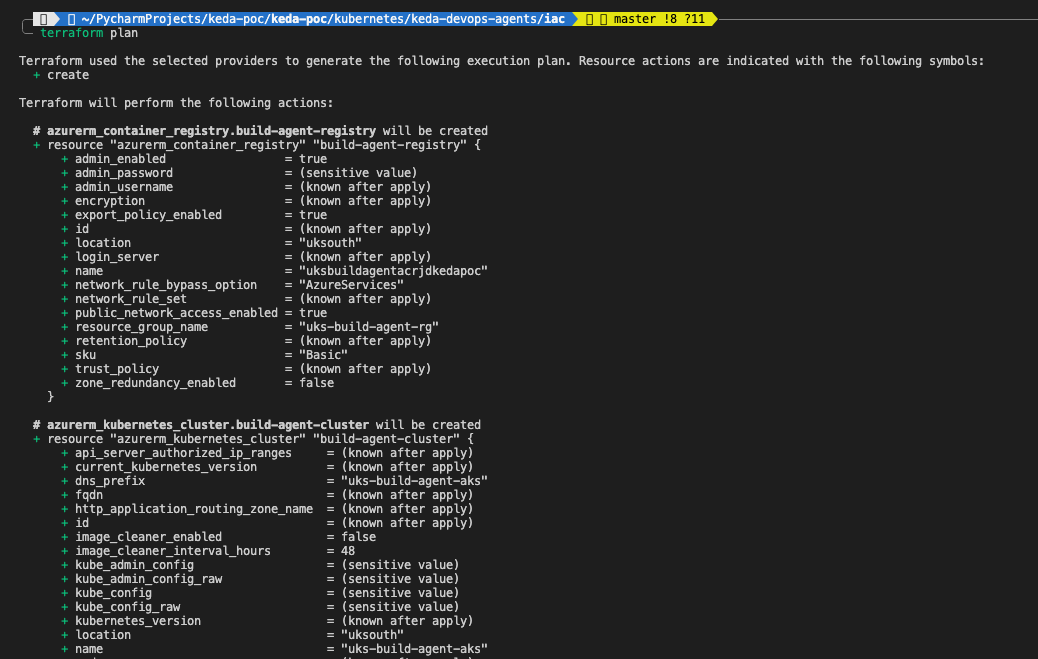
# Apply the Terraform configuration to create the resources
terraform apply -auto-approve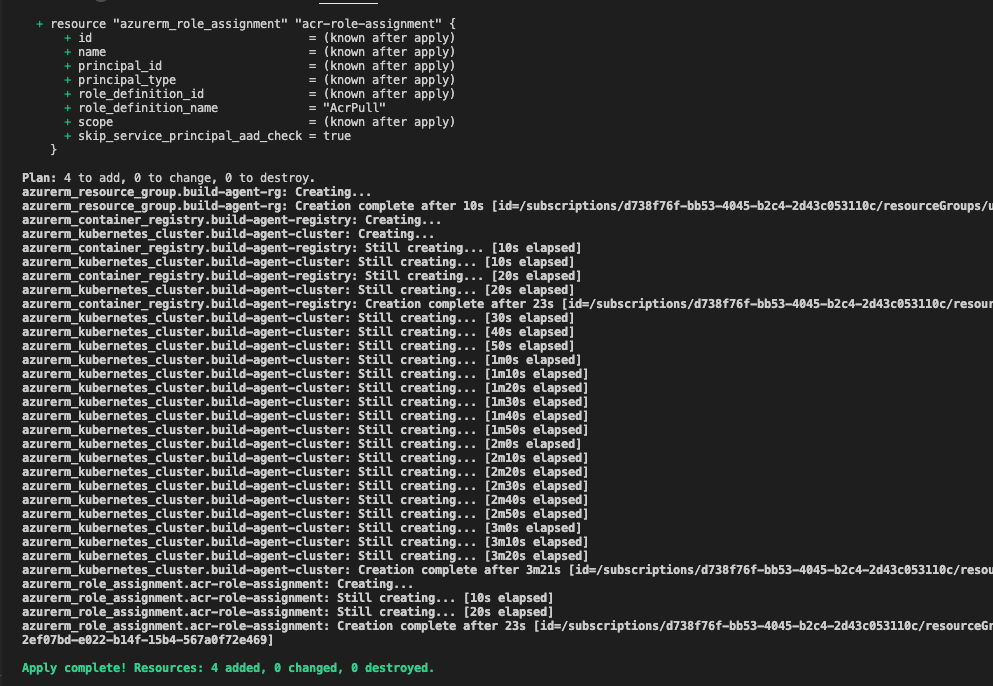
If all commands would complete successfully, in Azure we should have all needed resources created.
After the AKS cluster is deployed, trigger below to configure your local kubectl client to interact with an Azure Kubernetes Service (AKS) cluster. By running this command, the AKS credentials will be retrieved and merged into your kubeconfig file, allowing you to use kubectl commands to manage the cluster:
az aks get-credentials --resource-group uks-build-agent-rg --name uks-build-agent-aks4.1.2. Docker Image for Azure DevOps Agent
Next step will be preparing custom Dockerfile for our image that, will be used by Kubernetes as source images for containers. You can find examples directly on Microsoft site, but in our case, we will utilize image definition by from Martin Lakov, along with edited start.sh script which has additional flags for removing unneeded pipeline agents and killing container process after job completion.
##############
# Dockerfile #
##############

FROM ubuntu:20.04

# Set DEBIAN_FRONTEND and TARGETARCH environment variables
ENV DEBIAN_FRONTEND=noninteractive
    TARGETARCH=linux-x64

# Combine apt-get update, upgrade, package installation, Azure CLI installation, and PowerShell installation into one RUN command
RUN apt-get update &&
    apt-get upgrade -y &&
    apt-get install -y -qq --no-install-recommends
        apt-transport-https
        apt-utils
        ca-certificates
        curl
        git
        iputils-ping
        jq
        lsb-release
        software-properties-common
        wget &&
    curl -sL https://aka.ms/InstallAzureCLIDeb | bash &&
    wget -q https://github.com/PowerShell/PowerShell/releases/download/v7.1.5/powershell-7.1.5-linux-x64.tar.gz -O /tmp/powershell.tar.gz &&
    mkdir -p /opt/microsoft/powershell/7 &&
    tar zxf /tmp/powershell.tar.gz -C /opt/microsoft/powershell/7 &&
    ln -s /opt/microsoft/powershell/7/pwsh /usr/bin/pwsh &&
    rm -rf /var/lib/apt/lists/* /tmp/powershell.tar.gz

# Set working directory
WORKDIR /azp

# Copy the startup script and ensure it's executable
COPY --chmod=755 ./start.sh .

# Set the entry point
ENTRYPOINT [ "./start.sh" ]
############
# start.sh #
############
#!/bin/bash
set -e
if [ -z "$AZP_URL" ]; then
echo 1>&2 "error: missing AZP_URL environment variable"
exit 1
fi
if [ -z "$AZP_TOKEN_FILE" ]; then
if [ -z "$AZP_TOKEN" ]; then
echo 1>&2 "error: missing AZP_TOKEN environment variable"
exit 1
fi
AZP_TOKEN_FILE=/azp/.token
echo -n $AZP_TOKEN > "$AZP_TOKEN_FILE"
fi
unset AZP_TOKEN
if [ -n "$AZP_WORK" ]; then
mkdir -p "$AZP_WORK"
fi
export AGENT_ALLOW_RUNASROOT="1"
cleanup() {
if [ -e config.sh ]; then
print_header "Cleanup. Removing Azure Pipelines agent..."
# If the agent has some running jobs, the configuration removal process will fail.
# So, give it some time to finish the job.
while true; do
./config.sh remove --unattended --auth PAT --token $(cat "$AZP_TOKEN_FILE") && break
echo "Retrying in 30 seconds..."
sleep 30
done
fi
}
print_header() {
lightcyan='�33[1;36m'
nocolor='�33[0m'
echo -e "${lightcyan}$1${nocolor}"
}
# Let the agent ignore the token env variables
export VSO_AGENT_IGNORE=AZP_TOKEN,AZP_TOKEN_FILE
print_header "1. Determining matching Azure Pipelines agent..."
AZP_AGENT_PACKAGES=$(curl -LsS
-u user:$(cat "$AZP_TOKEN_FILE")
-H 'Accept:application/json;'
"$AZP_URL/_apis/distributedtask/packages/agent?platform=$TARGETARCH&top=1")
AZP_AGENT_PACKAGE_LATEST_URL=$(echo "$AZP_AGENT_PACKAGES" | jq -r '.value[0].downloadUrl')
if [ -z "$AZP_AGENT_PACKAGE_LATEST_URL" -o "$AZP_AGENT_PACKAGE_LATEST_URL" == "null" ]; then
echo 1>&2 "error: could not determine a matching Azure Pipelines agent"
echo 1>&2 "check that account '$AZP_URL' is correct and the token is valid for that account"
exit 1
fi
print_header "2. Downloading and extracting Azure Pipelines agent..."
curl -LsS $AZP_AGENT_PACKAGE_LATEST_URL | tar -xz & wait $!
source ./env.sh
print_header "3. Configuring Azure Pipelines agent..."
./config.sh --unattended
--agent "${AZP_AGENT_NAME:-$(hostname)}"
--url "$AZP_URL"
--auth PAT
--token $(cat "$AZP_TOKEN_FILE")
--pool "${AZP_POOL:-Default}"
--work "${AZP_WORK:-_work}"
--replace
--acceptTeeEula & wait $!
print_header "4. Running Azure Pipelines agent..."
trap 'cleanup; exit 0' EXIT
trap 'cleanup; exit 130' INT
trap 'cleanup; exit 143' TERM
chmod +x ./run.sh
# To be aware of TERM and INT signals call run.sh
# Running it with the --once flag at the end will shut down the agent after the build is executed
./run.sh "$@" --once & wait $!Build image and push it to our Azure Container Registry.
# Build the Docker image
docker build -t uksbuildagentacrjdkedapoc.azurecr.io/azure-devops-agent:v1 .

# If you are using machine with ARM architecture CPU for build, check platform compatibility, and add according one to --platform param
kubectl get nodes -o wide
docker build --platform="linux/amd64" -t uksbuildagentacrjdkedapoc.azurecr.io/azure-devops-agent:v1 .

# Additionally you can test our build by running the container, before pushing it to ACR (You can get values for envs from the container registry in the portal)
docker run -e AZP_URL= -e AZP_TOKEN= -e AZP_AGENT_NAME= -e AZP_POOL= <image>

# Log in to ACR (credential can be found under Settings/Access keys tab in Azure Container Registry)
az acr login --name uksbuildagentacrjdkedapoc

# Push the image to ACR
docker push uksbuildagentacrjdkedapoc.azurecr.io/azure-devops-agent:v1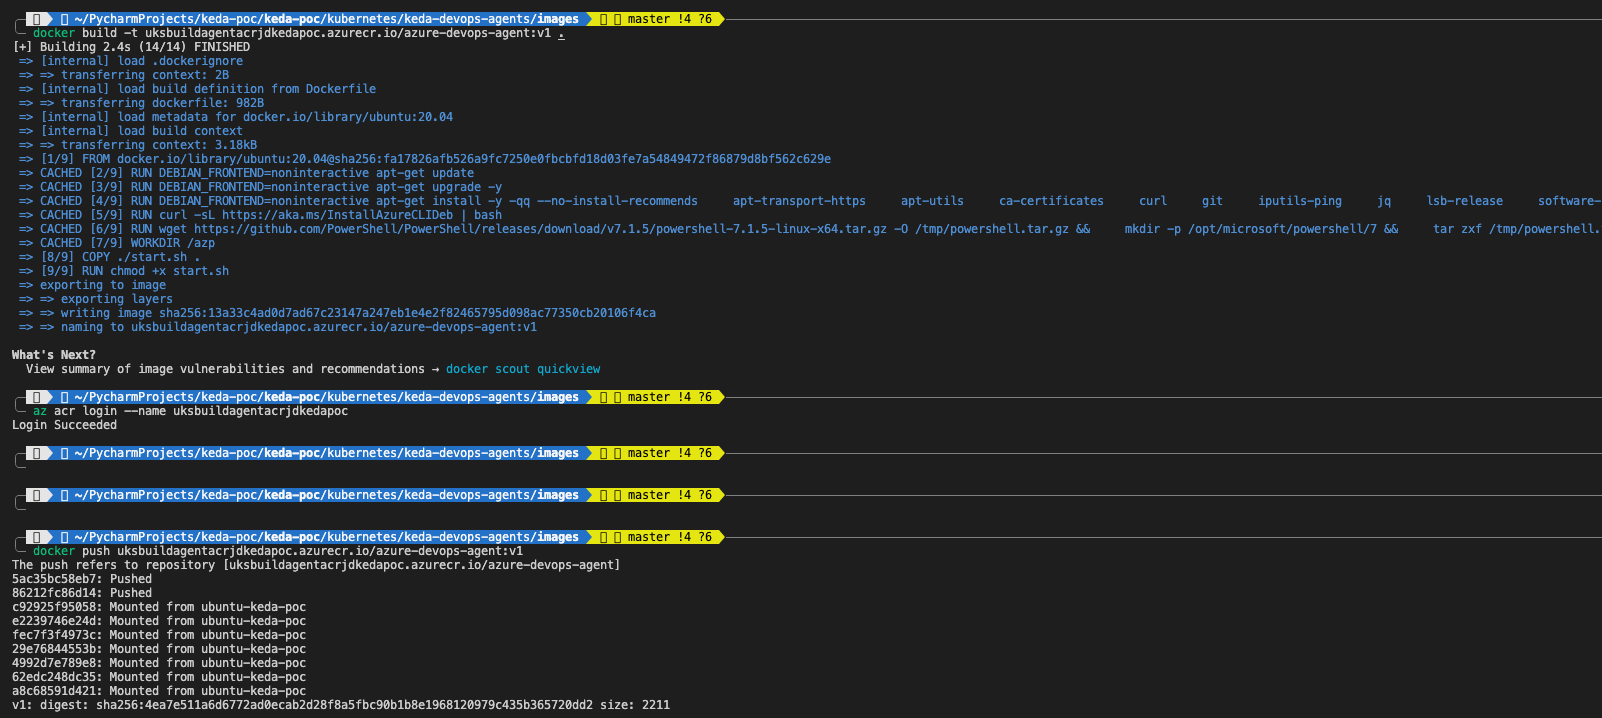

4.2. Adding KEDA to AKS Cluster
KEDA can be considered as a extension for Kubernetes and its not built-in feature, therefore we need to install it. In below steps we will use Helm to have all in one setup (all manifests necessary for installation can be found on KEDA site and can be applied directly without Helm).
Add the KEDA Helm repository:
helm repo add kedacore https://kedacore.github.io/charts<br>helm repo updateInstall KEDA Using Helm (This will install KEDA in your Kubernetes cluster under the keda namespace):
helm install keda kedacore/keda --namespace keda --create-namespace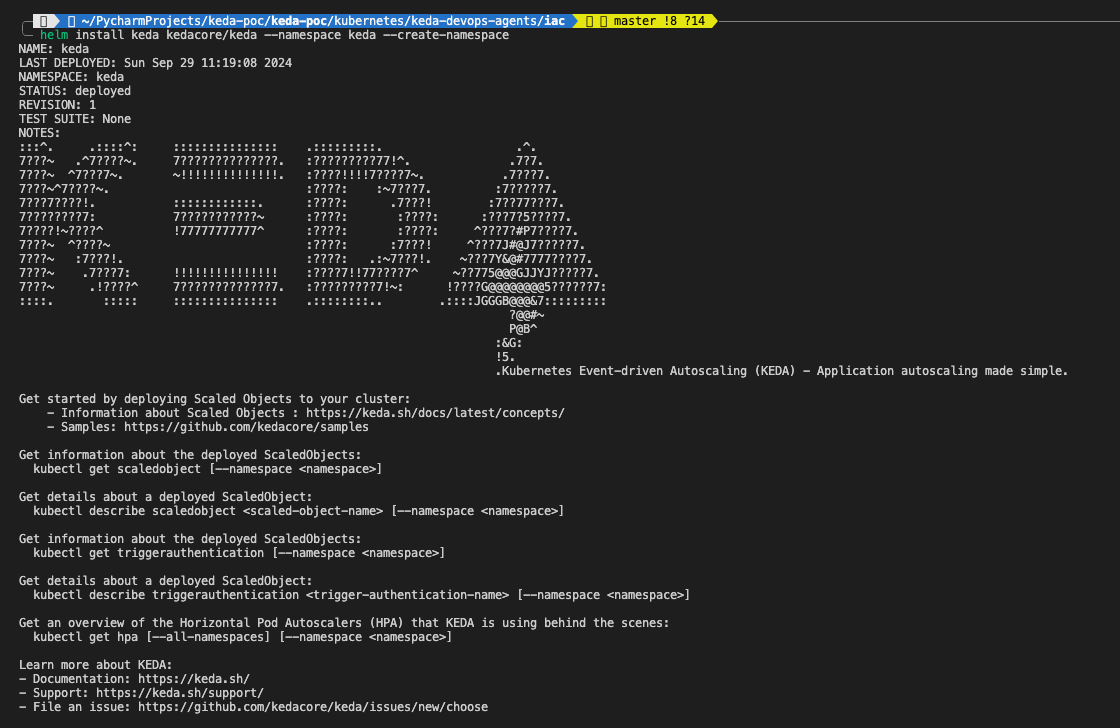
Verify the Installation by checking that KEDA components are installed and running:
kubectl get all -n kedaIf no errors were spotted, we’ve successfully set up the foundational components required to implement KEDA-based auto-scaling for Azure DevOps Agent Pools. You now have an AKS cluster with a connected ACR and KEDA installed for managing scaling.
5. Implementing KEDA ScaledJob for Azure DevOps Agent Pools
In this section, we will configure KEDA to dynamically scale Azure DevOps agents using the ScaledJob resource. Although a Deployment is not strictly required when using ScaledJob, we will utlize it due to fact that otherwise we will not have any idle agents and Azure pipeline job cannot be queued on empty Agent Pool.
5.1. Configure Azure DevOps Agent Pool and Personal Access Token
Before we begin applying any configurations to our newly created AKS Cluster, it’s important to set up the Azure DevOps environment. We need to create a self-hosted agent pool at the organization level and generate a Personal Access Token (PAT).
5.1.1. Creating Azure DevOps Agent Pool & Personal Access Token
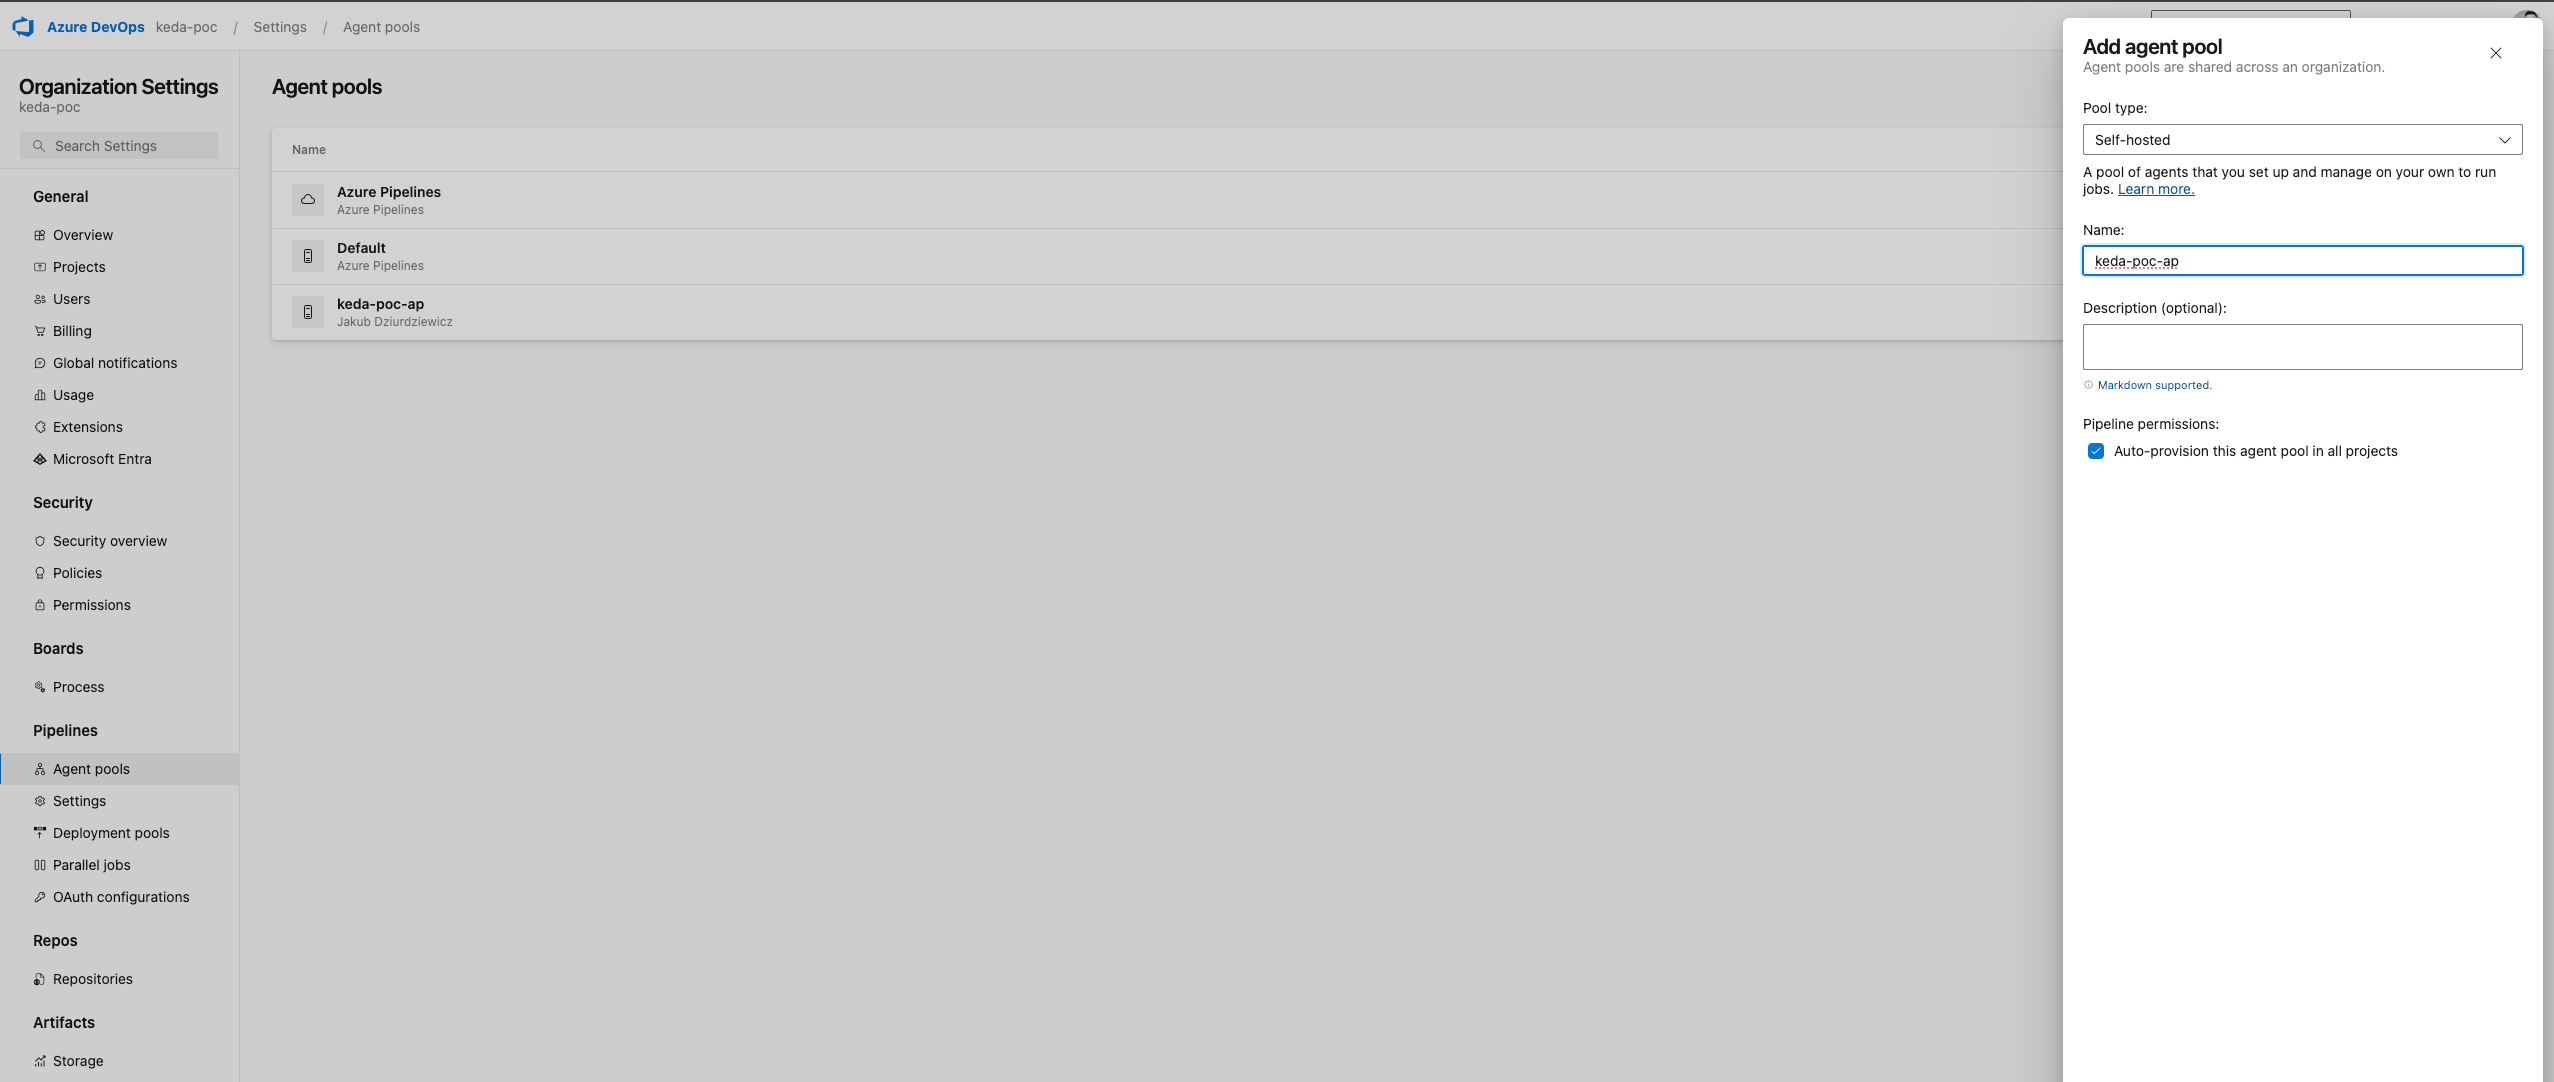
Before configuring Azure DevOps agents on your AKS cluster, you need to create an agent pool. This pool will serve as the destination where your self-hosted agents will register and execute jobs, allowing for better control and management of resources.
Detailed steps "how-to" create an Agent Pool can be found directly on Microsoft site: Configuring Agent Pools
Remember to:
- Create it as Organization Level
- Set it as self-hosted type
- Keep Name and Id of Agent Pool (we will be using it later in K8s manifests)
5.1.2. Creating Personal Access Token
To enable your self-hosted agents to authenticate and connect with Azure DevOps, you must generate a Personal Access Token (PAT). This token provides secure access to your organization and agent pool, ensuring that the agents can communicate effectively with Azure DevOps services.
Similar to Agent Pools, I will not rewrite the wheel and just redirect you to Microsoft site: Configuring Personal Access Tokens.
Remember to:
- Copy PAT into secure place as it will not be visible anymore
- Set permissions according to "least privilege" principal by selecting only the necessary scopes:
- Agent Pools (Read & Manage): Required for the agent to register itself in the pool and for KEDA to manage the pool size.
- Build (Read & Execute): Required if the agent needs to access build pipelines.
- Project and Team (Read): Required for the agent to read project information, such as pipeline definitions.
- User Profile (Read): Required for the agent to authenticate and access user profile information.
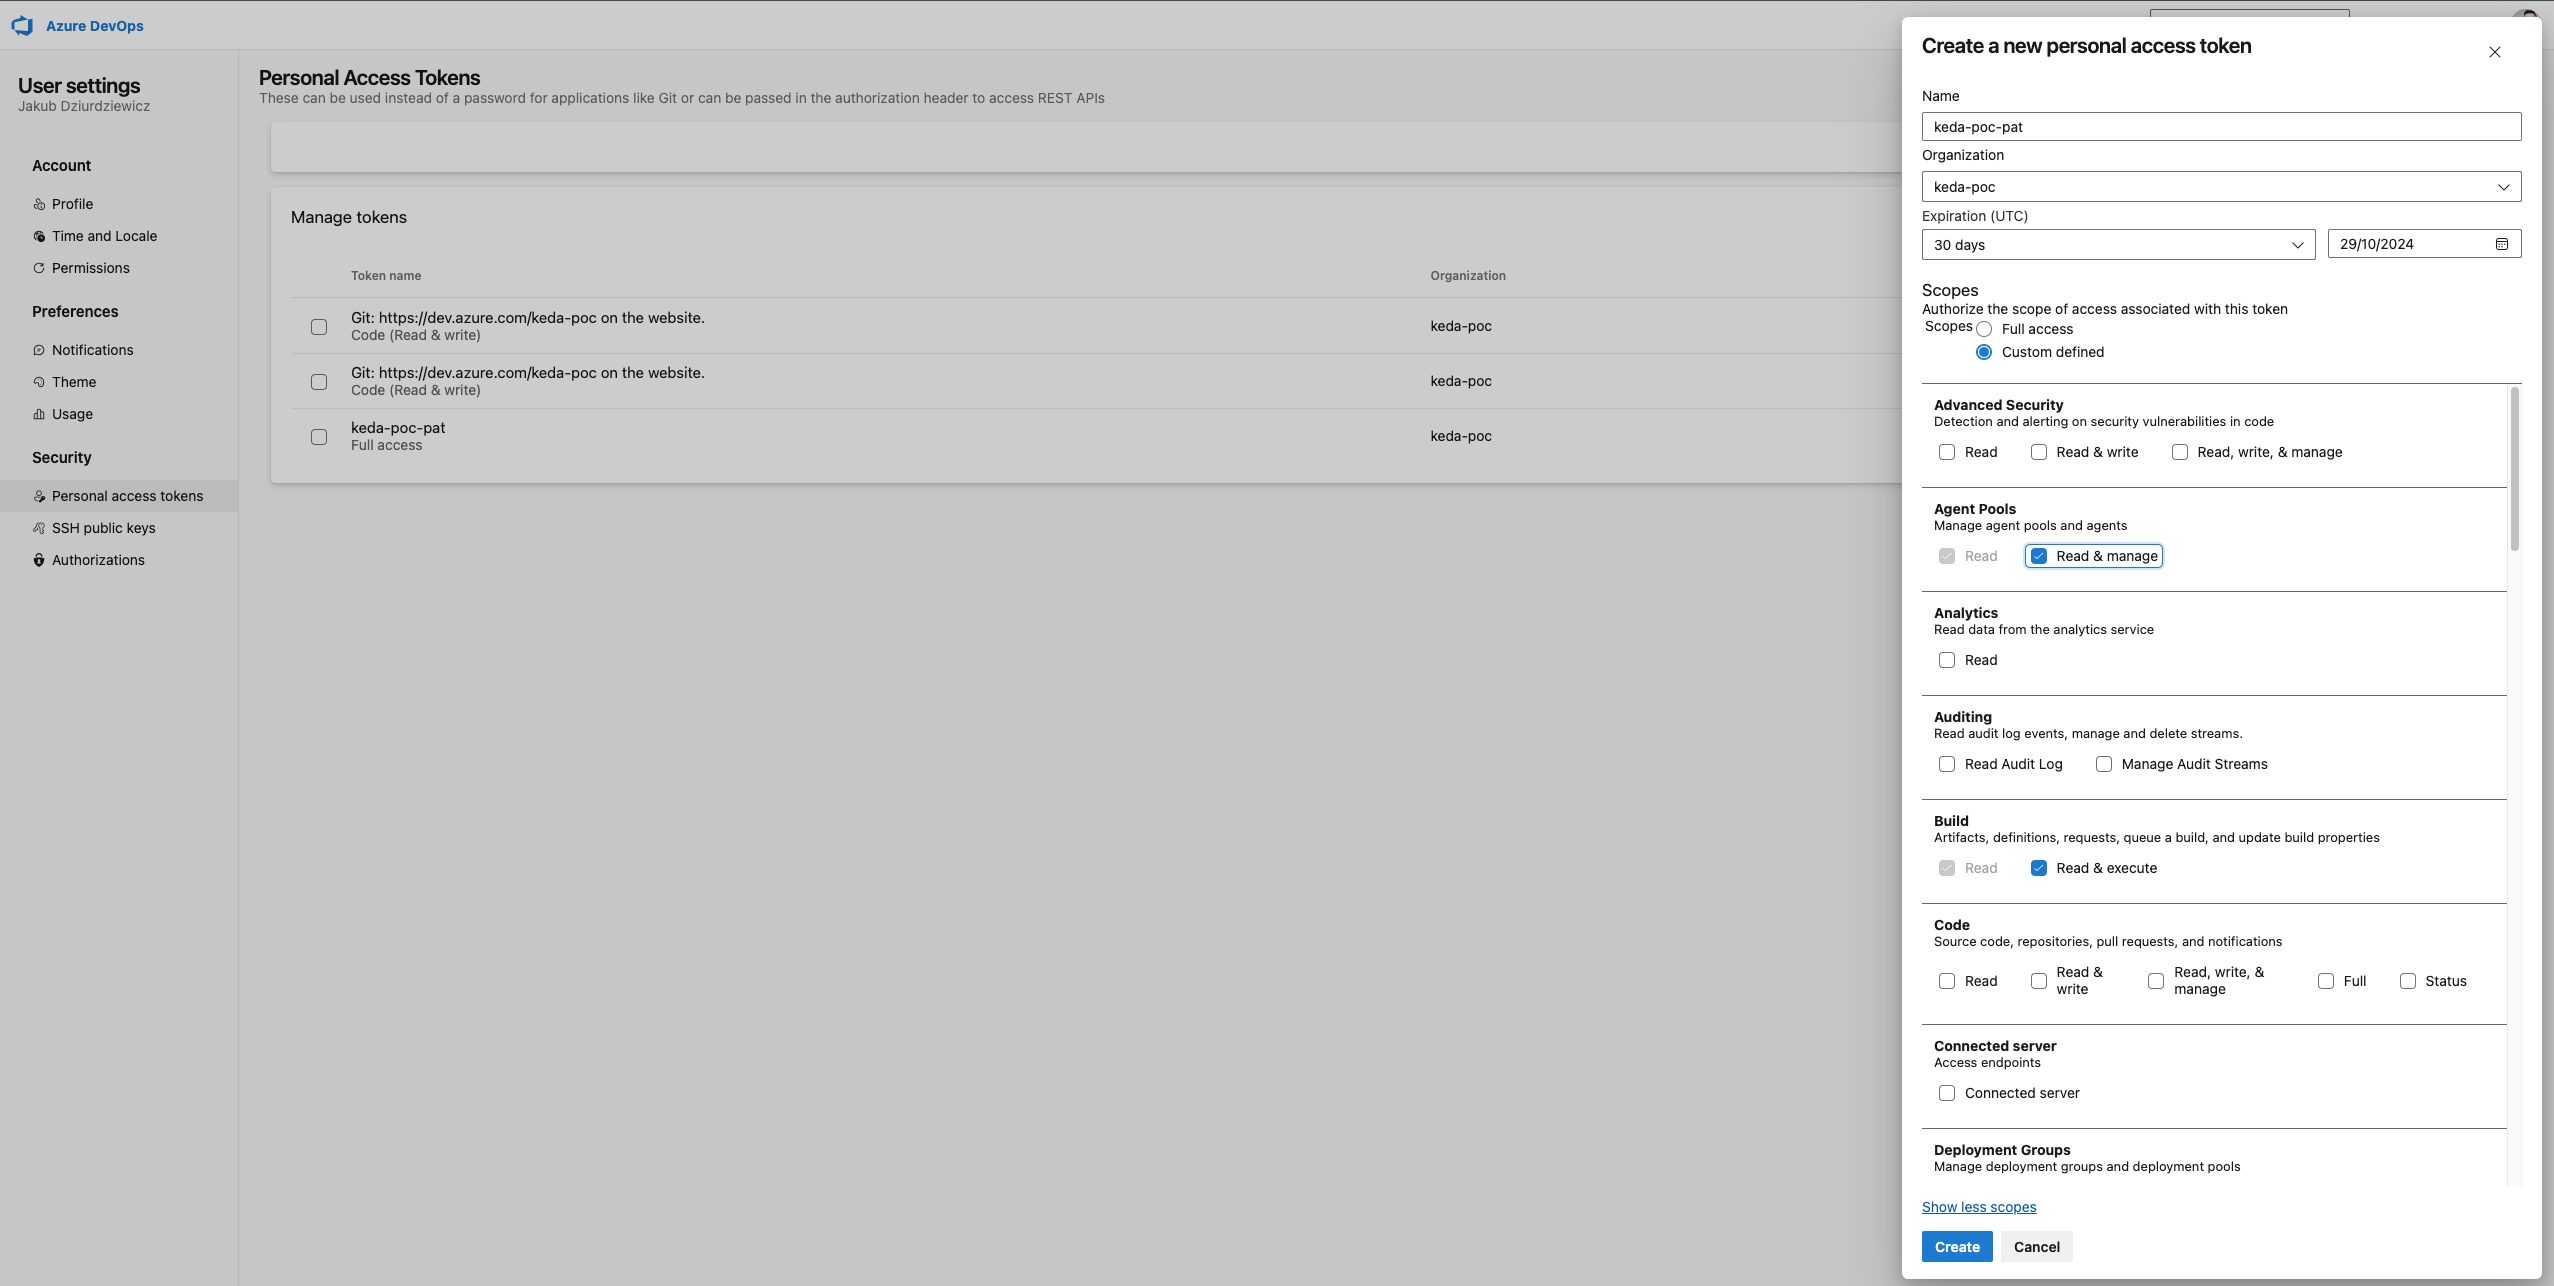
Once the PAT is generated, we’ll need to encode it to base64 format, which can be done using the following command:
echo -n "your-pat-token" | base645.2. Configure ScaledJob and Deployment
First, let's define Secret, that will keep our Azure DevOps PAT and create it.
###############
# secret.yaml #
###############

apiVersion: v1
kind: Secret
metadata:
  name: azdevops
data:
  AZP_TOKEN: <base64-encoded-ADOPAT>  # Replace with your base64 encoded PAT
kubectl apply -f secret.yamlNow we can move to Deployment, that ensures at least one agent is always available in the pool. This deployment will use the custom Docker image we discussed earlier, which includes the custom start.sh script for agent setup and execution.
###################
# deployment.yaml #
###################

apiVersion: apps/v1
kind: Deployment
metadata:
  name: azdevops-deployment
  namespace: default
  labels:
    app: azdevops-agent
spec:
  replicas: 1  # Keep at least one agent running at all times
  selector:
    matchLabels:
      app: azdevops-agent
  template:
    metadata:
      labels:
        app: azdevops-agent
    spec:
      containers:
      - name: azdevops-agent
        image: uksbuildagentacrjdkedapoc.azurecr.io/azure-devops-agent:v1
        env:
          - name: AZP_URL
            value: "https://dev.azure.com/<organization>"
          - name: AZP_POOL
            value: "<agent-pool-name>"
          - name: AZP_TOKEN
            valueFrom:
              secretKeyRef:
                name: azdevops
                key: AZP_TOKEN
kubectl apply -f deployment.yamlAt the end we will configure the ScaledJob resource, which will dynamically create additional agents based Azure DevOps Pipelines workload.
#########################
# keda-scaled-jobs.yaml #
#########################

apiVersion: keda.sh/v1alpha1
kind: ScaledJob
metadata:
  name: azdevops-scaledjob
  namespace: default
spec:
  jobTargetRef:
    template:
      spec:
        containers:
        - name: azure-devops-agent
          image: uksbuildagentacrjdkedapoc.azurecr.io/azure-devops-agent:v1
          imagePullPolicy: Always
          env:
            - name: AZP_URL
              value: "https://dev.azure.com/<organization>"
            - name: AZP_POOL
              value: "<agent-pool-name>"
            - name: AZP_TOKEN
              valueFrom:
                secretKeyRef:
                  name: azdevops
                  key: AZP_TOKEN
  pollingInterval: 10  # Check for new jobs every 10 seconds
  maxReplicaCount: 10  # Maximum number of agents to be created by this ScaledJob
  successfulJobsHistoryLimit: 5  # Number of successful jobs to retain
  FailedJobsHistoryLimit: 5  # Number of failed jobs to retain
  scalingStrategy:
    strategy: "default"
  triggers:
    - type: azure-pipelines
      metadata:
        poolID: "<pool-id>"
        organizationURLFromEnv: "AZP_URL"
        personalAccessTokenFromEnv: "AZP_TOKEN"
kubectl apply -f keda-scaled-jobs.yamlVerify if all Kubernetes resources were created correctly
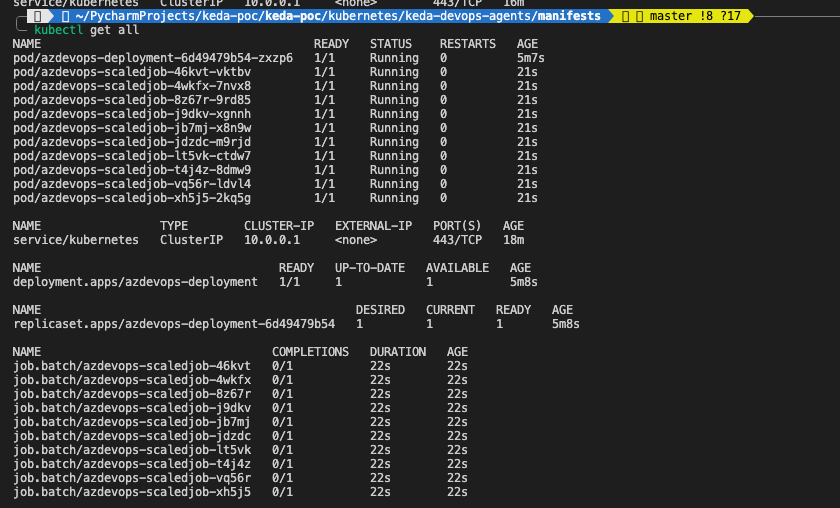
kubectl get secret
kubectl get all
kubectl get scaledjob
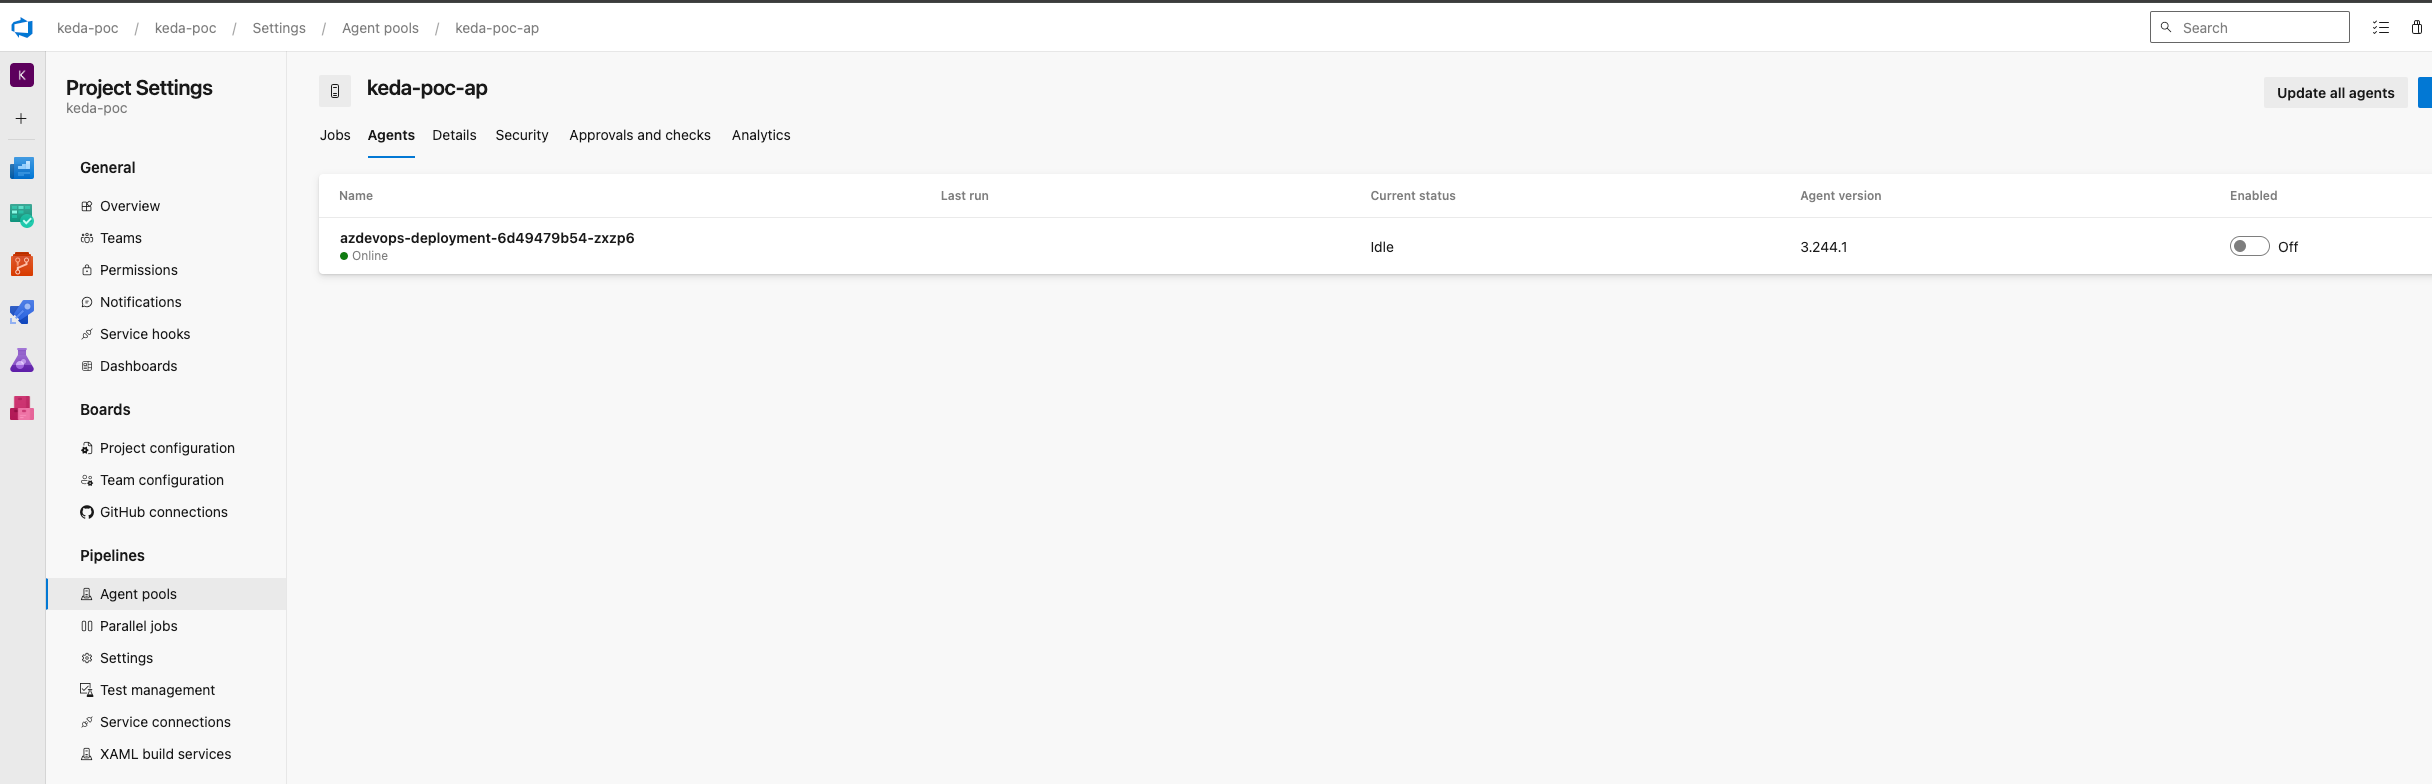
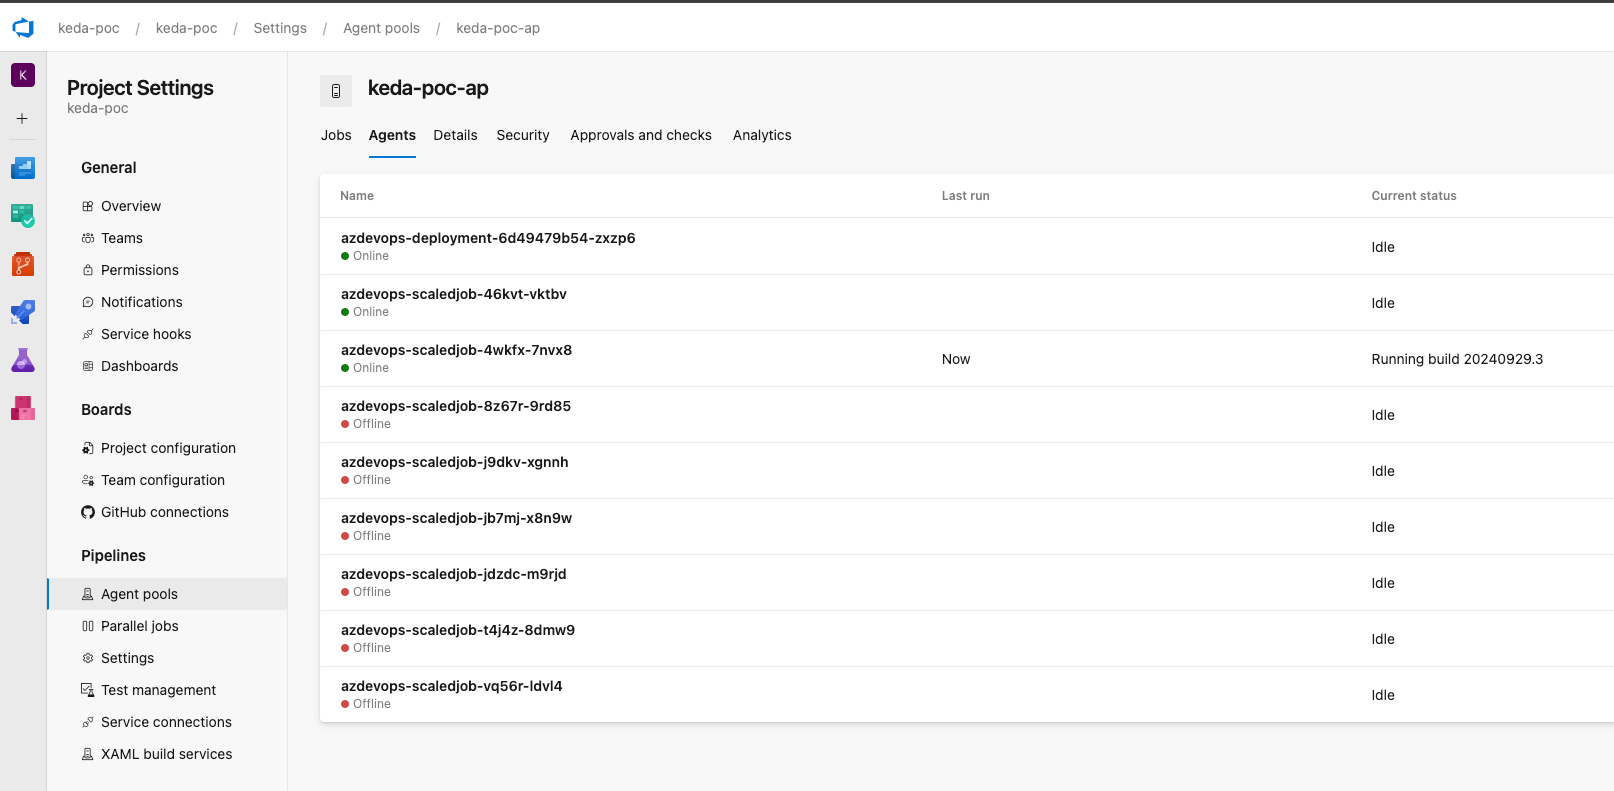
Check in Azure DevOps if our single, stale Agent was registered correctly and disable it.
After configuring the agent pool and deploying an agent, it’s important to verify that the agent has registered correctly in Azure DevOps and disable it. Azure DevOps requires at least one agent to be present in the agent pool to avoid errors when queuing jobs -- If no agent is available in pool, Azure DevOps will show an error when attempting to queue pipeline jobs. This can cause issues, as KEDA is scaling agents based on demand and in our case ScaledJob will not spawn any resources until job will be successfully queued in pool. By disabling the agent, you ensure it is not used accidentally to process any pipeline jobs and is not consuming any system resources. This is important because this agent is intended as a workaround to avoid errors, not as a working agent that should handle workloads.
5.3. Time to test it!
It's finally time to check how our setup behave in action. If everything will work as designed, KEDA will periodically check the Azure DevOps build queue based on the configured interval for new jobs. To test it, you can create a pipeline in your Azure DevOps using below code, which initiates 10 concurrent jobs, each running PowerShell script with looping operations. Execute this pipeline to observe KEDA dynamically scaling the agents in response to the workload fluctuation.
##################
# load-test.yaml #
##################

trigger: none

pool: <pool-name>

jobs:
- job: job1
  steps:
  - task: PowerShell@2
    displayName: loop1
    inputs:
      targetType: 'inline'
      script: |
        for($i=1;$i -le 15;$i++)
        {
            Start-Sleep -Seconds 60
        }

- job: job2
  steps:
  - task: PowerShell@2
    displayName: loop2
    inputs:
      targetType: 'inline'
      script: |
        for($i=1;$i -le 15;$i++)
        {
            Start-Sleep -Seconds 60
        }

- job: job3
  steps:
  - task: PowerShell@2
    displayName: loop2
    inputs:
      targetType: 'inline'
      script: |
        for($i=1;$i -le 15;$i++)
        {
            Start-Sleep -Seconds 60
        }

- job: job4
  steps:
  - task: PowerShell@2
    displayName: loop2
    inputs:
      targetType: 'inline'
      script: |
        for($i=1;$i -le 15;$i++)
        {
            Start-Sleep -Seconds 60
        }

- job: job5
  steps:
  - task: PowerShell@2
    displayName: loop2
    inputs:
      targetType: 'inline'
      script: |
        for($i=1;$i -le 15;$i++)
        {
            Start-Sleep -Seconds 60
        }

- job: job6
  steps:
  - task: PowerShell@2
    displayName: loop2
    inputs:
      targetType: 'inline'
      script: |
        for($i=1;$i -le 15;$i++)
        {
            Start-Sleep -Seconds 60
        }

- job: job7
  steps:
  - task: PowerShell@2
    displayName: loop2
    inputs:
      targetType: 'inline'
      script: |
        for($i=1;$i -le 15;$i++)
        {
            Start-Sleep -Seconds 60
        }

- job: job8
  steps:
  - task: PowerShell@2
    displayName: loop2
    inputs:
      targetType: 'inline'
      script: |
        for($i=1;$i -le 15;$i++)
        {
            Start-Sleep -Seconds 60
        }

- job: job9
  steps:
  - task: PowerShell@2
    displayName: loop2
    inputs:
      targetType: 'inline'
      script: |
        for($i=1;$i -le 15;$i++)
        {
            Start-Sleep -Seconds 60
        }

- job: job10
  steps:
  - task: PowerShell@2
    displayName: loop2
    inputs:
      targetType: 'inline'
      script: |
        for($i=1;$i -le 15;$i++)
        {
            Start-Sleep -Seconds 60
        }
Concurrent jobs are being queued

Kubernetes pods are being spawned according to jobs load
New Agents are being added
And that's all folks! KEDA spawned according numbers of agents to match queued jobs. Now each job will have it's own agent to run on (this can be customized), and after completion, agent will be removed as per successful/failed limits configuration in our K8s manifests.
6. Hints for KEDA and Auto-Scaling Azure DevOps Agent Pools
Auto-scaling Azure DevOps Agent Pools with KEDA requires careful planning and configuration to ensure efficient resource utilization, reduced latency, and smooth CI/CD operations. Below are few hints to consider when implementing this solution:
- Cancelled Jobs: Whenever job is cancelled in pipeline, agent / pod will still be running and will not be deleted as if the job would be completed. It's known issue with KEDA.
- Use Pre-Built Images: Create custom Docker images for your agents that include all necessary tools and dependencies. This reduces the initialization time, allowing agents to register with Azure DevOps more quickly and start processing jobs without delay.
- Minimize Startup Scripts: Simplify and optimize the start.sh script provided in previous part of this article, to reduce the time it takes for agents to register and become available. Remove unnecessary commands or redundant operations that can slow down the process.
- Separate Agent Pools for Different Workloads: Use different agent pools for various workloads, such as build, release, or specialized jobs like security scans. This helps in isolating resources and managing scaling more efficiently.
- Adjust Pool Size Based on Historical Data: Monitor your pipeline execution patterns and adjust ScaledJob configuration based on historical job load data.
- Always use the principle of least privilege. Only assign the PAT scopes that are necessary for your automation.
- Rotating PATs regularly minimizes the risk of unauthorized access if a token is compromised and ensures compliance with security best practices. It also reduces the impact of any accidental exposure, keeping your Azure DevOps environment secure.
- If you want to avoid using a PAT, consider creating a service connection in Azure DevOps using a service principal or managed identity, which can offer more granular permissions and security (not covered in this article)
- Use Custom Metrics for Precise Scaling: This requires setting up for example a custom Azure Monitor metric that accurately tracks job queues, including cancellations.
7. Conclusion
Auto-scaling Azure DevOps Agent Pools using KEDA provides a dynamic and efficient solution for managing build and deployment resources in a Kubernetes environment. By leveraging KEDA’s ScaledObject and/or ScaledJob resources, you can ensure that your Azure DevOps agents scale automatically based on real-time demand, reducing costs and improving job processing times.
In this article, we covered:
- An introduction to KEDA and its role in event-driven scaling for Kubernetes.
- Differences between ScaledObject and ScaledJob and how they apply to Azure DevOps Agent Pools.
- Step-by-step setup and configuration of AKS and ACR using Terraform.
- Creating and deploying a custom Docker image with a start.sh script for agent initialization.
- Implementing a solution using ScaledJob to optimize agent availability and scalability.
There are still more topics that we can elaborate on like solution setup based on ScaledObject, Security, Monitoring, replacing K8s with alternatives and many many more. Maybe I will write something about those in next articles.
I hope you found this insightful!
Kuba Dziurdziewicz
Written by
Kuba Dziurdziewicz
Once an experienced developer with demonstrated history of working in different industries, now DevOps Engineer that continues his road to professional growth.
Our Ideas
Explore More Blogs


Contact