Blog
How to structure your infrastructure: Using environment based Terraform Cloud Workspaces

After working with Terraform for a few years now, I have only recently begun to explore the power of workspaces and their role in development. One thing that always frustrated me when working with terraform was having to separate configurations by environment. Although this is a well documented “best practice” to separate configurations by environment, I always found this to be a sub optimal approach, as anytime something had to be updated or added, it would have to be done manually in all each environment’s version of the config files, which increases the risk of misconfiguration due to human error, there by taking away from a core pillar of IaC.
With all the fancy features available to us in Terraform Cloud I think the separation method is outdated, and I have developed a method that I believe reduces the human error margin by condensing the config files down to just 1 set, as well as automating much of the approach in order to improve development times. So, lets get started!
Prerequisites:
- Terraform Cloud configured — For those yet to start using Terraform Cloud I would highly recommend getting acquainted ASAP. Outside of what we are working on here, it provides a lot of helpful and powerful features to secure and develop your code. And the best part is, for the 5 first users in the organisation, it is totally free! So ideal for individual developers and small teams.
- Cloud Credentials — In this example I will be using GCP but it is applicable to all providers. I will cover where these credentials should be added within the workspace, but it is important you know how to generate and gather credentials for service account users that have necessary permissions within your chosen provider e.g GCP AWS
Setup
Git
The first stage of our setup is to create a git repository for our terraform config. Terraform Cloud supports all major Git platforms, so you should be able to use your favourite. When naming your new project, it is not mandatory that it matches the workspace name in Terraform Cloud, but I find it helps, so in my case I used the name terraform-cloud-workspaces. Once created, create branches for each environment.
So for this example:
- production -> production
- main -> staging
- feature -> dev
Then open your favourite IDE checkout your feature branch locally.
For the file structure, again there is no mandated structure, but in order to fit into standard terraform structure I put my terraform config files into a terraform/ directory rather than in root. Wherever you choose to put your files, remember it for later, as it is important when linking the workspace.
terraform-cloud-workspaces
|- README.md
|- terraform/
| |- main.tf
| |- variables.tf
Terraform Config
Since this is an example that focuses mostly on deployment over resources, we are going to employ a super simple config that consists of just a VM instance, but there are some things to highlight within the config:
main.tf
terraform {
  backend "remote" {
    organization = "myTerraformCloudOrg"
    workspaces {
      prefix = "terraform-cloud-workspaces-"
    }
  }
  required_providers {
    google = {
      source  = "hashicorp/google"
      version = ">= 4.73.0"
    }
  }
}
locals {
  region = "europe-west4"
}
provider "google" {
  project = "my-project-id"
  region  = local.region
}
resource "google_compute_instance" "example" {
  name         = "${var.env}-my-server"
  machine_type = var.machine_type
  zone         = "${local.region}-a"

  boot_disk {
    initialize_params {
      image = "debian-cloud/debian-11"
    }
  }

  network_interface {
    network = "default"
  }
}
The two most important things to note here are:
The use of prefix in the workspaces block, and the use of a var within the resource block name.
The centre point of this deployment method is the use of prefix in the workspace block. By doing this, we open up the configuration to be linked to multiple workspaces in terraform cloud, instead of direct 1 to 1 links for each environment. Hopefully what we are doing here will become clearer later on when we set up the workspaces in cloud, but more info on the prefix argument can be found here.
When deploying our infrastructure to each environment, we must somehow distinguish the resources from each other. Following security best practice this would be done by deploying each environment configuration to its own project in order to ensure isolation and avoid cross-contamination, however for the sake of this example I am simply using the environment name to define which VM has been deployed meaning at the end of our process we should have 3 distinct VMs all in the same project region:
- dev-my-server
- stg-my-server
- prd-my-server
Again, this should become more clear down the line, but for now the point to focus on is that environment based resources must be distinct somehow. This can be done by using different projects or regions, but for our basic example we are just using the environment name in the resource name.
variables.tf
variable "env" {
description = "Environment name"
type = string
}
variable "machine_type" {
description = "Machine type to be used for the VM"
type = string
}
As perviously mentioned, we want to adjust the environment name for each workspace, so an env variable has been included to allow this.
I have also included a machine_type variable. This is not mandatory, but I have included it to give an idea how other more tangible resource settings can be adjusted from environment to environment. For our example I will be adjusting the machine size getting larger as we get closer to prod, but this variable could easily be something else that pertains to your resource but changes through environments, such as a cluster scaling limit, or security group whitelisting settings.
Workspaces
Overview
Now we have our configuration in place, we can set up our workspaces that will facilitate deploying it to each environment. Below is a diagram of what we are looking to achieve:
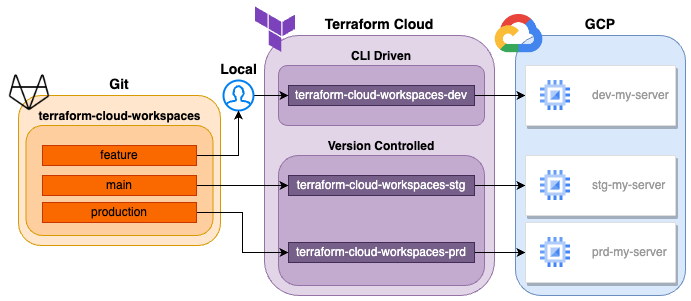
Workspaces workflow diagram
As you can see, we have 2 different types of workspace within Terraform Cloud:
In order to enable us and other developers within the team to develop quickly and efficiently, we want our dev workspace to be CLI driven. Using this method allows us to make deployments directly from the CLI using what we have in our local branch, meaning we can quickly deploy and test our changes before moving them down the line.
Version controlled workspaces however block deployments via CLI. These workflows are triggered when a change is made, or a merge request opened to a specific branch within a git repo. This means it can be properly integrated into a CI/CD workflow, and enable the proper checks and balances to be in place in order for successful deployment.
CLI Driven
CLI driven workflows can be added via the Terraform cloud UI, however I personally prefer using the CLI, and since we will be using the UI to set up the Version Controlled workspaces, it will be good to explore the CLI method here (assuming you have Terraform cloud configured and are logged in via CLI).
From the terminal inside your terraform directory, run the command:
terraform initTo initialise the backend. This will create the .terraform/ dir but result in an error:
Error: No existing workspaces.In order to create the dev workspace, run:
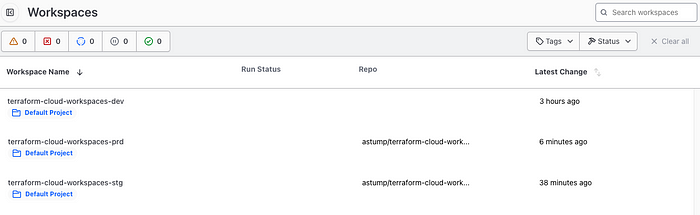
terraform workspace new devTo check that the workspace was created, go to the web UI to see the workspace is present:

Now we have a workspace we need to add the workspace specific variables to deploy correctly to the given environment. To do this, inside the workspace select Variables from the left menu and add the following terraform (not environment) variables:

You will also need to add cloud credentials to the workspace if you haven’t already. Instructions on how to do this can be found here. If you often use the same service account to deploy your infrastructure, it may make sense to set these as a variable set rather than in each workspace, in order to avoid having to set them for each one.
Version Controlled
Now we have our dev workspace in place, we can work on our staging and production ones. For version controlled workspaces you will need to set up via the Terraform Cloud UI. Once there click New > Workspace and select Version control workflow. If you have not already connected a VCS provider, you should do so now, and once connected select your desired VCS.
Choose the repo, in my case terraform-cloud-workspaces, and for the settings:
Workspace Name: terraform-cloud-workspaces-stg Advanced options ↓ Terraform Working Directory: terraform Auto apply: ✅ Auto-apply API, CLI, & VCS runs VCS Branch: main
Everything else can be left as default.
NOTE: if your Terraform config files are in root or a different directory to terraform/ you will have to change the Terraform Working Directory to match that.
OPTIONAL: When working with larger projects containing more than just a terraform config, you may wish to set the VCS Triggers to “Only trigger runs when files in specified paths change” and set the path to the terraform config dir. This will improve development speed and ensure Terraform deployments are only made when the config actually changes.
Now you have the staging workspace in place, you must again set the variables the same way as you did for dev only with the following

Don’t forget to add the credentials too if you are doing that per workspace!
Finally we can create the production workspace. Create another workspace the same way as we did for staging but with the following settings:
Workspace Name: terraform-cloud-workspaces-prd Advanced options ↓ Terraform Working Directory: terraform Auto apply: Leave unchecked VCS Branch: production
Notice this time we are using a “Manual apply” this time. This means that after the branch is merged we must manually approve it in the UI in order for it to be deployed. Choosing manual over automatic adds one extra safety step before deployment but ultimately the decision comes down to how you want your CI/CD pipeline to flow. For the sake of this example, we are exploring both methods.
You can now, once again, add variables to the production workspace this time (don’t forget the credentials variables if required):

You should now have 3 correctly configured workspaces
OPTIONAL: If you want to tidy up your workspaces slightly, you can create a New > Project called “terraform-cloud-workspaces” and move your workspaces over into it:

Deployment
Its been a long road, but we are finally ready to see the new method in action! Below is a diagram to show how the deployments should work in conjunction with your development lifecycle:
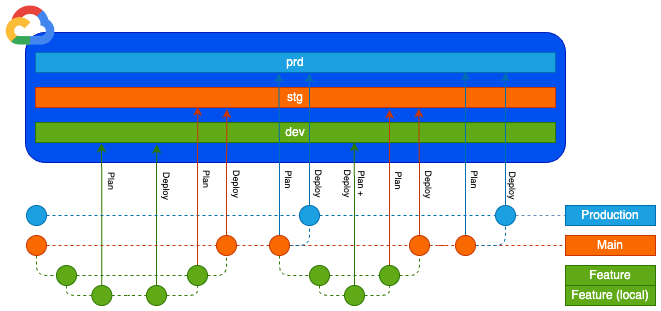
Git workflow diagram
Notice how branches a layer below trigger a plan for the layer above when the merge request is created, and then the deploy occurs when the merge is accepted.
Dev
Developers are in full control of when they want to plan and deploy infrastructure. We can test this from our local feature branch by running:
terraform applyThis should generate a plan for us were the only resource to be deployed is an e2-micro VM instance named dev-my-server:
# google_compute_instance.example will be created
    + resource "google_compute_instance" "example" {
    + can_ip_forward = false
    + cpu_platform = (known after apply)
    + current_status = (known after apply)
    + deletion_protection = false
    + guest_accelerator = (known after apply)
    + id = (known after apply)
    + instance_id = (known after apply)
    + label_fingerprint = (known after apply)
    + machine_type = "e2-micro"
    + metadata_fingerprint = (known after apply)
    + min_cpu_platform = (known after apply)
    + name = "dev-my-server"
    + project = (known after apply)
    + self_link = (known after apply)
    + tags_fingerprint = (known after apply)
    + zone = "europe-west4-a"
Once approved this will proceed to deploy this resource. You can check the deployment by going to your compute instances in GCP to see the server there:

Staging
In order to first initialise the Terraform Cloud deployment, you may have to trigger a run from the UI for the workspace before it can be triggered from a change to the git repo. To do this, simply go to the workspace in the UI and select Actions > Start new run and use the following settings:
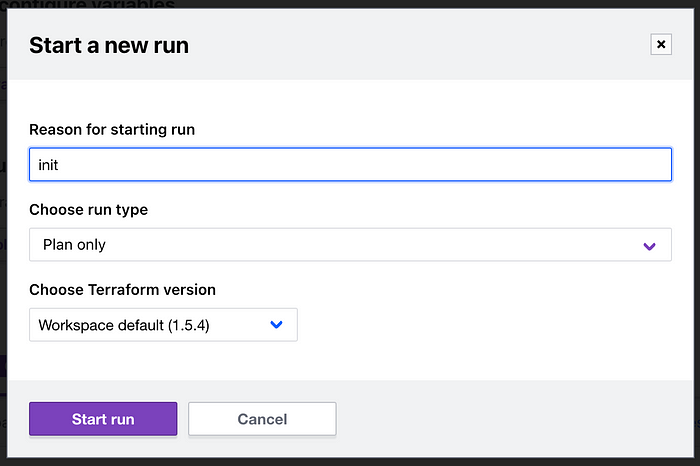
Assuming the branch is still empty, this run should result in an error, but it will initialise the deployment so that future changes to the repo will trigger runs.
Now we can raise a merge request from our feature branch into the main branch, which our staging version controlled workspace is linked to. This will trigger a plan run within our staging workspace. If you head to the Runs section from the left menu in the workspace you can explore this plan and see this time it will deploy a e2-small instance with name stg-my-server:
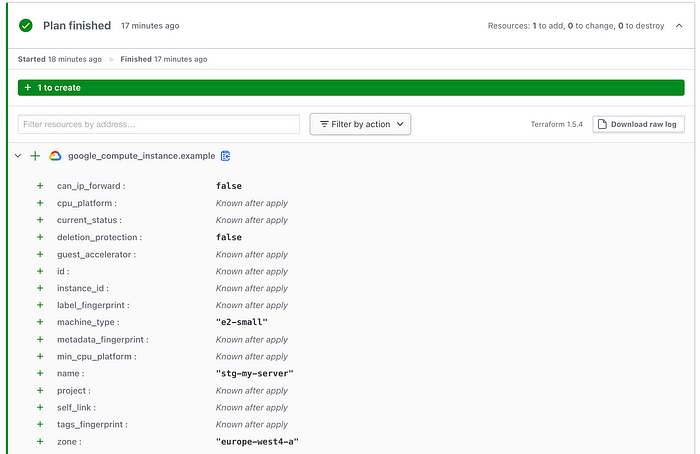 Staging deployment plan[/caption]
If everything looks good here you can merge the branch from feature to main. Since we set this workspace to “Auto apply”, as soon as you merge it will automatically trigger deployment. You can once again check progress from the Runs tab in the workspace, and once complete you should now have 2 servers deployed to your GCP project, with the staging being one size larger:

Production
Finally we can deploy our production infrastructure. As we did for the staging workspace, first initialise the deployment by triggering a plan only run from the UI. Next we can trigger a proper run by raising a merge request in our git repo from main branch to production. This will once again trigger a plan run, but this time with a e2-medium instance with name prd-my-server:
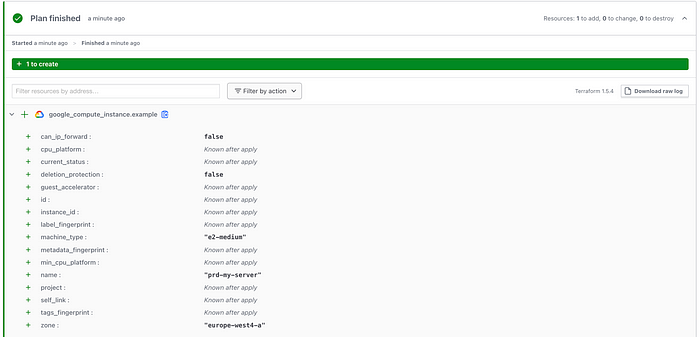 Production deployment plan[/caption]
If this all looks good, you can approve the merge request in the git repo. This will trigger another run, however, unlike in the staging environment the run will require approval in the UI before proceeding from plan to apply:
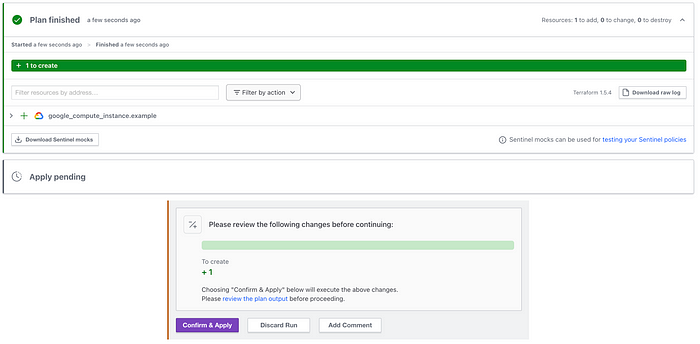
Click Confirm & Apply to continue the deployment, and once finished, you should now have 3 servers deployed all of varying size based on env!

Review
So lets review! Although all these steps may seem a little complex, we can condense what we have done: Using only 1 set of terraform configuration files, we have created a workflow that deploys unique resources based on environment, and integrated it into our CI/CD pipeline
Doing this helps reduce human error by cutting down on the sets of config files, as well as securing staging and production from being deployed without proper checks and balances in place
Update
Please check out my blog post here for an update on defining variables using this method.
Destruction
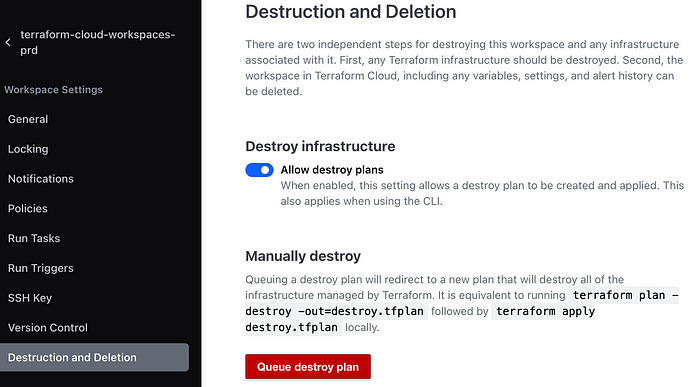
To finish this off, dont forget to destroy your resources at the end. For staging and production this can be done via the UI by going into the workspace and under Settings > Destruction and Deletion queuing a destroy plan (you may have to confirm this run in the same way you did for apply):
And for dev this can be done locally by running the command:
terraform destroyOnce complete, double check your GCP resources to confirm everything is gone.
Written by
Andrew Stump
Our Ideas
Explore More Blogs


Contact