It all started with my attendance at Brian Sam-Bodden’s presentation at Spring IO 2022, which raised a great curiosity about how powerful Redis could be as a primary database. The main reason was speed. A writing operation takes less than a millisecond to be performed due to Redis data being stored in memory.
I needed to test this. And since I’m a Kotlin and Spring utilizer. Why not use Redis OM Spring, the library that Brian was advocating for in his presentation and to which he is the main contributor?
What I didn’t know was that this curiosity would lead me to my first open-source contribution. A contribution that helped Redis OM Spring persist data 10 times faster.

Summary
- Introduction (How I decided and got the chance to contribute)
- Getting my hands dirty
- Understanding Spring Data Redis (taking a step back)
- Understanding Redis OM Spring (diving deeper)
- Overwriting the saveAll method
- Conclusion
Introduction
My first tests were a bit frustrating, the speed for inserting 10 thousand records was of 35 seconds, not mind-blowing at all. So I tweeted:
I just followed the tutorial to get started with a Spring Boot Application and #Redis OM Data. Running Redis Stack locally on #Docker. I was expecting sub-millis results, but taking 35 secs to insert 10000 objects and 4 millis to select 1 object 😕
— Raphael De Lio 🇧🇷🇳🇱 (@RaphaelDeLio) July 6, 2022
This tweet started a thread in which Brian Sam-Bodden and Steve Lorello share that it’s probably a matter of pipelining. Besides that, Brian said they were first tackling usability, and then they would tackle performance.
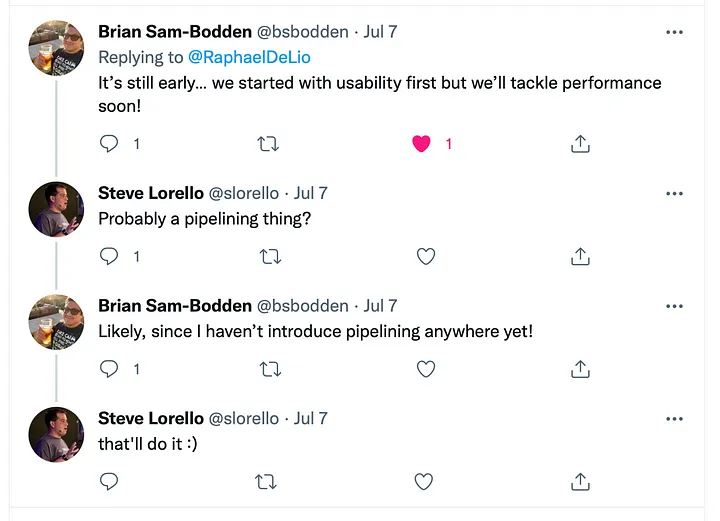
That ignited my curiosity even further. I was just getting started with Redis and I don’t even know what pipelining is. So I decided to forget about it for a second and get started with Redis Server, Redis CLI, and Redis Insight first.
Redis OM Spring does a great job at usability. The abstraction is so well done that I was able to get started and start using Redis even before understanding how Redis works. However, understanding the basics of Redis was more important at this stage.
And so I did it. I learned a few things, I got started with running Redis locally, then learning the basics of Redis CLI, Redis Insight, how it persists data to the disk, pipelining, transactions, and a few other things. Still, a long path to go, but enough to get started with pipelining on the Kotlin side.
The architecture of Redis OM Spring
Redis OM Spring is built on top of Spring Data Redis, which in turn, is built on top of Jedis or Lettuce, two different drivers for connecting Java to a Redis Server.
Lettuce seems to be more powerful as it allows asynchronous calls and clusterization, which I haven’t dived into yet. Jedis allows commands to be pipelined, everything I needed. I decided to go with Jedis.
Jedis is very easy to use, you send commands as you would be sending to the server as well. For example, to set a simple String key, all you need to do is:
jedis.set("key", "value");And to pipeline commands, you can do it as:
Pipeline pipeline = jedis.pipelined();
pipeline.set("key1", "value1");
pipeline.set("key2", "value2");
pipeline.sync();
Cool. Let me see how long it takes to add 1 million simple String keys…
Now, that’s mind-blowing… 4 seconds?
So I tweeted again:
Inserting one million keys in 4 seconds using Spring Boot and Jedis? That’s a beast! #redis @Redisinc
— Raphael De Lio 🇧🇷🇳🇱 (@RaphaelDeLio) August 26, 2022
And sent a message to Brian if there was any way I could actually contribute to the project:
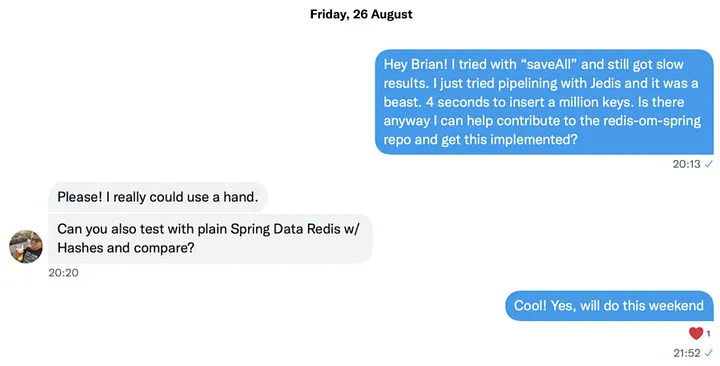
Brian asked me to do a comparison with Spring Data Redis as well. His intention was to understand if this was something Redis OM Spring had inherited from.
These were the results I shared with him and in my GitHub repository (Check it here) as well:

With this exercise, I also took the opportunity to dive deeper into Spring Data Redis and Redis OM Spring implementations, which allowed me to engage in a conversation on where to get started with Brian.
Brian directed me to the right places in the code to refactor:

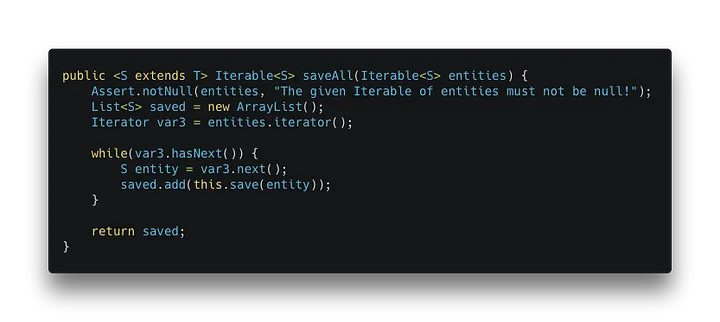
The problem was that Redis OM Spring was inheriting the saveAll methods from Spring Data Redis. And Spring Data Redis was doing one insert at a time, not benefitting from the pipelining feature.
Redis OM Spring allows us to manipulate both Hashes and Documents. Therefore, we had to overwrite this method in two different places: SimpleRedisEnhancedRepository and SimpleRedisDocumentRepository.
Getting my hands dirty
As Brian suggested, I started by implementing a getter for the Redis Client in RedisModulesOperations:

com.redis.om.spring.ops.RedisModulesOperations
With an instance of Jedis in hand, I was ready to overwrite the saveAll method and implement the new faster solution.
However, in order to complete this task, I would have to do backward engineering and understand a bit better how Spring Data Redis and Redis OM Spring work.
Understanding Spring Data Redis
When you call the saveAll method in Spring Data Redis with a collection of entities, it will actually iterate over the entities and call the save method for each one of them:
org.springframework.data.keyvalue.repository.support.SimpleKeyValueRepository
The save method will check whether the entity is new and call the insert or update method of the KeyValueOperations.
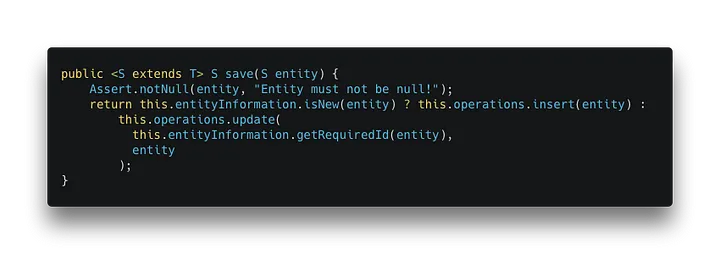
org.springframework.data.keyvalue.repository.support.SimpleKeyValueRepository
The insert method will generate a new key while the update method will get the key that already exists. Regardless of the method called, both of them will end up calling the put method of the KeyValueAdapter.
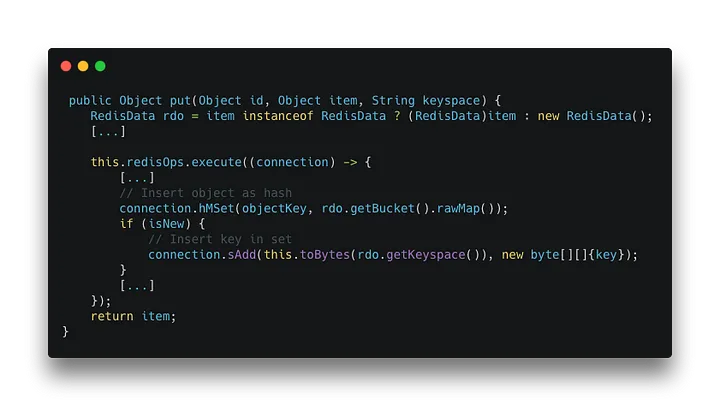
org.springframework.data.keyvalue.repository.support.SimpleKeyValueRepository
The put method doesn’t insert only one key. It inserts two! One is your actual object, and the other is the key as the member of the set that contains all IDs in the specific keyset.
All of this is important to understand how Redis OM Spring works.
Understanding Redis OM Spring
In Redis OM Spring, we have two new Key Adapters implemented. One for Enhanced Hash operations and another one for JSON operations.
We also have two new Repositories implemented. One for Enhanced Hash operations and another one for JSON operations.
The key adapters will overwrite the put method. However, the repositories were not overwriting the saveAll methods of the original implementation.
As we previously saw, the original saveAll method calls the original save method. This means that we were inserting one entity at a time. Therefore, we had to overwrite the saveAll methods in the repositories in order to be able to pipeline the commands.
The implementation of the enhanced Key Adapter for hash operations in Redis OM Spring was very similar to Spring Data Redis.
For the JSON operations, on the other hand, it was a bit trickier. This is because Spring Data Redis doesn’t support operations in JSON. This is one of the many benefits of Redis OM Spring.
The implementation of the put method in the Key Adapter for JSON operations relies on a third library: the JRedisJSON library (You can check it here), which extends the functionality of Jedis with JSON commands.
Unfortunately, I wasn’t able to reuse the methods already implemented in the library because they were not benefitting from pipelining. I had to copy the implementation, which was basically sending custom commands to Redis through Jedis.
It took me two iterations to get to the stage the methods are currently at. In the first one, I didn’t take into consideration the time to live (expiration) of the key values nor that I had to process the audit annotations.
Audit Annotations
This a cool feature of Redis OM Spring that allows you to keep track of when a change happens to an entity. You must equip your entity classes with auditing metadata to benefit from that functionality. Learn more here.
Overwriting the saveAll Method In Redis OM Spring
With my understanding of Spring Data Redis and Redis OM Spring a bit more enhanced, I was able to overwrite the methods in Redis OM Spring.
I would have to overwrite the method in two different repositories: SimpleRedisEnhancedRepository and SimpleRedisDocumentRepository.
I decided to start with the repository for hash operations, SimpleRedisEnhancedRepository.
SimpleRedisEnhancedRepository
The implementation of the method is pretty straightforward. The saveAll method receives an Iterable of entities. We get a Jedis connection, start a pipeline and iterate over the entities.
In the iteration, we check if the entity is new, we create a new key if necessary, then we process the audit annotations, and we pipeline the commands to insert the key into the set of keys of the respective keyspace and the object as a hash.
Then, we check if an expiration time is defined for the object and pipeline the command to set it. Finally, after we have iterated over all the entities, we execute the pipelined commands.
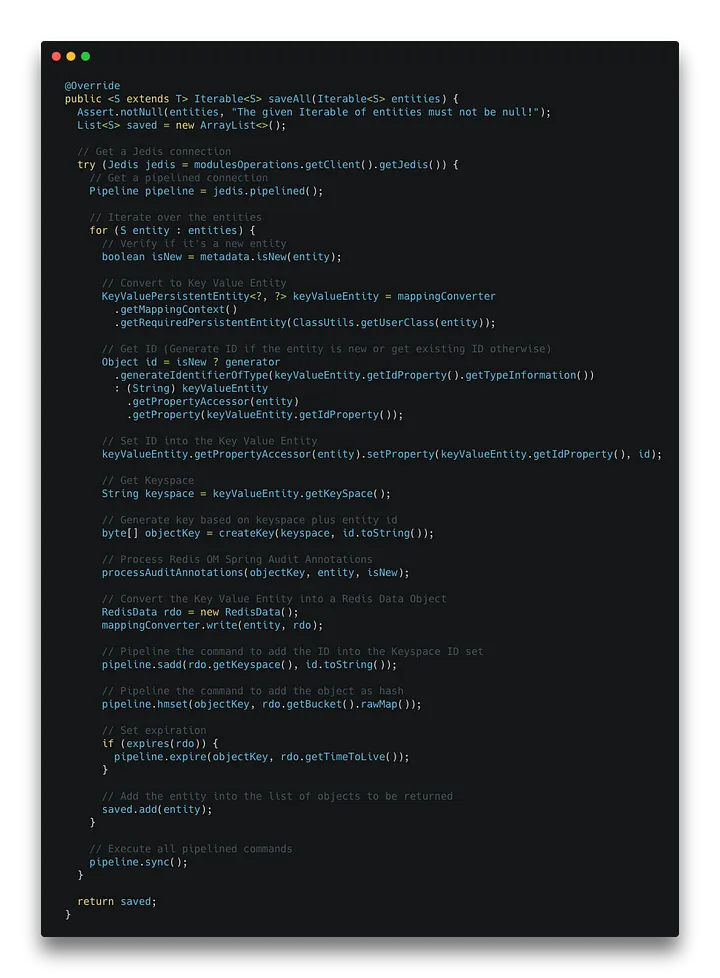
com.redis.om.spring.repository.support.SimpleEnhancedRedisRepository
SimpleRedisDocumentRepository
In a nutshell, overwriting the saveAll method is basically the same as the hash repository.
The saveAll method receives an Iterable of entities. We get a Jedis connection, start a pipeline and iterate over the entities.
In the iteration, we check if the entity is new, we create a new key if necessary, then we process the audit annotations, and we pipeline the commands to insert the key into the set of keys of the respective keyspace and the object as a JSON.
Then, we check if an expiration time is defined for the object and pipeline the command to set it. Finally, after we have iterated over all the entities, we execute the pipelined commands.

com.redis.om.spring.repository.support.SimpleRedisDocumentRepository
Testing
Since we implemented new features, it’s important to have them tested.
Redis OM Spring is already pretty well-tested. However, I implemented new tests for testing the expiration time of the key values and the processing of audit annotations when using the saveAll method for both repositories. I won’t go through the implementation of the tests here, but you can check them in the merge itself by clicking here.
Conclusion
I opened the PRs, and they were reviewed by Brian and then merged.
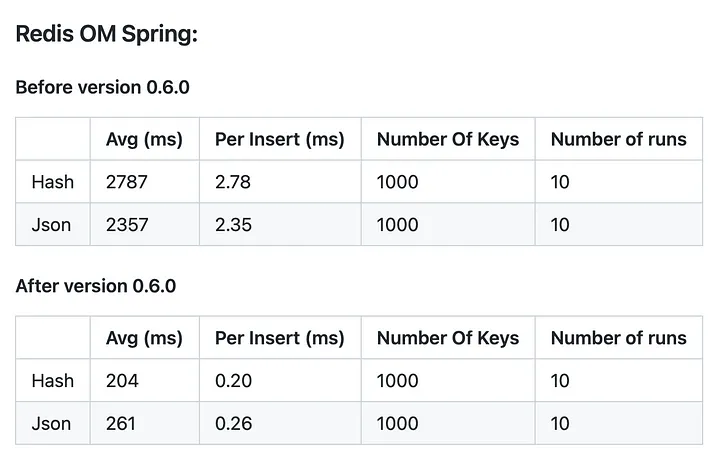
With the implementation of the saveAll methods, we were able to see a significant improvement in the insertions. Inserting is now around 10 times faster than it was before.
This better performance was achieved because, in the previous implementation, the saveAll iterated over the elements saving one at a time. With this new implementation, it’s now pipelining all commands and only then executing them. Taking full advantage of Jedis’ performance.
This feature was released in version 0.6.0, and you can see the results of the new implementation below:
