In the age of rapid releases and continuous up-time for software applications, most of you are familiar with the advantages of DevOps for achieving integrated development and delivery. In this post, a step-by-step process that illustrates the practical implementation of DevOps with an automated Build-Integrate-Test-Release pipeline is described in detail.
Essential elements of DevOps
Irrespective of which tools you use and the underlying technology stack, there are a few essential elements for any successful DevOps environment, namely:
- Code repository with version control
- Continuous Integration (CI)
- Automated Build
- Automated Release through Continuous Delivery or Continuous Deployment (CD)
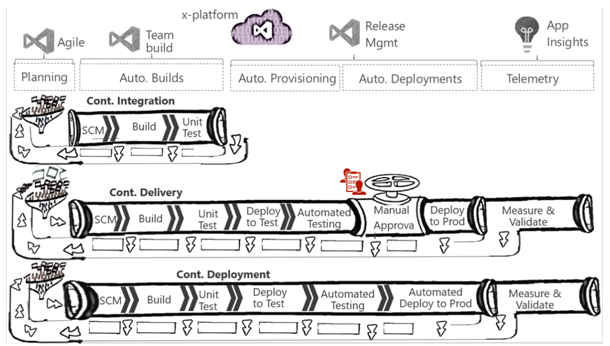
In case of a manual deployment, the CI/CD workflow from Code Commit<Continuous Integration<Continuous Delivery will be as shown in the picture below:

The primary difference between continuous delivery and continuous deployment is, in case of the former, pushing code to production stage is done manually, whereas it is automated in the latter scenario.

For a customer, whose application is built on Microsoft technology stack, and is deployed using Azure cloud services, we have automated the build to release pipeline as described below:
Code Commit and Version Control
With Git as the code repository, we adopted the following process for committing the code and triggering a pre-build:
- Created a pull request to check for periodic updates from individual developers, and commit the code to the code repository with appropriate versioning. Git generates a dynamic version number, based on the branches and the changes that were committed prior to the current build
- Using NuGet, a Microsoft-specific tool to identify and pull together all dependent code, a NuGet package is generated, which is a single ZIP file with the .nupkg extension, containing compiled code (DLLs), other files related to that code, and a descriptive manifest with version number and a date-time stamp.
- Any new code commits triggers an automated pre-build to check the sanctity of the code that is checked in.
- As part of pre-build, impacted tests (unit tests) are run automatically.
- If the pre-build is unsuccessful, an automatic build failure notification is generated

Continuous Integration
Continuous Integration (CI) is a development practice that integrates code created by multiple developers through an automated framework. We used Microsoft Visual Studio Team Services (VSTS) as the CI/CD tool, and adopted the following process:
- If the pre-build is successful, an automated merge-request is generated.

- The merge-request triggers a new build, which builds the solution and merges with the master branch.
@echo off
ECHO SOURCE BRANCH IS %BUILD_SOURCEBRANCH%
IF %BUILD_SOURCEBRANCH% == refs/heads/master (
ECHO Building master branch so no merge is needed.
EXIT
)
SET sourceBranch=origin/%BUILD_SOURCEBRANCH:refs/heads/=%
ECHO GIT CHECKOUT MASTER
git checkout master
ECHO GIT STATUS
git status
ECHO GIT MERGE
git merge %sourceBranch% -m “Merge to master”
ECHO GIT STATUS
git status
ECHO GIT PUSH
git push origin
ECHO GIT STATUS
git status
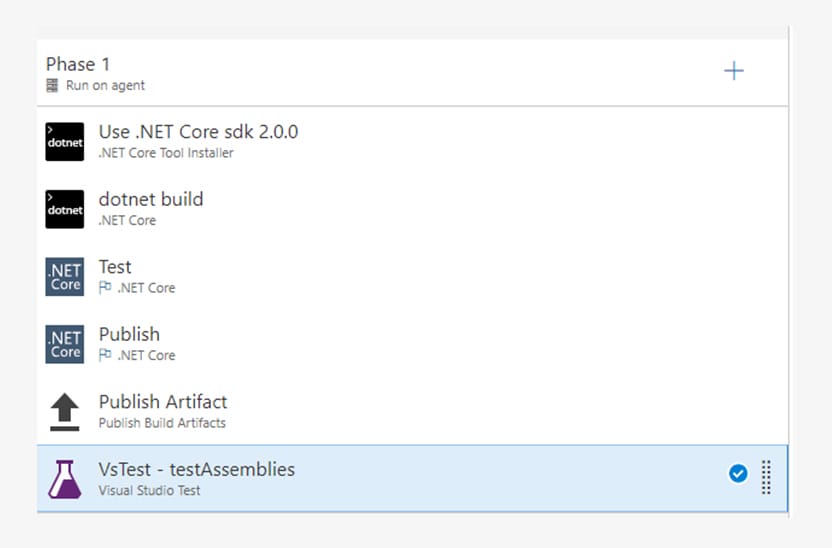
- Automated regression tests are executed on the solution. The Visual Studio Test task automatically runs tests included in the app assemblies, but there is a wide range of configuration options that can be used to run only specific tests. Refer Run Tests using Visual Studio task for more information.
- If the regression tests are unsuccessful, an automatic failure notification is generated.
Release Management: Deployment and Delivery

Source: Microsoft
Continuous Deployment (CD) is the ability to use the output from CI and automatically deploy the tested build to different environments. Continuous delivery involves a manual decision prior to pushing to staging and production, whereas in continuous deployment, the latest working version is automatically deployed to a production environment.
- If the regression tests are successful, an artefact is dropped to the release branch.

- In case of continuous delivery, a notification will be generated and sent to an approver.
- The approver will manually trigger deployment of the application to a staging environment, using Azure cloud services deployment task.
- Here, manual functional tests are run, and if successful, then the application is deployed to a production environment. If the functional test is automated, run them early in the CD pipeline. For this, add the Deploy Test Agent and Run Functional Tests tasks to your release definition. Refer Testing in Continuous Integration and Continuous Deployment Workflows for more information
- In the production environment, performance and availability tests are run manually, before releasing the application to a live environment. Load testing can be performed using cloud-based load tests and Apache JMeter load tests.
- Azure PowerShell task is used to SWAP the application from staging to a production environment, and once the application is live the staging instance will be suspended.
- In case of any changes to the database schema, the same is updated through Execute Azure SQL task.

- In a continuous deployment environment, all the above tasks including functional, performance, and availability tests are also automated, and the application is deployed to a live environment without any manual intervention.
- White Source Bolt and White Source extensions available in VSTS are used to checking for any external dependencies and ensure that the package is complete and up to date in all respects. This is a mandatory step executed as part of the Build & Release pipeline.
The Wrap
The level of automation that one chooses to implement as part of DevOps, will be largely determined by the nature of the development environment, as well as the needs of the production and/or live environments. The right tooling and workflow will go a long way in ensuring that the latest code is always in a production-ready, deployable mode.
The author is a Senior Software Engineer with Vision Planner-coMakeIT team.
Error: Contact form not found.


