
In this blog post I will show how you can use a Makefile to make your life easier.
In this blog I will use CDK with python. But the principle of the Makefile will work on almost any project.
When you start a new PoC you do not have a full CI/CD environment in place yet.
So how can you deploy your CDK application? And make it easy to add the CI/CD pipeline at a later point?
Let’s begin!
I used CDK 1.124.0 (build 65761fe) for this blog post.
First we will need a CDK project. So we will create a working folder named: makefile_cdk_blog:
mkdir makefile_cdk_blog
cd makefile_cdk_blog
cdk init --language python
mkdir tests
At this point you will have an empty CDK project. Most projects have dependencies. You can divide them into 2 categories:
- Project dependencies, dependencies needed for the project, located in
setup.py. - Development dependencies, dependencies needed to develop on the project, located in
requirements.txt. Let’s start with adding some development dependencies in therequirements.txtfile:-e . black pytest pytest-cov pytest-black setuptoolsNow we need to configure pytest. Add the following to a new file
setup.cfg:[tool:pytest] testpaths = tests
[coverage:run] branch = True source = makefile_cdk_blog
[coverage:report]
show_missing = true
fail_under = 100
exclude_lines =
pragma: no cover
if name == .main.:
The only thing left is the Makefile itself. Create a file called Makefile in the root of your project. Make sure it has the following content:
SHELL = /bin/bash -c
VIRTUAL_ENV = $(PWD)/.venv
export BASH_ENV=$(VIRTUAL_ENV)/bin/activate

$(VIRTUAL_ENV):
    python3 -m venv $(VIRTUAL_ENV)

.PHONY: install clean synth diff deploy test lint

install: $(VIRTUAL_ENV)
    pip install -r requirements.txt

clean:
    [[ -d $(VIRTUAL_ENV) ]] && rm -rf $(VIRTUAL_ENV) || true
    [[ -d .pytest_cache ]] && rm -rf .pytest_cache || true
    [[ -d cdk.out ]] && rm -rf cdk.out || true
    [[ -f .coverage ]] && rm .coverage || true

synth:
    cdk synth

diff:
    cdk diff

deploy: test
    cdk deploy

test: lint
    pytest --cov --cov-report term-missing

lint:
    black .

 $(VERBOSE).SILENT:
Alright we are good to go! First we want to commit our changes, but before we can do that we should test them. We added dependencies, so we need to install those first! But since we have a make target for that now we can use it.
make install
I will walk you through what is happening on the background:
- First the
Makefilewill select bash as a shell. - Define the location of the virtual environment.
- The
BASH_ENVvariable has a dependency on the$(VIRTUAL_ENV)target. It will create a virtual environment on the defined location. - The virtual environment is then exported in the
BASH_ENVvariable. - Then we will execute the
installtarget. All commands are now executed in the context of the virtual environment. pip installwill install all dependencies in therequirements.txtand in thesetup.py.
We can now run the test target to see if everything works as expected.
make test
You would see something like:
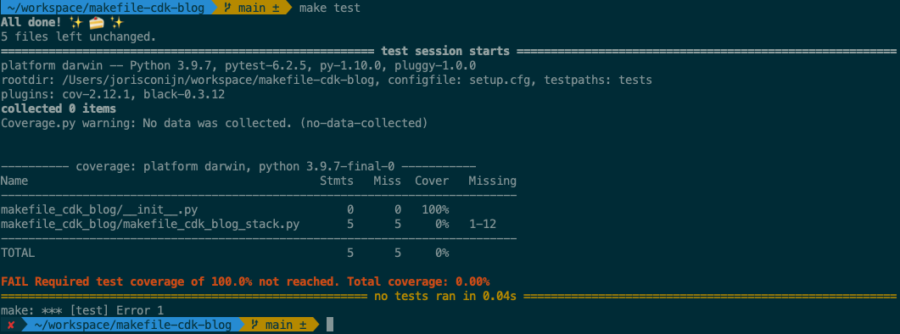
So what happened? We invoked the test target. This target has a dependency on the lint target.
The lint target contains black . and this command formats all the python code. Afterwards, it will continue and execute the commands in the test target.
So the test is failing because we did not meet the configured code coverage threshold. That is fine for now so let’s commit!
git add .
git commit -m "chore: setup project using a Makefile"
Deployment time!
Before we can deploy I assume that you configured your AWS credentials properly.
export AWS_PROFILE=my-profile-name
make deploy
And it failed? Because the deploy target has a dependency on the test target. So the test target is being executed first but that fails.
This is the real power of using a Makefile. You have simple names for actions that you want to do. For example: test, deploy, etc.
And in this case you should not deploy if your test fail.
You can extend these targets with different checks/commands.
For example, you could synthesize the template and then use the following tools:
- cfn_nag
- cloudformation-guard.
Conclusion
Makefiles allow you to standardize actions across projects. They can execute commands in virtual environments for you. And if kept simple they are easy to read!
Update: Improve your Makefile even more by adding a help target!
Written by

Joris Conijn
Joris is the AWS Practise CTO of the Xebia Cloud service line and has been working with the AWS cloud since 2009 and focussing on building event-driven architectures. While working with the cloud from (almost) the start, he has seen most of the services being launched. Joris strongly believes in automation and infrastructure as code and is open to learning new things and experimenting with them because that is the way to learn and grow.
Our Ideas
Explore More Blogs


Contact