Blog
How to publish a Python package to a Gitlab package registry using uv

What Is uv and How Does It Help Publish Python Packages to GitLab?
uv is a fast Python package manager that simplifies dependency management, virtual environments, package building, and publishing. When integrated with GitLab Package Registry and GitLab CI/CD, uv enables developers to automate package versioning, build Python distributions, and publish internal packages securely, making software delivery faster and more reliable.
In many organizations, there is a need for internal packages. Installing these package is often difficult. To make this easier, you can use an internal package registry. Gitlab provides this feature by default. We'll show how to deploy to this index using uv, a fast Python package manager.
Why uv?
We can recommend uv for the following reasons:
- It's extremely fast with resolving dependencies and installing them. This makes development and builds faster, which is awesome.
- It manages virtual environments for you.
- It can manage Python versions for you. This removes the need for Conda,
pyenvor manual installation of Python. - It's built on standards such as the
pyproject.tomlspecification.
For more benefits, you can check out the uv repository.
Let's install it!
Install uv
You can install uv in a couple different ways. If you already have Python you can use pipx. pipx can install programs separately from other python environments: pipx install uv.
If you want to install it as a standalone, you can use curl:
curl -LsSf https://astral.sh/uv/install.sh | sh
You can find more instructions in the uv repository.
Create a new Gitlab repository
Note: If you have an existing repository, you can skip this step. Your project still needs to be set up with uv though.
- On Gitlab, create a new repository using the
+button and walk through the steps.

- Clone the repository to your computer: Click the blue "code" button and walk through the steps. You may need to set up authentication first.
- Once cloned,
cdinto the project directory and runuv init --package. This will set up the project. We use the--packageflag because we want to distribute our code as a package! - Create a git commit:
git add .andgit commit -m "Init package" - Finally, push it to our repository:
git push.
Our package is now ready to be published. But it's not published just yet. Let's create a pipeline to publish our package!
Create your Gitlab CI pipeline
In your project directory, create a file called .gitlab-ci.yml. In this file, we're telling Gitlab what our CI pipeline will look like. We will be using git tags to determine our version number.
Copy the following contents into the file:
# We can define multiple stages here, but for this example we have only one. What happens in the publish stage is defined later.
stages:
  - publish

variables:
  PYTHON_VERSION: "3.13"
  UV_VERSION: "0.5.5"
  # With the following variables, we tell uv how to publish our package.
  # Gitlab has built in usernames and passwords for publish packages. This means you don't need to change them!
  UV_PUBLISH_URL: "${CI_API_V4_URL}/projects/${CI_PROJECT_ID}/packages/pypi"
  UV_PUBLISH_USERNAME: "gitlab-ci-token"
  UV_PUBLISH_PASSWORD: "${CI_JOB_TOKEN}"

# Before we do anything else, we need to install uv
before_script:
  - pip install uv==${UV_VERSION}  # pipx is not needed on Gitlab, because we use a fresh environment every run

# This stage publishes to our Gitlab package registry
publish:
  stage: publish
  image: python:${PYTHON_VERSION}
  script:
    # Set the version in pyproject.toml to the current git tag
    - VERSION=$(git describe --exact-match --tags)
    - uvx --from=toml-cli toml set --toml-path=pyproject.toml project.version $VERSION
    # Build and publish the package
    - uv build
    - uv publish dist/*.whl
  only:  # Only run this stage when a tag is created/pushed
    - tags
Explanation of the CI pipeline definition
Variables
In the variables, we define variables that can be set in one place and can be reused. This helps when expanding the pipeline, so it's good to set it up from the start.
Publish stage
This publish stage publishes our package to the package registry. This involves a number of different steps:
- Get the version number from the latest git tag.
- Change the version number in
pyproject.tomlto the latest git tag. At the time of writing,uvdoes not (yet) support dynamic versioning. For more information, see this issue. - Build our project. This will create a
distdirectory containing our built package. - Publish the package to the registry we've defined in the variables. This will only publish the
whlfile found in thedistdirectory. Thewhlis much faster to install because it does not need to be built from scratch (like a.tar.gz).
Commit, tag and push your CI pipeline
First, commit our new pipeline:
git add .gitlab-ci.yml
git commit -m "Add pipeline to publish our package"
Then create a git tag, specifying your version number. Note that it cannot already exist, or it will give an error.
git tag 0.0.1
Now push the commit and tag to our Gitlab repository:
git push --tags
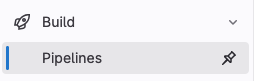
Our pipeline will automatically trigger on tags. This means it should already be running! To view the progress, go to your repository on Gitlab and choose Build > Pipelines in the sidebar:
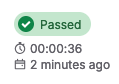
If everything went well, you should see "Passed" in green. If there was an error, investigate it by clicking on "Failed" and carefully reading the logs. Then apply the appropriate fixes.
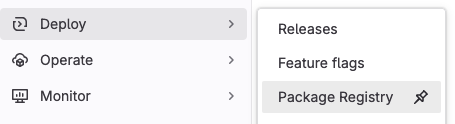
When succesful, we can now view our published package under Deploy > Package Registry:
Conclusion
In this blogpost we have:
- Create a Python package using
uv - Created a Gitlab CI pipeline
- Succesfully published a package to an internal package registry.
Now users can start installing our package!
Sources
Many thanks to the following sources:
https://docs.astral.sh/uv/guides/integration/gitlab/#using-the-uv-imagehttps://docs.astral.sh/uv/configuration/environment/https://github.com/astral-sh/uv/issues/9195https://github.com/astral-sh/uv/issues/6298#issuecomment-2335034247
Photo by Kindel Media on Pexels
Frequently Asked Questions
Written by
Timo Uelen
Timo Uelen is a Machine Learning Engineer at Xebia.


Contact