
GitHub is the place where developers live, share, and try out new things. With the boom in AI in the last year, more and more people want to play around with AI and see how they can integrate it into their application and tools. There are a lot of providers of AI models available, some have free tiers to get started with, and some have only paid access to their model library. An AI model is a program that has been trained on a set of data to recognize certain patterns or make certain decisions without further human intervention. It can be used to generate things like text, images, or even code. A common example of this, that most people have heard of, is ChatGPT, where you can ask it a question like "Create a poem on the beauty of a forest during sunset", and the model will produce a nice poem.
GitHub has created a free way to access the power of AI through their GitHub Models functionality. GitHub Models is a way to get access to AI capabilities through GitHub's user interface, that enables you experiment with AI to see what you can do with it. There is a playground available that lets you ask the AI model questions and get the answers back in your browser. GitHub Models contains a collection of pre-trained models that you can use in your application. These models are trained on a variety of datasets and are ready to be used and come from different providers: from Meta-Llama to OpenAI, Cohere, Mistral, to Phi. The main benefit is that you can use your GitHub Access Token to authenticate against the models. That gives you plenty of room to test and validate your ideas without any additional cost.
Let's dive into models!
Note: at the time of writing GitHub Models is in public beta, so some changes are expected to happen in the future.
Marketplace
The GitHub Marketplace is the place to find loads of tools offered by the community. Most of it is free (GitHub Actions) and some have a paid subscription model in them as well (some GitHub Apps). GitHub Models is a new addition to the Marketplace and is free to use. You can start by going to the marketplace and select 'Models':
https://github.com/marketplace/models. The GitHub Models on the marketplace are a subset of what is available in the Azure Open AI models.
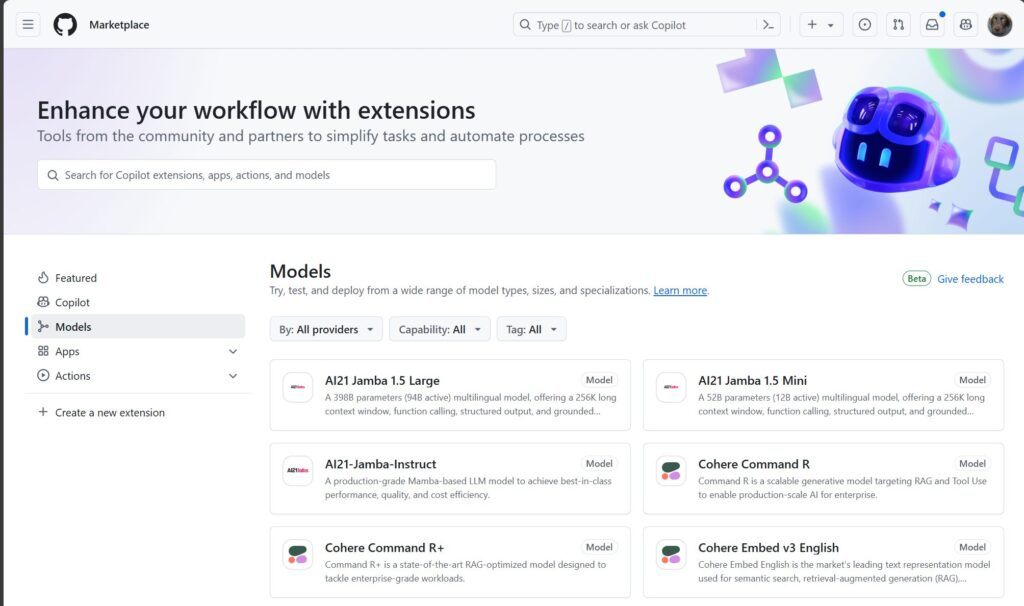
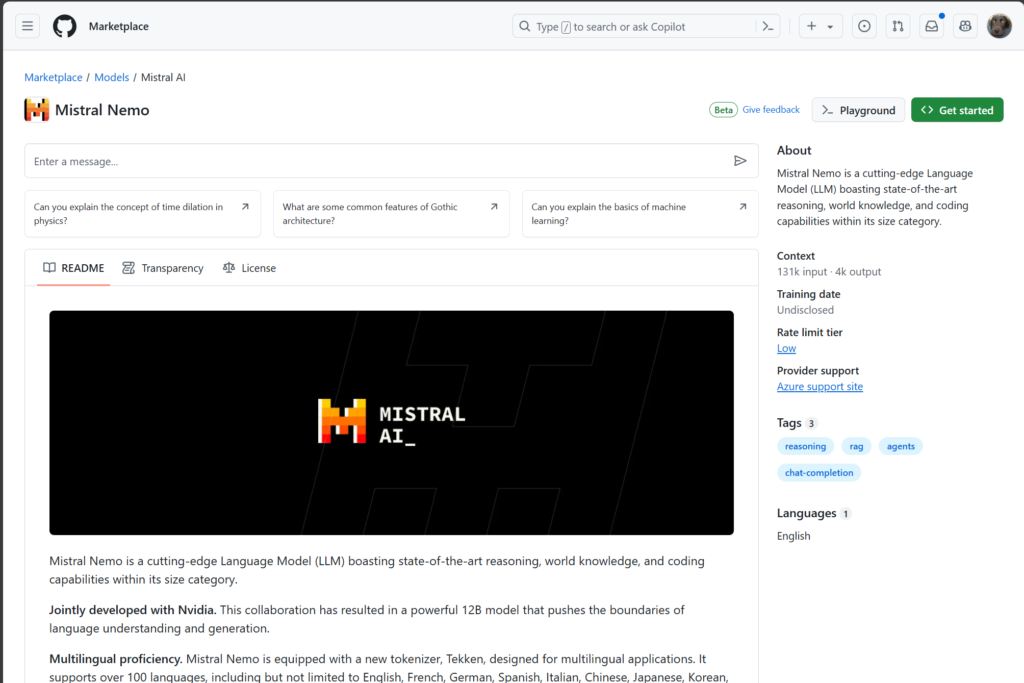
By using the filters you can search for models and learn more about them. Clicking on a card will show you the details for those models. This includes links to learn more about the model or the way it was trained.
Playground
By going to the playground (upper right hand corner) you can now start testing around with the model. It already shows some examples out of the box to get you started with a chat conversation with the model you choose. Note that in the top left corner you can easily switch between different models!
Even better, all the code that you are working with is available in the playground as well. On the code tab, you can find the code that is needed to make the test in the playground work. This way you can easily copy and paste the code into your own application and start using the model in your own application. The playground shows you how to build your code against the model in several programming languages: Python, JavaScript, C#, and REST calls using cURL.
Azure OpenAI
GitHub Models has been created as an easy way to get started using AI. You can choose to use the SDK from the model vendor, or to use the Azure AI Inference SDK. The recommendation is to use the Azure SDK, as that abstracts away the complexity of the different model implementations. Instead of working with the vendor flavor, the Azure SDK lets you switch the model by just changing the model identifier.
In the example below you can see how to use the Azure SDK to interact with the model. The code is in Python and uses the Azure SDK to interact with the model. After setting up the client with authentication, we create a completion request with a system message (grounding the conversation in a certain direction). After that, we create a user message that we want to send to the model. This is called the "prompt". The last line shows the response from the model, which is the completion of the user message.
client = ChatCompletionsClient(
endpoint="https://models.inference.ai.azure.com",
credential=AzureKeyCredential(os.environ["GITHUB_TOKEN"]),
)

response = client.complete(
messages=[
SystemMessage(content="You are a friendly assistent"),
UserMessage(content="Can you explain the basics of machine learning?"),
],
model="Mistral-Nemo", # change this line to use a different model
temperature=0.7,
max_tokens=4096,
top_p=1
)

print(response.choices[0].message.content)
The way all this works is that GitHub is hosting the models on Azure, and is letting you authenticate against their implementation using your GitHub Token. You can use this authentication from anywhere, so not only through the playground, but also in your own application!
Even inside of a GitHub Codespace (a virtual workspace hosted by GitHub), the GITHUB_TOKEN environment variable in that workspace is automatically set to the token of the user using the Codespace. This way you can easily use the models in your Codespace without any additional setup.
Very awesome in my opinion! This means that ANYONE with a GitHub account can start using AI models in their solutions. Whether you want to build this into your mobile application or your web backend, you can try it out with GitHub Models! No need to sign up for a new service, no need to pay for a subscription, just use the models in your application and start testing.
Getting started
The getting started button will take you to a screen with more examples. The examples guide you on how to implement the setup you have been testing in the Playground and add them into your own application or repository.
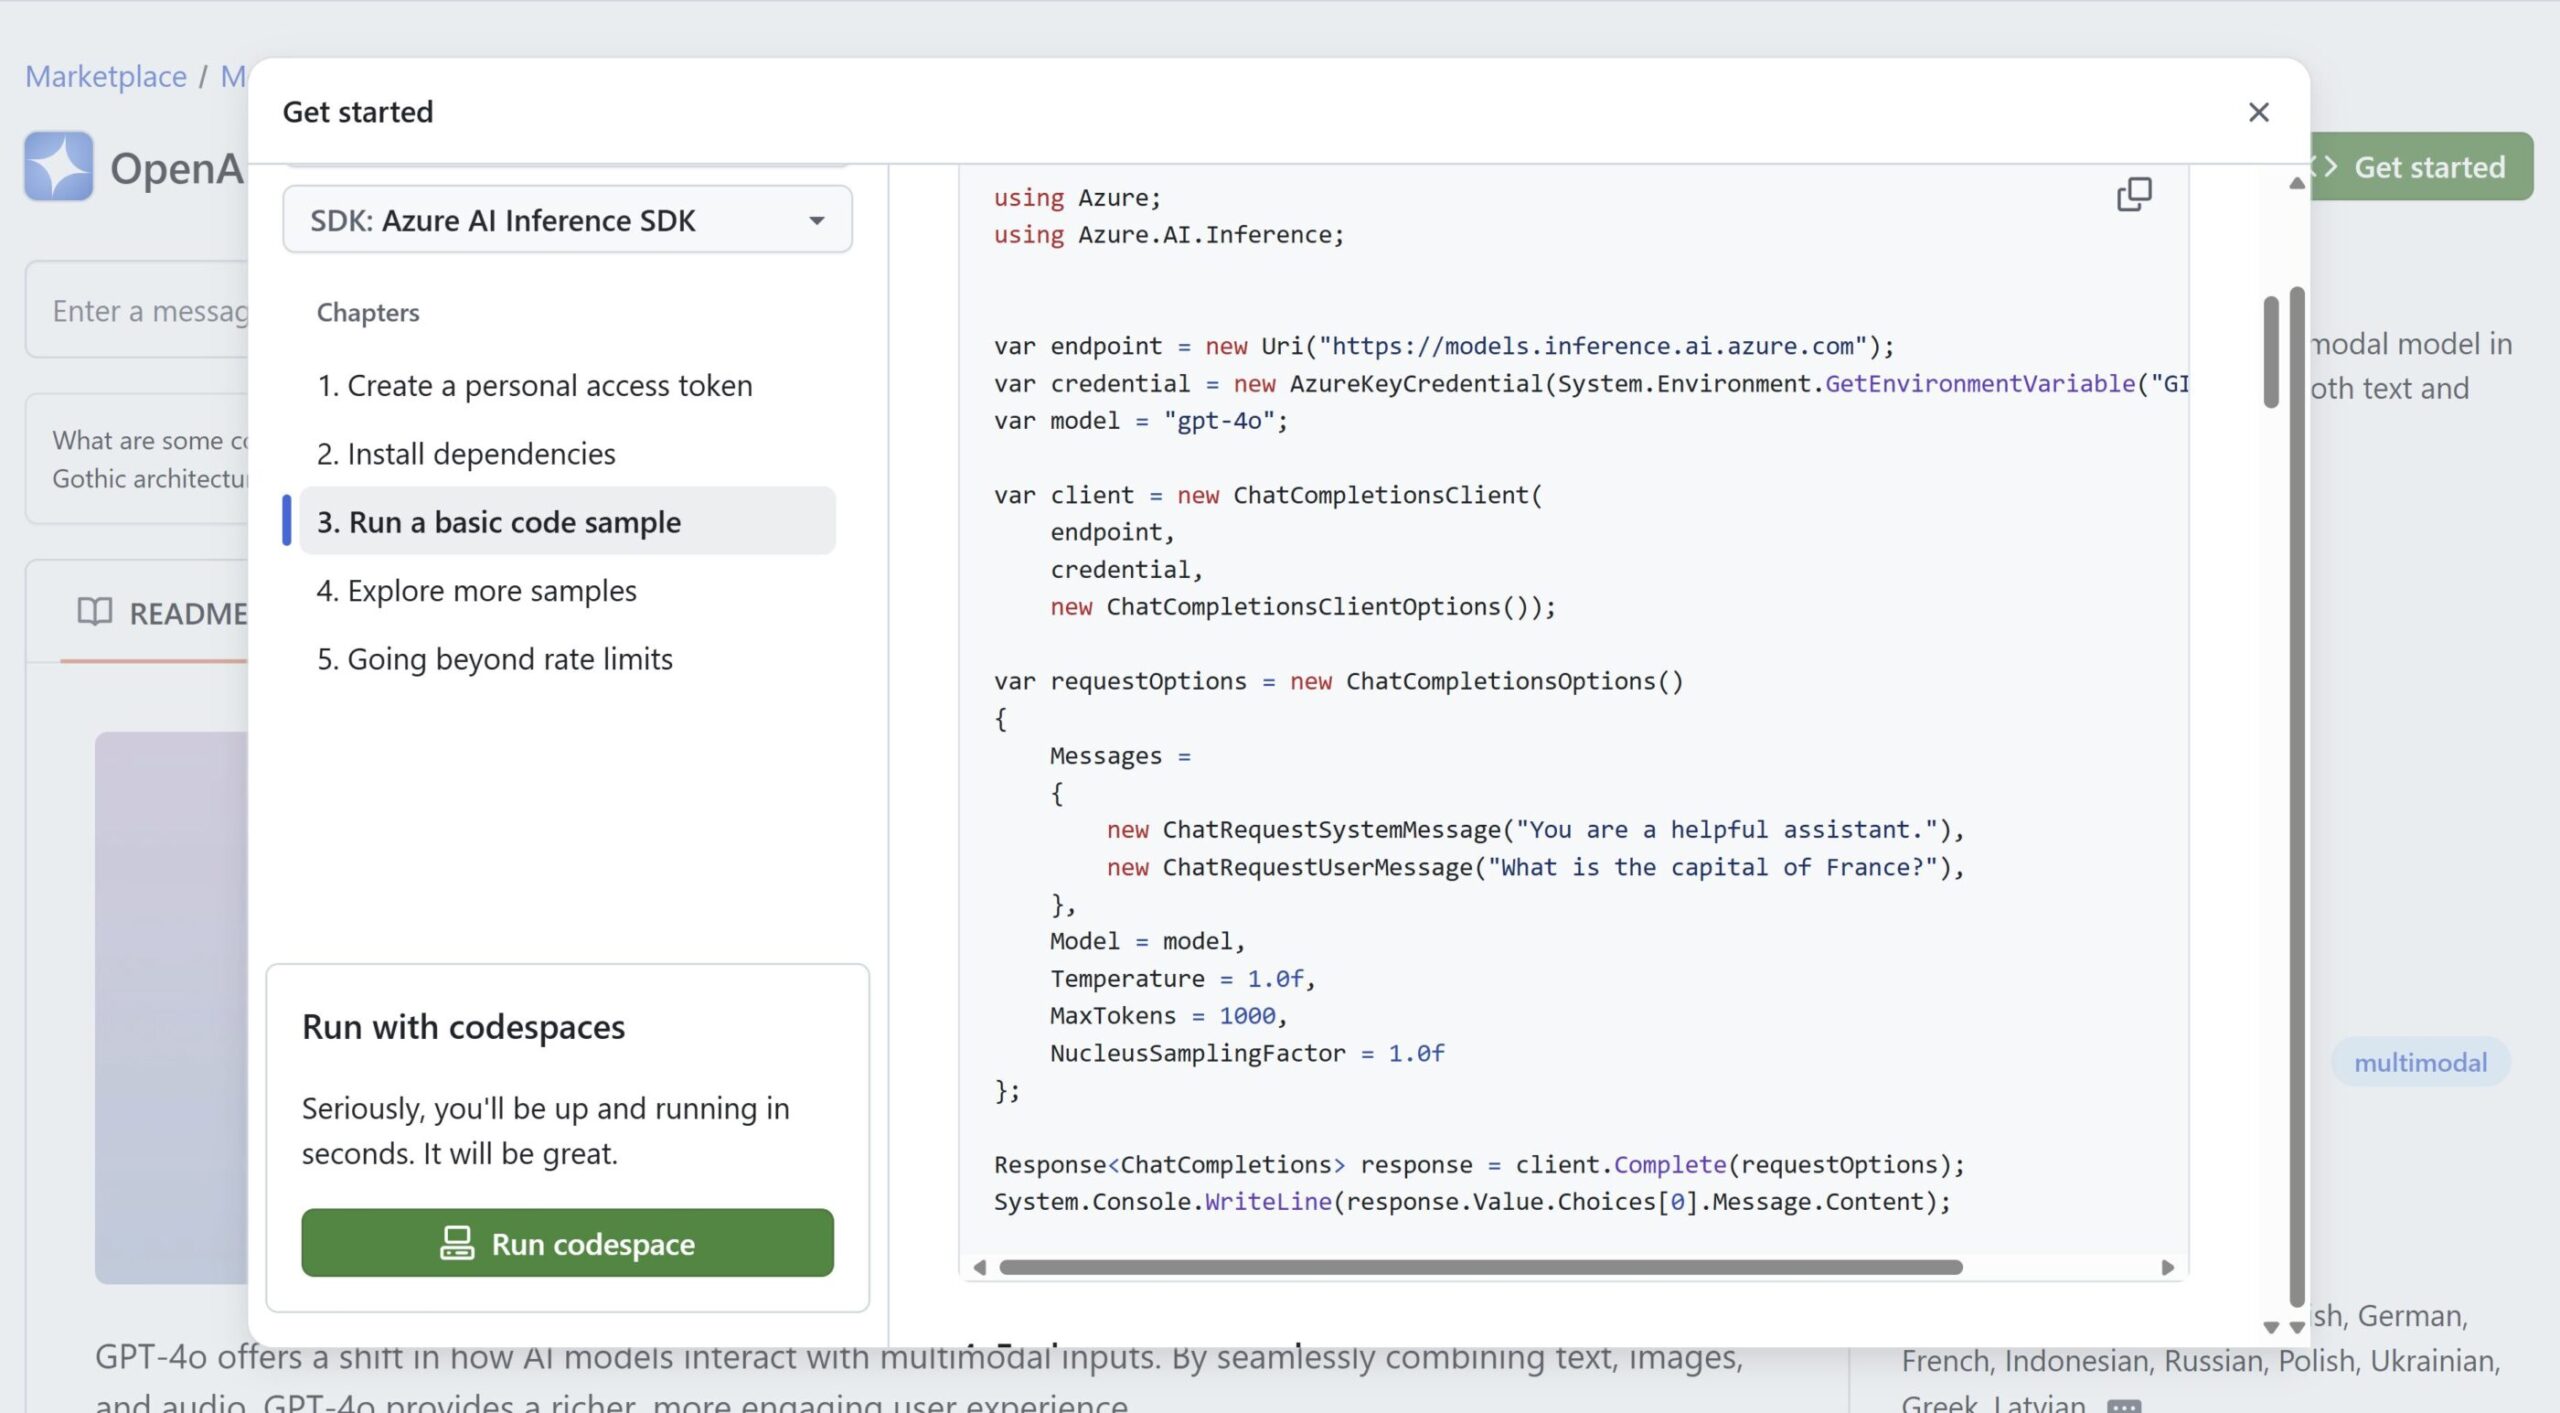
When you use the button "Run Codespace", you will actually create a new Codespace on the github/codespaces-models repository. A Codespace is a full-fletched hosted coding environment, that saves you downloading the repo as well as installing all the dependencies. Every GitHub user has access to 60 hours of free Codespace usage per month (with a dual core config). You can use this to test out the models in your own environment, without running into any compute cost.
Note: the Codespace is a completely separate experience from the Playground. The Codespace is configured with all sorts of sample projects for you get started with.
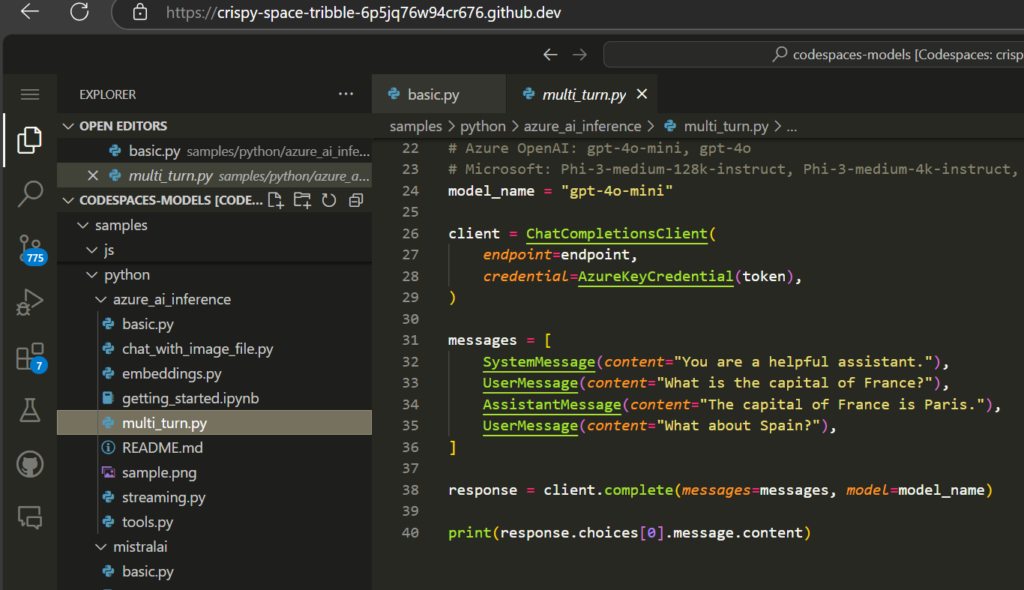
The Codespace is equipped with a lot of examples and documentation to get you started with using the models. You can easily run the examples and see how they work, right from the terminal in the Codespace. Since your GITHUB_TOKEN is automatically set in the Codespace, you can go straight to the terminal and run the examples.
Open up a folder in the code language that you prefer, and learn all about the different AI interaction options that are available to you:
- Basic chat (one prompt and response turn)
- Chat with an image file (ask questions on the image)
- Embeddings (retrieve a part of a text, like the city name from a sentence)
- Multi-turn chat (having chat conversations with history)
There are also several examples available in Jupyter notebook files (.ipynb) that you can run in the Codespace. A Jupyter Notebook is a common way in the machine learning community to document steps in a process and have a user interface to run those steps. The VS Code extensions to run the notebook are already installed in the Codespace, so you can just open the notebook and run the cells to see the output. Click on the 'play' icon the execute the step. In the screenshot you can see the UI for executing the steps, with the description of what happens in the step, the actual code for the step, and the highlighted result of the step.
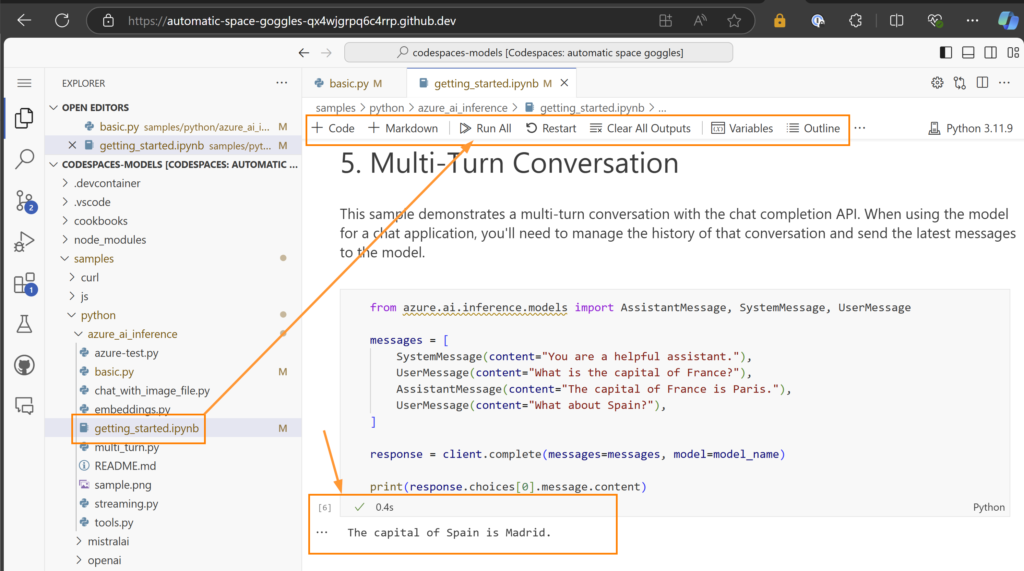
The benefit of the notebook is that these have been filled with a lot more guidance on what is happening, so this is a great way to learn more about the code that is needed for application or AI-flow.
Change the code in the notebook and see how the output changes. All inside a of a free environment.
Rate limits
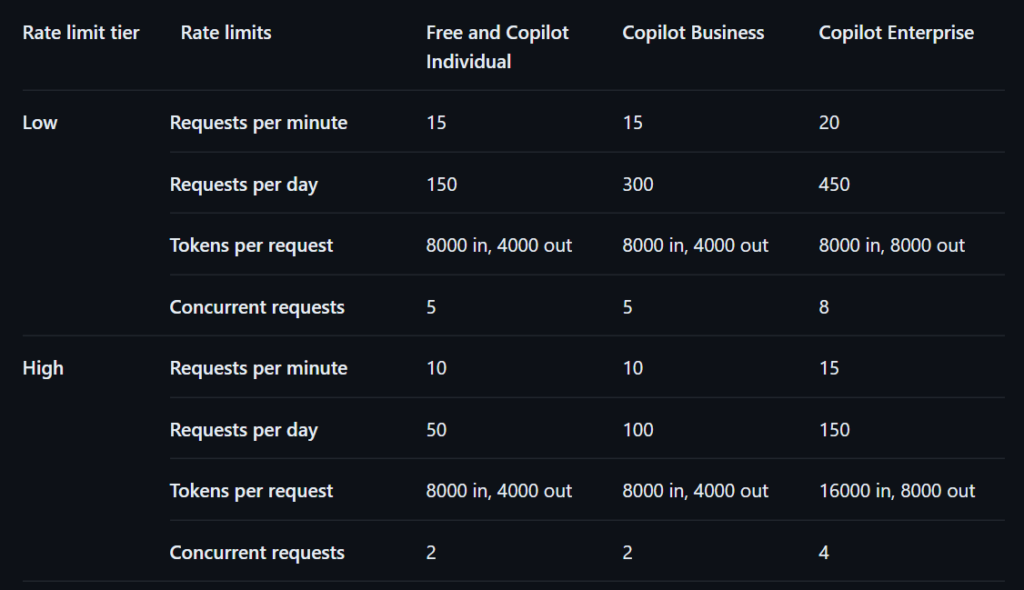
Since this all is freely available there have to be some limits. The setup is not intended for production use, but for development and testing. The rate limits are very sufficient for you to start testing and give you plenty of room to work during the day by yourself.
As you can see in the screenshot, the amount of calls per minute and hour are dependent if you already have a GitHub Copilot license or not. The limit for the amount of tokens in and out of the model is limited to a relative straightforward amount as well: 12.000 tokens (in+out) is plenty to start experimenting and validating if your idea works.
Going to production
If you have played around enough with the free options, it is time to start testing with a broader audience and validate your solution with other people (e.g. beta testers). If you have chosen the Azure AI Inference SDK, you can easily switch to a paid Azure OpenAI instance in your own Azure subscription. If you have chosen the vendor SDK, you can switch to a paid subscription with the vendor.
Deploying to Azure
To deploy your AI integration to Azure you need to first deploy an Azure OpenAI instance. You can deploy that the same way you would deploy any other Azure service: through the Azure portal, the Azure CLI, or through an ARM/bicep template.
Here's an example to get you started:
# example deployment of an Azure OpenAI instance using the Azure CLI
az cognitiveservices account create
--name MyOpenAIResource
--resource-group OAIResourceGroup
--location swedencentral
--kind OpenAI
--sku s0
--subscription <subscriptionid></subscriptionid>

# deploy a model to your Azure OpenAI instance
az cognitiveservices account deployment create
--name MyOpenAIResource
--resource-group OAIResourceGroup
--deployment-name gpt-4o
--model-name gpt-4o
--model-version "2024-05-13"
--model-format OpenAI
--sku-capacity "1"
--sku-name "Standard"
When you have deployed the Azure OpenAI instance, get a key from the 'keys and endpoint' section of the Azure OpenAI instance and use that in your application. The GITHUB_TOKEN is no longer needed then. You only need to change the endpoint and the API Token in your application to start using the Azure OpenAI instance.
Here's the example of the new code with only two lines changed:
client = ChatCompletionsClient(
endpoint="https://xms-openai.openai.azure.com/openai/deployments/gpt-4o", // this line was changed, do note the deployments/deploymentname, without /models/completions!
credential=AzureKeyCredential(os.environ["AOAI_TOKEN"]), // this line was changed
)

response = client.complete(
messages=[
SystemMessage(content=""""""),
UserMessage(content="Can you explain the basics of machine learning?"),
],
model="Mistral-Nemo", # change this line to use a different model
temperature=0.7,
max_tokens=4096,
top_p=1
)

print(response.choices[0].message.content)
Conclusion
GitHub Models is a great way to get started with AI models. It is free to use and you can start using the models in your application right away. The Azure OpenAI SDK is recommended to use, as that abstracts away the complexity of the different model implementations.
Be aware that the authentication happens through your GitHub Token, which enables you to run your tests from anywhere. You are not tied to the Playground, the Codespace, or running this in GitHub. I'm curious to see what you will build with GitHub Models!
This article is part of XPRT.#17. Download the magazine here.
Written by
Rob Bos
Rob has a strong focus on ALM and DevOps, automating manual tasks and helping teams deliver value to the end-user faster, using DevOps techniques. This is applied on anything Rob comes across, whether it’s an application, infrastructure, serverless or training environments. Additionally, Rob focuses on the management of production environments, including dashboarding, usage statistics for product owners and stakeholders, but also as part of the feedback loop to the developers. A lot of focus goes to GitHub and GitHub Actions, improving the security of applications and DevOps pipelines. Rob is a Trainer (Azure + GitHub), a Microsoft MVP and a LinkedIn Learning Instructor.
Contact