Blog
Building Resilient Public Networking on AWS: Part 1

Revisiting Networking Concepts from the Client’s Perspective
Welcome to our comprehensive blog series on advanced networking strategies tailored for regional evacuation, failover, and robust disaster recovery. Together, we'll delve into a range of critical topics that are pivotal for understanding and implementing sophisticated networking solutions. Here's what you can expect in this engaging journey:
- Revisiting networking concepts from the client’s perspective: Before setting up anything on the server side, we'll begin by reviewing fundamental networking concepts from the client's perspective to ensure a solid grasp of the essentials that underpin the forthcoming discussions.
- Deploy Secure Public Web Endpoints: Learn the intricacies of deploying a web server and fortifying its public endpoint on AWS. Additionally, we'll demystify the management of a DNS hosted zone with AWS Route 53, including its seamless integration with third-party DNS hosting providers.
- Region Evacuation with DNS approach: At this point, we will deploy the previous web server infrastructure in several regions, and then we will start reviewing the DNS-based approach to regional evacuation, leveraging the power of AWS Route 53. We'll study the advantages and limitations associated with this technique.
- Region Evacuation with static anycast IP approach: Again, we will deploy the web server infrastructure in several regions, and then we’ll start exploring the concept of region evacuation using the robust Global Accelerator with a static anycast IP approach. Gain insights into its benefits and considerations for implementation.
- Client’s TCP persistent connections and why this could be a problem: Concluding our series, we'll shed light on the critical role of addressing one of the most common HTTP client behaviors—TCP persistent connections. Uncover why overlooking this aspect can lead to the potential failure of previously discussed approaches.
Moreover, along with this series of blog posts, we’ll provide a GitHub repository to easily and quickly deploy the necessary infrastructure using AWS CDK (Cloud Development Kit), without needing to perform manual tasks using AWS Console. We won’t need it for this first post in the series, however.
Introduction
In this first blog post, tailored for beginners, we'll set the stage by delving into the basics of networking from the client's perspective. We'll take a closer look at the underlying mechanisms that facilitate the interaction between your device and the public endpoints on the internet. From understanding the role of DNS resolvers to unraveling the most common behaviors of HTTP clients, we’ll review the basic networking concepts, ensuring you're equipped with the essential knowledge to navigate the upcoming discussions confidently.
So, buckle up and join us on this exhilarating journey to uncover the secrets of resilient networking on AWS.
The Public Internet from the Client’s Perspective
Let's dive deeper into understanding how the public internet operates from the perspective of a client. As we progress through this blog post, we'll closely examine the intricate interplay between HTTP clients and DNS resolvers, understanding the mechanisms that enable secure and seamless connection to your public endpoint. This exploration is not only crucial for understanding your server-side requirements but also forms the foundation for building a robust and reliable networking infrastructure.
Imagine an HTTP client, which could be a web browser, an application, or any program facilitating HTTP requests. When this client needs to establish a new TCP connection, it initiates a DNS resolution process. This process entails the transmission of a DNS query to a DNS resolver, typically provided by the user's operating system. The DNS resolver then undertakes the task of translating the domain name into an IP address by consulting authoritative DNS servers, storing the result along with the Time-to-Live (TTL) value for that specific DNS record for subsequent use.
In the following diagram, we aim to present a concise summary of the concepts elucidated in this section, outlining the sequential steps involved in sending an HTTP request. Additionally, we introduce the foundational infrastructure that will be further explored in future installments of this blog series.
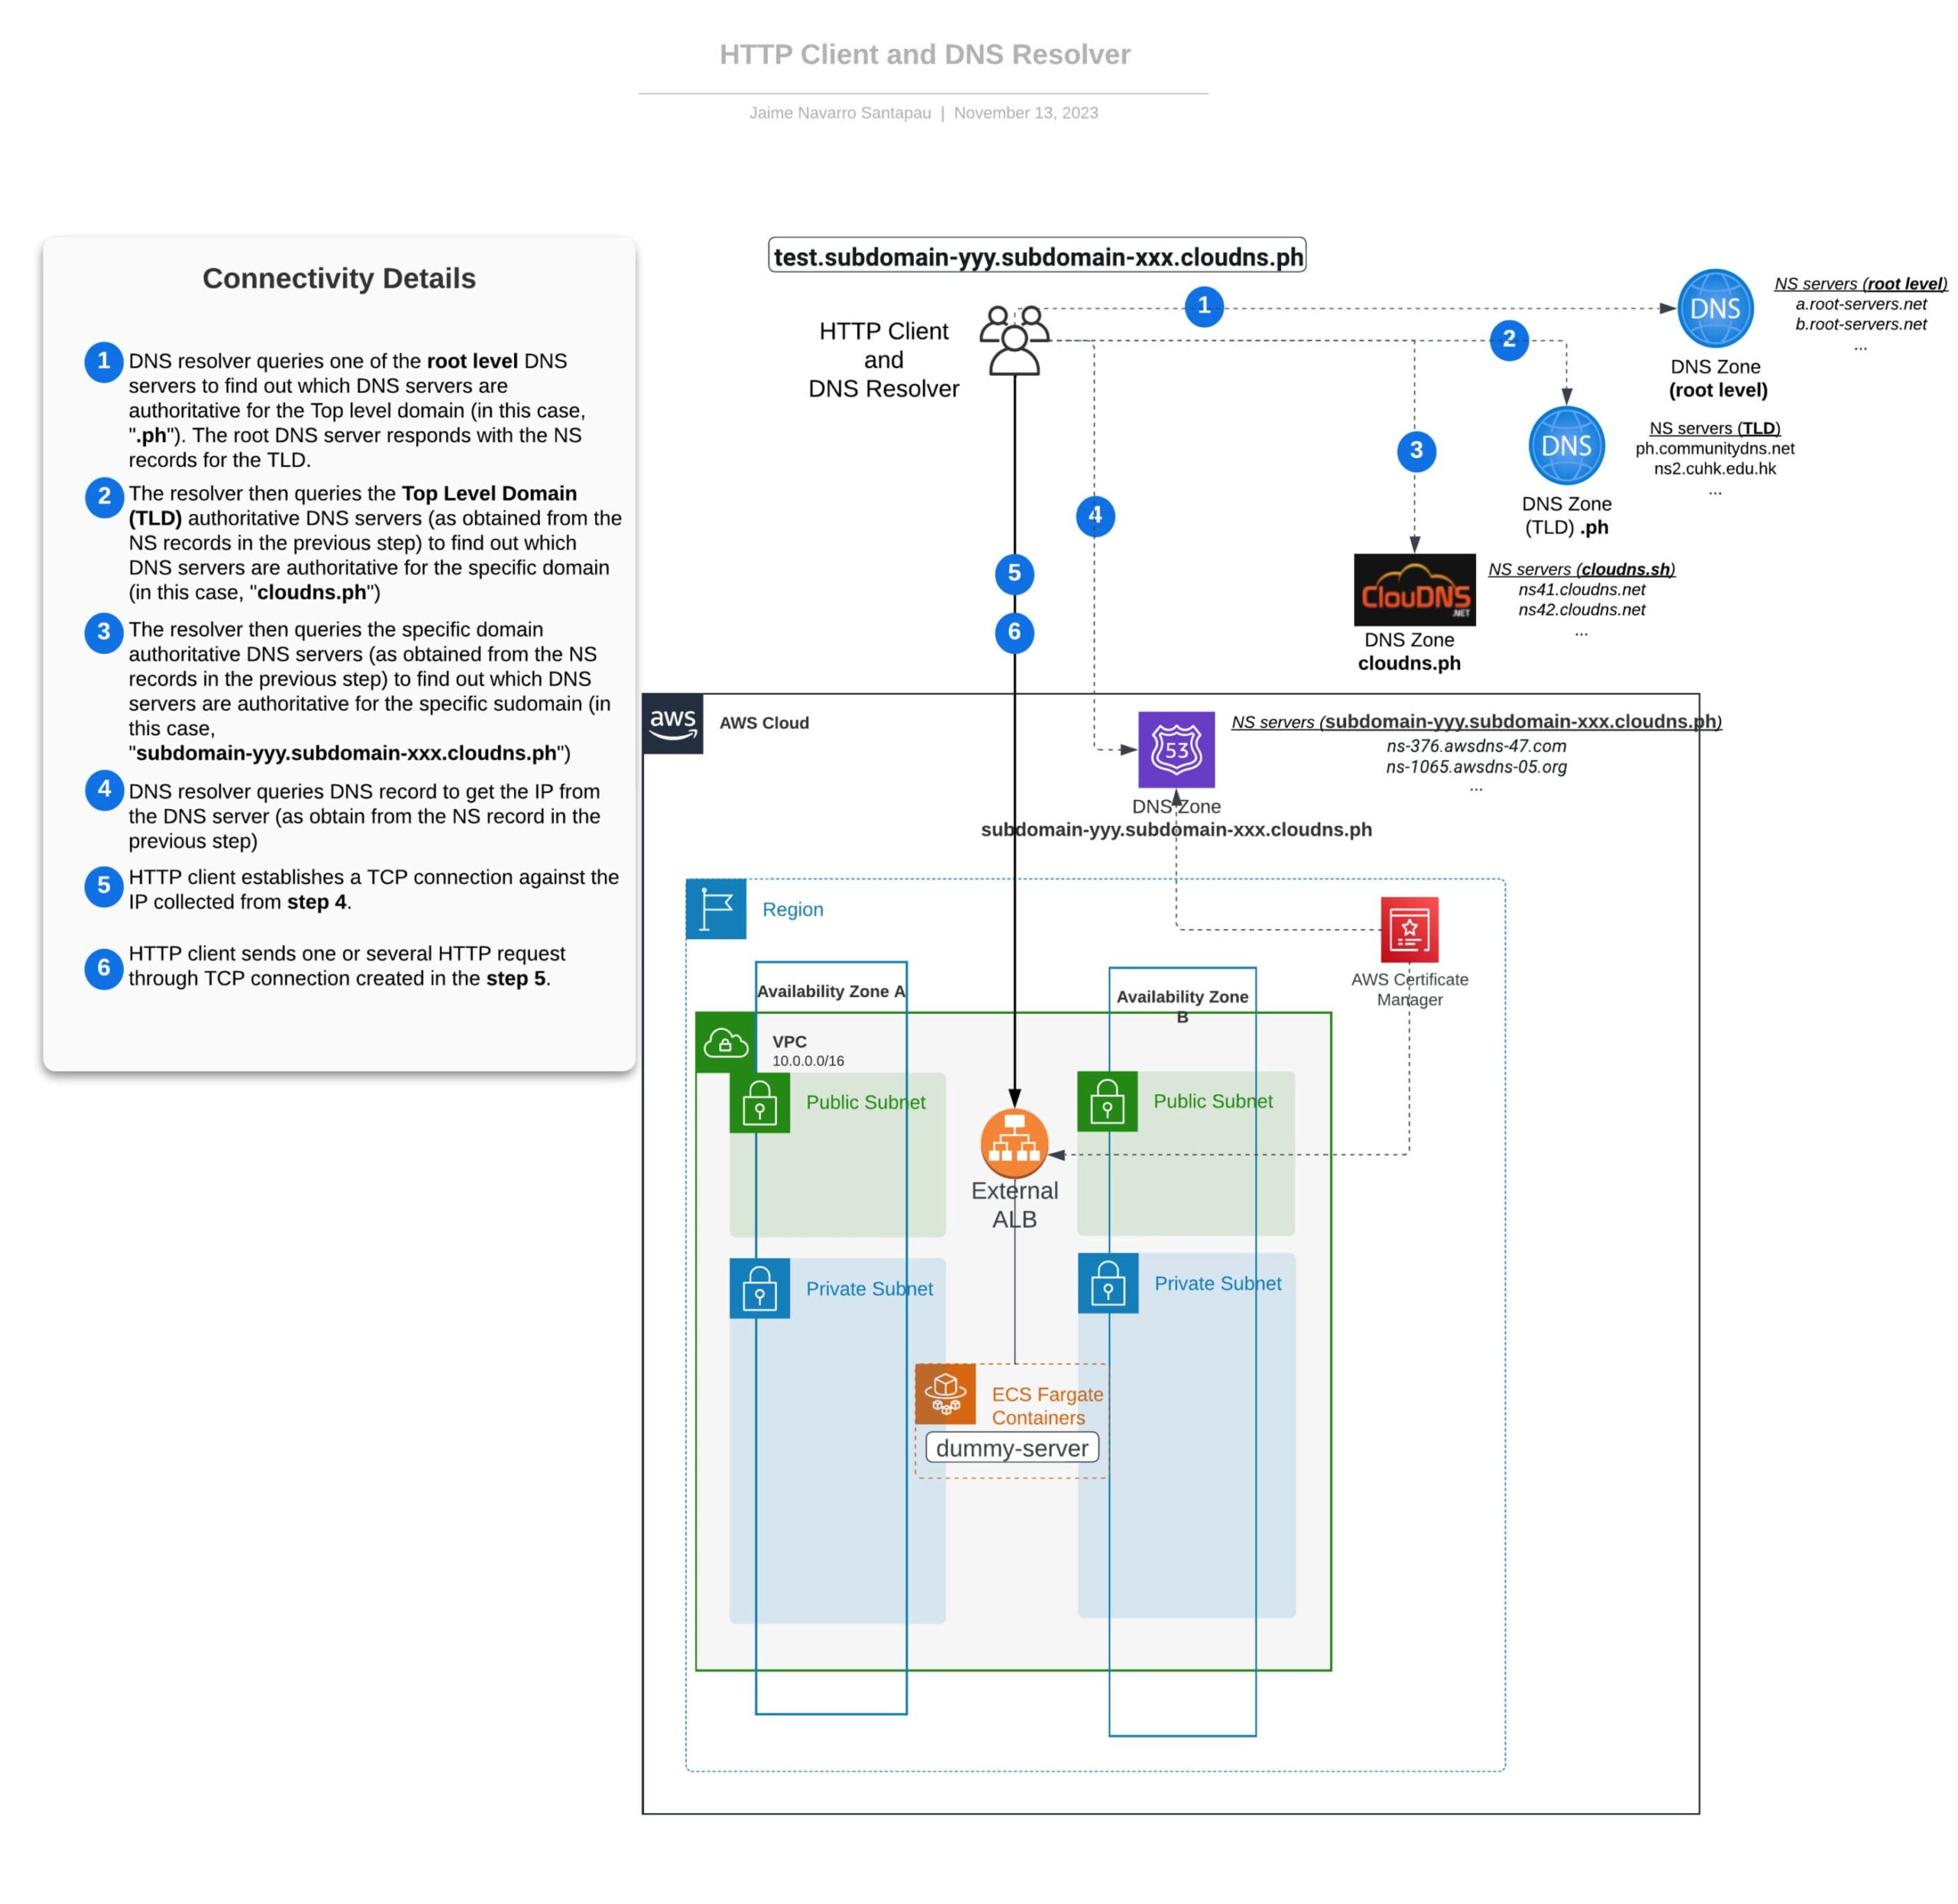
Connectivity overview from the client side
DNS Resolver
In this section, we will focus on the DNS resolver part and shed some light on how that component works on the client side, which will also give us a basic understanding of how Domain Name System (DNS) works on the Internet.
DNS Resolver - Theory
A DNS resolver, or Domain Name System resolver, is an important component of the internet's infrastructure that plays a vital role in translating human-friendly domain names (like www.example.com) into numerical IP (Internet Protocol) addresses that computers and network devices use to locate each other on the internet. It acts as an intermediary between users' devices and the authoritative DNS servers that store the IP address information for domain names.
Most popular operating systems such as Windows, macOS, and Linux all include DNS resolvers as part of their networking components. These built-in resolvers are typically configured to use the DNS servers provided by the network or the ones specified by the user.
Here's a diagram explaining how a DNS resolver works:
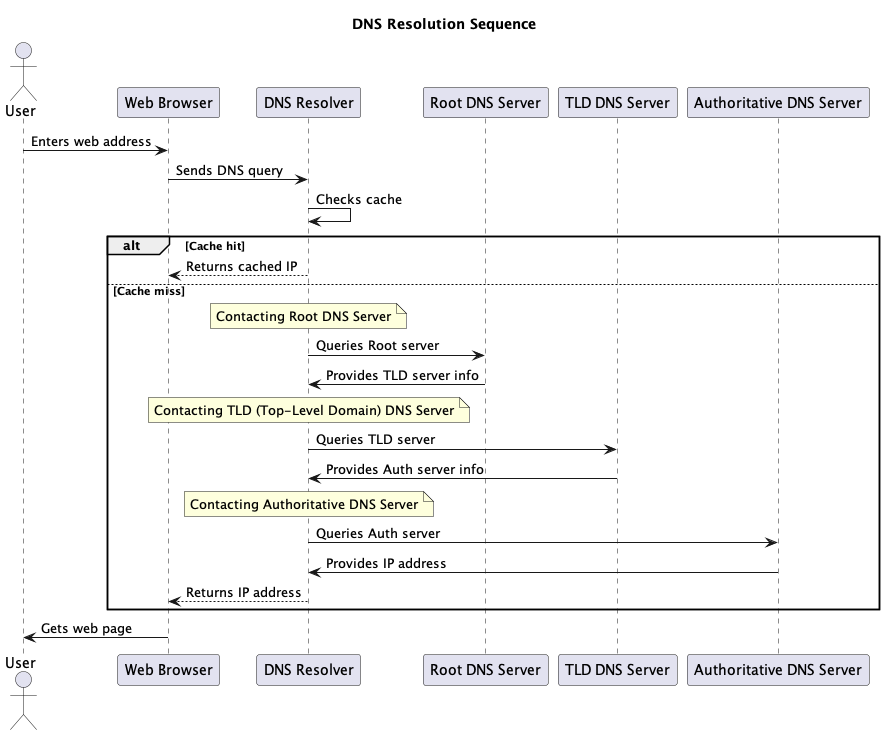
DNS resolvers are crucial for the efficient functioning of the internet, as they reduce the burden on authoritative DNS servers by caching information and speeding up the process of translating domain names into IP addresses. Additionally, they may provide security features like DNS filtering and DNSSEC (DNS Security Extensions) validation to protect users from malicious websites and DNS-related attacks.
It’s important to remember that NS (Name Server) records (or authoritative DNS servers) are like signposts that guide DNS resolvers to the correct DNS servers responsible for a particular domain. They play an important role in the efficient and decentralized operation of the DNS system, ensuring that DNS queries are directed to the appropriate authoritative servers for the final IP resolution.
DNS Resolver - Real Example
In this section, we will use the dig +trace command to give the reader a tool to validate the results explained previously.
The dig +trace command is used to trace the delegation path of a DNS query and display the step-by-step process of how the DNS resolution is performed. When you run this command with a domain name like test.subdomain-yyy.subdomain-xxx.cloudns.ph, it will provide a detailed output showing the authoritative DNS servers responsible for each level of the domain and the resolution process.
Here's what you might see in the output of the dig +trace command for the given domain:
- Root Server: The command will start by querying one of the root DNS servers to find the authoritative DNS servers for the .ph (top-level domain). The root DNS servers have NS records like this one:
- Record type: NS
- TTL: 23247 seconds
- Value: i.root-servers.net
- TLD Server: After obtaining the information about the .ph authoritative name servers from the root server, the command will query one of the .ph authoritative name servers to find out which name servers are responsible for the cloudns.ph domain. The .ph authoritative name servers have NS records like this one:
- Record type: NS
- TTL: 172800 seconds
- Value: ph.communitydns.net
- Second-Level Domain Server: The command will then query one of the authoritative name servers for cloudns.ph to determine which name servers are authoritative for the subdomain-xxx.cloudns.ph domain. The authoritative name servers for cloudns.ph have NS records like this one:
- Record type: NS
- TTL: 86400 seconds
- Value: ns43.cloudns.net
- Subdomain Server: Finally, it will query the authoritative name server for subdomain-yyy.subdomain-xxx.cloudns.ph to retrieve the specific DNS records (such as A, AAAA, MX, etc.) associated with that subdomain. The authoritative name server for subdomain-yyy.subdomain-xxx.cloudns.ph have NS records like this one:
- Record type: NS
- TTL: 172800 seconds
- Value: ns-1055.awsdns-03.org
- The last few lines indicate the IP address associated with the DNS Record 'test.subdomain-yyy.subdomain-xxx.cloudns.ph.', which is:
- Record type: A
- TTL: 300 seconds
- Value: 192.168.0.1
Moreover, the output will present DNS records such as the NS (Name Server) Record, DS (Delegation Signer) Record, RRSIG (Resource Record Signature) Record, and NSEC3 (Next Secure version 3) Record for each level of the hierarchy. However, for the sake of simplicity, we have included only the NS records in the output, omitting the other DNS records associated with DNSSEC.
dig test.subdomain-yyy.subdomain-xxx.cloudns.ph +trace | grep -v RRSIG | grep -v RRSIG | grep -v DS

; <<>> DiG 9.10.6 <<>> test.subdomain-yyy.subdomain-xxx.cloudns.ph +trace

;; global options: +cmd

.           23247   IN  NS  i.root-servers.net.

.           23247   IN  NS  k.root-servers.net.

.           23247   IN  NS  m.root-servers.net.

.           23247   IN  NS  b.root-servers.net.

.           23247   IN  NS  h.root-servers.net.

.           23247   IN  NS  g.root-servers.net.

.           23247   IN  NS  a.root-servers.net.

.           23247   IN  NS  d.root-servers.net.

.           23247   IN  NS  e.root-servers.net.

.           23247   IN  NS  f.root-servers.net.

.           23247   IN  NS  j.root-servers.net.

.           23247   IN  NS  c.root-servers.net.

.           23247   IN  NS  l.root-servers.net.

;; Received 1109 bytes from 100.90.1.1#53(100.90.1.1) in 11 ms

ph.         172800  IN  NS  ph.communitydns.net.

ph.         172800  IN  NS  ns2.cuhk.edu.hk.

ph.         172800  IN  NS  ns4.apnic.net.

;; Received 625 bytes from 192.58.128.30#53(j.root-servers.net) in 145 ms

cloudns.ph.     86400   IN  NS  ns43.cloudns.net.

cloudns.ph.     86400   IN  NS  ns44.cloudns.net.

cloudns.ph.     86400   IN  NS  ns41.cloudns.net.

cloudns.ph.     86400   IN  NS  ns42.cloudns.net.

;; Received 540 bytes from 202.12.31.53#53(ns4.apnic.net) in 292 ms

subdomain-yyy.subdomain-xxx.cloudns.ph. 3600 IN NS ns-231.awsdns-28.com.

subdomain-yyy.subdomain-xxx.cloudns.ph. 3600 IN NS ns-1965.awsdns-53.co.uk.

subdomain-yyy.subdomain-xxx.cloudns.ph. 3600 IN NS ns-724.awsdns-26.net.

subdomain-yyy.subdomain-xxx.cloudns.ph. 3600 IN NS ns-1055.awsdns-03.org.

;; Received 212 bytes from 108.62.121.219#53(ns42.cloudns.net) in 123 ms

test.subdomain-yyy.subdomain-xxx.cloudns.ph. 300 IN A 192.168.0.1
...

;; Received 228 bytes from 205.251.199.173#53(ns-1965.awsdns-53.co.uk) in 37 ms
It's important to note that while the presented output serves as a guideline, the actual output may vary depending on the DNS infrastructure and the specific configuration of the domain under consideration. Nonetheless, utilizing this command proves to be a valuable method for tracing the DNS resolution process and gaining insights into the intricacies of DNS delegation for any given domain.
For more comprehensive insights into the capabilities and functionalities of dig command, check this tutorial.
HTTP Client and Common Behaviors
Following the resolution of the DNS query and the retrieval of the IP address by the DNS resolver, the next critical step in the communication process involves the HTTP client. As a key element in the data transfer, the HTTP client orchestrates the seamless exchange of information between the client and the server, playing a pivotal role in establishing effective communication channels.
Within this intricate process, several crucial behaviors and protocols significantly impact the performance and efficiency of data transfer. Among these, the management of TCP persistent connections emerges as a critical focal point. Enabling the transmission of multiple requests and responses over a single persistent connection reduces the overhead associated with establishing multiple connections. However, it's important to recognize that the persistence of these connections can potentially lead to resource exhaustion and latency concerns, especially within high-traffic environments.
In addition to addressing TCP persistent connections, understanding other common HTTP client behaviors, including caching mechanisms, cookie management, and effective handling of redirects, is equally vital for ensuring efficient and secure data transfer. However, our primary focus throughout this blog series will revolve around comprehending the nuances of TCP persistent connections and their implications on the server side.
TCP Persistent Connections for Different Tools
In this section, we'll delve into the practical implementation of TCP persistent connections across various tools commonly used in the field. By exploring the functionalities of popular tools such as Curl and Postman, we aim to provide a comprehensive understanding of how these tools manage TCP persistent connections. Through this exploration, you'll gain valuable insights into the diverse approaches employed by these tools to handle persistent connections, enabling you to understand which tool is the best fit to test different scenarios.
TCP persistent connections for Curl
Curl, a powerful command-line HTTP client, is favored for quick networking validations. However, its use in testing TCP persistent connections may have limitations, as the operating system releases associated resources, including sockets, at the end of the command.
Despite this constraint, Curl does provide an option to establish TCP connections and send multiple HTTP requests through that connection. Here's an example demonstrating how to use Curl for this purpose:
curl https://www.google.com -o /dev/null -w "nDNS time: %{time_namelookup}nConnect time: %{time_connect}nAppCon time: %{time_appconnect}nPreXf time: %{time_pretransfer}nStartXf time: %{time_starttransfer}nTotal time: %{time_total}n"

--next https://www.google.com -o /dev/null -w "nDNS time: %{time_namelookup}nConnect time: %{time_connect}nAppCon time: %{time_appconnect}nPreXf time: %{time_pretransfer}nStartXf time: %{time_starttransfer}nTotal time: %{time_total}n"

…
...

DNS time: 0.010317

Connect time: 0.110349

AppCon time: 0.219555

PreXf time: 0.220107

StartXf time: 0.387455

Total time: 0.411979

…
...

DNS time: 0.000050

Connect time: 0.000000

AppCon time: 0.000000

PreXf time: 0.001372

StartXf time: 0.257576

Total time: 0.288846
The output clearly demonstrates the time differences between the initial and subsequent HTTP requests. The initial request incurs additional time due to the secure SSL TCP connection setup, involving the costly TCP handshake and SSL handshake. Subsequent requests benefit from reusing this secure TCP connection, thereby reducing the time required for transferring the data.
Although it’s out of the scope of this blog post, we would like to highlight that the Curl command can send requests using protocol HTTP/1.1 or HTTP/2; each of these protocols handles TCP persistent connections differently. So, if you are interested in knowing which one you’re using, you can add the option –v (verbose) in the previous command, and then you’ll be able to see which protocol is being used, among other useful information. For more comprehensive insights into the capabilities and functionalities of Curl, refer to the official documentation page.
TCP persistent connections for Postman
Postman, a user-friendly API testing tool, facilitates API development, testing, and documentation with its intuitive interface. Unlike the curl command-line, Postman's process remains active after sending an HTTP request, enabling the management of TCP persistent connections across multiple servers.
To demonstrate this behavior of TCP persistent connections within Postman, consider the following example:
- Launch Postman and initiate a new request (https://www.google.com/not-found)
- Send multiple HTTP requests to the desired endpoint while monitoring the response times and connection stability in the console section.
The following images show an example of the previous steps:
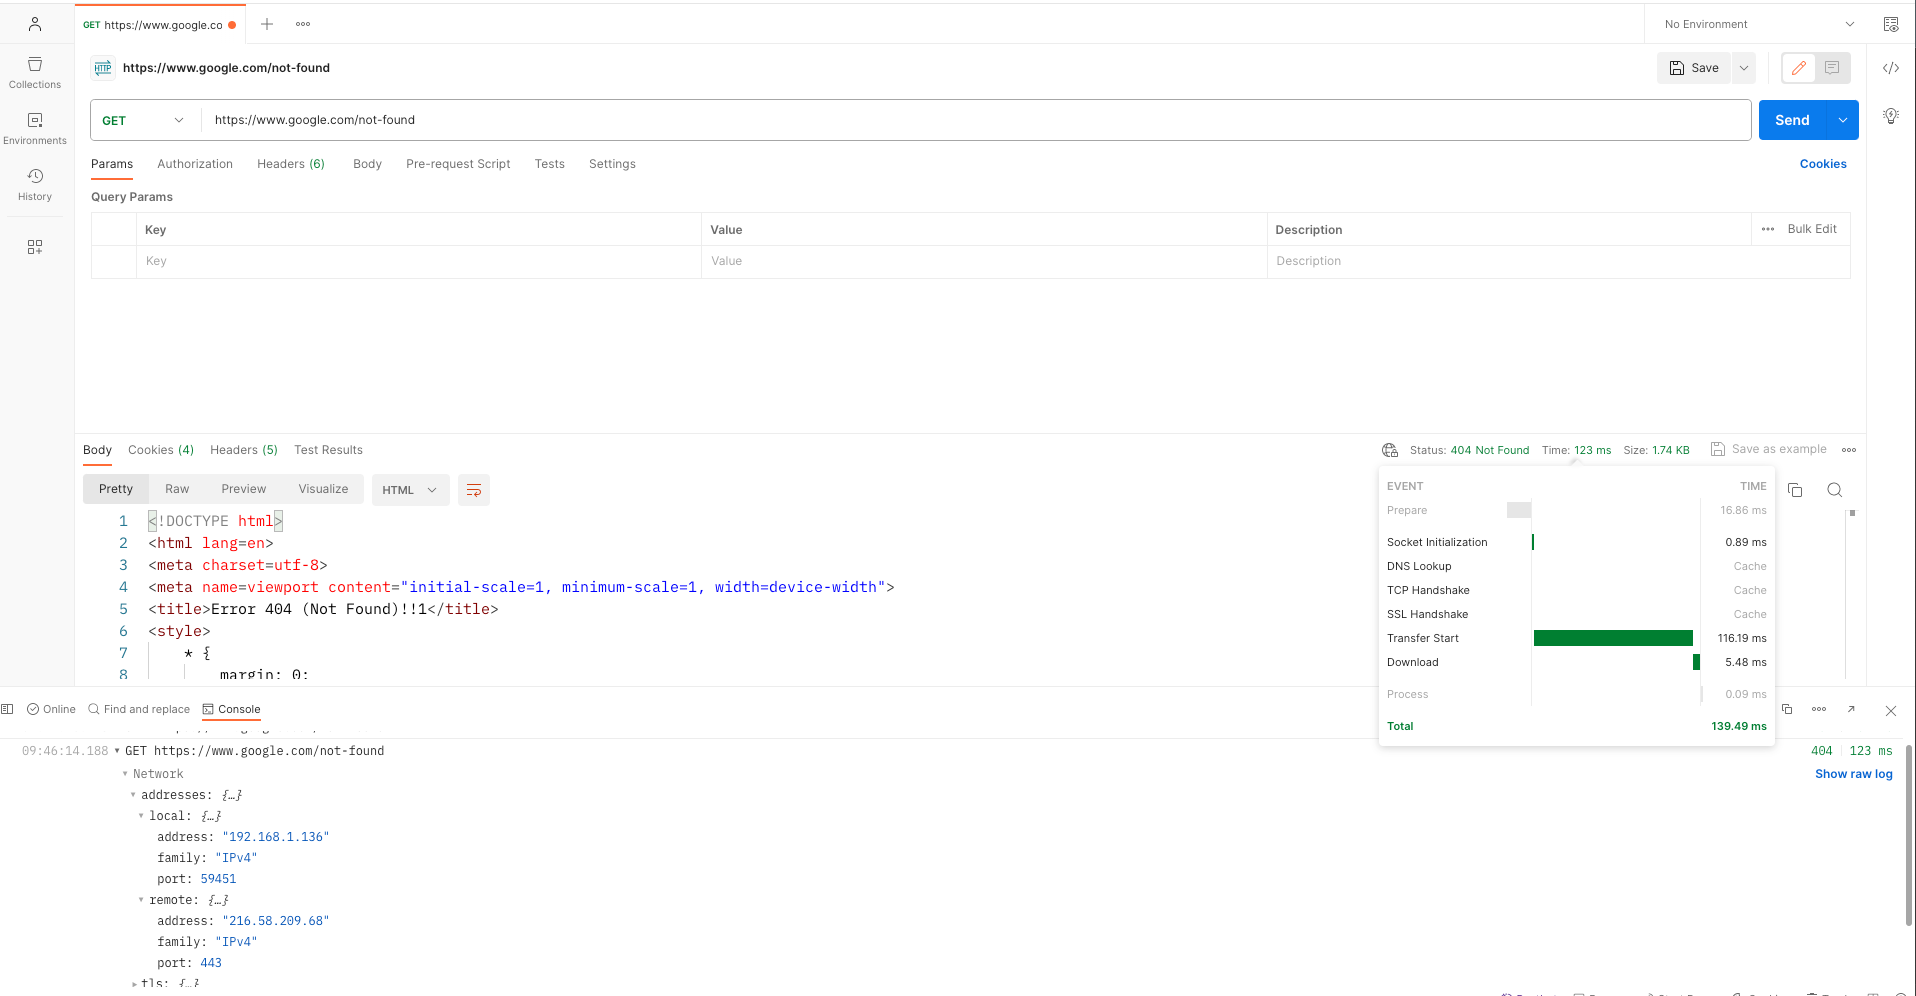
First HTTP request
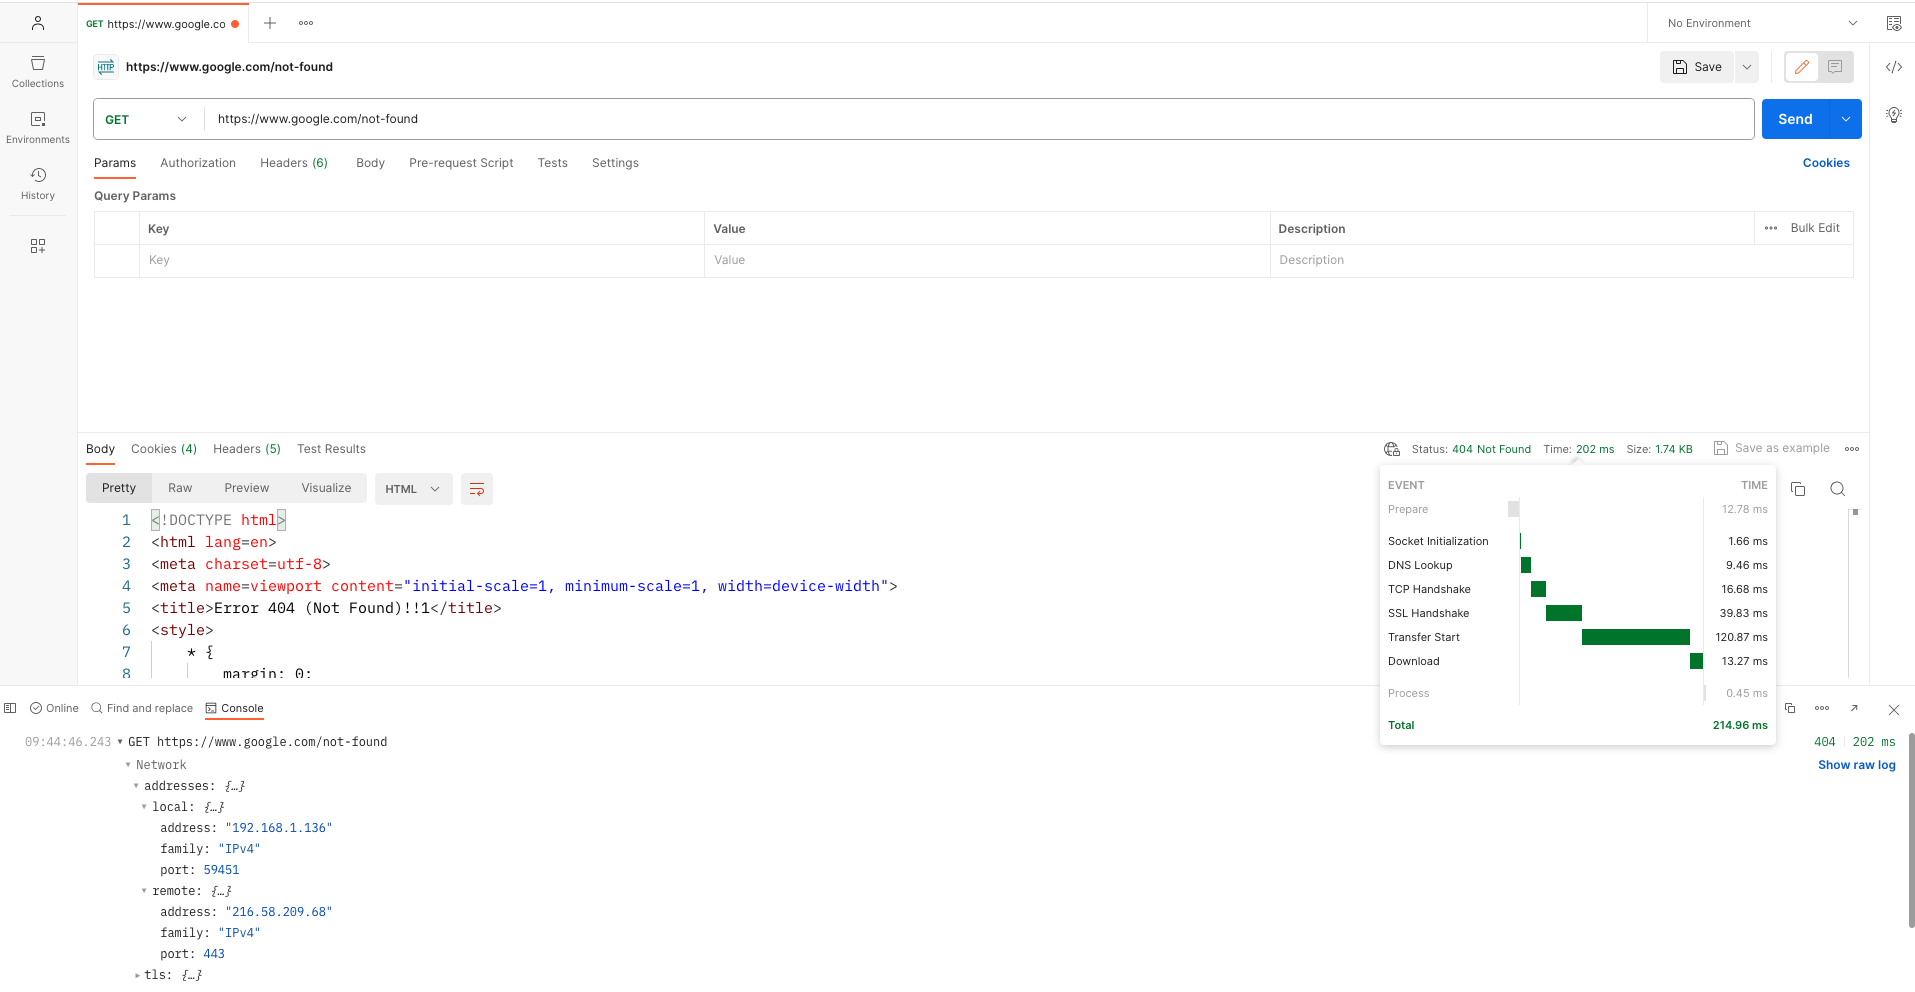
Second HTTP request
The output reveals noticeable time discrepancies between the initial and subsequent HTTP requests. The initial request entails additional time due to the secure SSL TCP connection setup involving the resource-intensive TCP handshake and SSL handshake. Subsequent requests leverage the reuse of this established secure TCP connection, resulting in reduced data transfer times.
Furthermore, executing the following command on your machine provides insights into the duration for which the TCP persistent connection remains established against the server.
for i in $(nslookup www.google.com | grep "Address: " | awk '{ print $2 }'); do echo $i; netstat -na | grep $i ; done

216.58.209.68

tcp4       0      0  192.168.1.136.59451    216.58.209.68.443      ESTABLISHED
The results demonstrate three different scenarios:
- Connection is closed on the client side: If the Postman process is terminated, the operating system promptly releases the associated resources and sockets, similar to the behavior observed with the curl command.
- Connection is closed on the server side: Conversely, when the Postman process remains active and no further HTTP requests are sent through the TCP connection, the server side eventually closes the connection based on the idle timeout configuration.
- Connection could last for an undefined period: Moreover, as long as the Postman process persists and continues to send HTTP requests through the TCP connection, the connection could remain established indefinitely, as there are no defined limits in the TCP protocol.
While this blog post primarily focuses on the understanding of TCP persistent connections, it's worth noting that, as of the current version, Postman exclusively supports sending HTTP requests using the HTTP/1.1 protocol. For further information on leveraging Postman's capabilities for managing TCP connections and conducting API testing, refer to the official Postman documentation.
Conclusion and What's Next
Congratulations! You've learned the basics about how HTTP clients can access public endpoints. The insights from this discussion will be instrumental in our upcoming blog posts.
In our next installment, we will explore the creation of a secure public endpoint on AWS, leveraging ACM (AWS Certificate Manager) and AWS Route53. Additionally, we will navigate the management of a DNS hosted zone with AWS Route 53 and its seamless integration with a third-party DNS hosting provider like ClouDNS. Armed with a comprehensive understanding of how the DNS resolver operates, we are now well-equipped to navigate the intricacies of managing DNS servers from the server side.
However, this serves only as a prelude to our comprehensive DevOps blog series. In the forthcoming articles, we will deploy our web server across multiple AWS regions and address crucial topics such as regional evacuation, failover, and disaster recovery, utilizing various AWS products and approaches. Here's a glimpse of what's to come:
- Reviewing region evacuation using a DNS approach with AWS Route53.
- Evaluating region evacuation employing the static anycast IP approach with Global Accelerator.
We'll thoroughly examine the strengths and weaknesses of each approach. Ultimately, we will conclude the series by shedding light on why these approaches could potentially fail without addressing one of the most common HTTP client behaviors - TCP persistent connections - and the scenarios where these connections could remain established indefinitely.
Stay tuned for a deeper dive into building resilient and highly available applications in the cloud.
Additional Resources
For readers seeking further insights into some of the topics mentioned in this article, we recommend exploring the following resources:
- New zine: How DNS Works! (jvns.ca) - This zine explains clearly and quickly with a bunch of diagrams how DNS works.
- TCP - Three-way handshake in details - A video by Sunny Classroom that helps understand how the TCP 3-way handshake workflow is done while establishing a connection.
- SSL/TLS handshake Protocol - A video by Sunny Classroom that explains what protocol is used between a web server and its clients to establish trust.
- HTTP 1 vs. HTTP 1.1 vs. HTTP 2: A Detailed Analysis - DZone: This article provides a detailed analysis of the differences between HTTP 1, HTTP 1.1, and HTTP 2.
Written by
Jaime Navarro Santapau
I'm a Senior DevOps Engineer with over 18 years of experience starting as a Software Engineer followed by Backend Software Development Lead. Currently, I manage complex infrastructure and deliver scalable solutions. Proficient in cloud platforms like AWS and Azure, containerization technologies (Docker, Kubernetes), and automation tools. Proven track record in driving successful DevOps implementations, streamlining workflows, and improving team collaboration. Strong expertise in CI/CD pipelines, monitoring, and scripting languages.


Contact